Table of Contents
Advertisement
Available languages
Available languages
Quick Links
See also:
Manual
Advertisement
Table of Contents

Subscribe to Our Youtube Channel
Related Manuals for Garmin Approach S2


Summary of Contents for Garmin Approach S2
- Page 1 Approach ® Quick Start Manual 操作手冊 快速入门手册 คู ่ ม ื อ Quick Start Panduan Cepat Pengoperasian...
-
Page 2: Getting Started
Approach ® Getting Started WARNING See the Important Safety and Product Information guide in the product box for product warnings and other important information. When using the device the first time, complete these tasks. 1 Charge the device (page 1). 2 Turn on the device (page 2). - Page 3 NOTICE To prevent corrosion, thoroughly dry the contacts and the surrounding area before charging or connecting to a computer. 1 Plug the USB cable into a USB port on your computer. 2 Align the charger posts with the contacts on the back of the device, and press the ➊...
- Page 4 Keys ➊ Hold to turn the device on and off. Select to turn on the backlight. ➋ Select to scroll through menus, holes, and settings. ➌ Select to scroll through menus, holes, and settings. ➍ Hold to open the menu for the current screen.
- Page 5 Playing Golf Before you can play golf, you must wait until the device acquires satellite signals, which may take 30–60 seconds. 1 Hold 2 Select Start Round. 3 Select a course from the list. The device automatically starts on the hole closest to your present location.
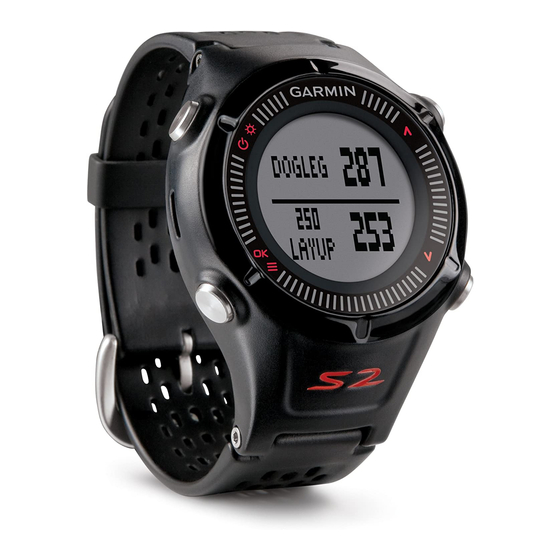
- Page 6 2 Select Measure Shot. 3 Walk to your ball. The distance automatically resets when you move to the next hole. Viewing Layup and Dogleg Distances You can view a list of layup and dogleg distances for par 4 and 5 holes. From the hole view (page 4), select ➊...
- Page 7 1. When you are at the Hole View page, hold the menu button to enter the page with Pause Round function. 2. After you press the Pause Round button, it will automatically switch back to the watch mode. 3. To be back to the game, hold the menu button to see the Resume Round button.
- Page 8 Keeping Score Before you begin keeping score, you must start a round (page 4). 1 From the hole view (page 4), hold 2 Select Start Scoring. 3 Select to set the score. ➊ Your total score is updated. Reviewing Scores You can edit individual scores but not the total score.
-
Page 9: Customizing Your Device
Using the Odometer You can use the odometer to record the time and distance traveled. The odometer automatically starts and stops when you start or end a round, and you can also start and stop it manually. 1 Hold or . 2 Select Odometer to view or start the odometer. -
Page 10: Viewing Device Information
3 Select to set the hour and minute. 4 Select AM or PM. Setting the Alarm 1 Hold 2 Select Alarm > Set. 3 Select to set the hour and minute. 4 Select AM or PM. 5 Verify the alarm is set to On. Viewing Device Information You can view the software version and unit ID. -
Page 11: Cleaning The Device
Cleaning the Device 1 Wipe the device using a cloth dampened with a mild detergent solution. 2 Wipe it dry. Specifications Battery type Lithium-ion Battery life Watch only: 3 weeks Playing golf: 8 hours NOTE: The actual battery life of a fully charged battery depends on how much time you use GPS, the backlight, and power save mode. -
Page 12: Clearing User Data
NOTE: This deletes all user-entered data. 1 Hold simultaneously. 2 Select Yes. Getting More Information • Go to www.garmin.com/intosports. • Go to www.garmin.com/learningcenter. • Go to http://buy.garmin.com, or contact your Garmin dealer for information about ® optional accessories and replacement parts. Registering Your Device Help us better support you by completing our online registration today. - Page 13 Title, ownership rights, and intellectual property rights in and to the Software remain in Garmin and/or its third- party providers. You acknowledge that the Software is the property of Garmin and/or its third-party...
- Page 14 Failure to avoid the following potentially hazardous situations could result in death or serious injury. Off-Road Navigation Warnings Some Garmin recreational products are able to suggest off-road routes for various outdoor activities, such as biking, hiking, and all-terrain vehicles. Follow these guidelines to ensure safe off-road navigation.
- Page 15 • The device, the heart rate monitor, and other Garmin accessories are consumer devices, not medical devices, and could suffer from interference from external electrical sources. The heart rate readings are for reference only, and no responsibility is accepted for the consequences of any erroneous readings.
- Page 16 Using another battery presents a risk of fire or explosion. To purchase a replacement battery, see your Garmin dealer or the Garmin Web site. • Replaceable coin cell batteries may contain perchlorate material. Special handling may apply. See www.dtsc .ca.gov/hazardouswaste/perchlorate.
- Page 17 Declaration of Conformity Hereby, Garmin declares that this product is in compliance with the essential requirements and other relevant provisions of Directive 1999/5/EC. To view the full Declaration of Conformity, go to www.garmin.com/compliance. FCC Compliance This device complies with part 15 of the FCC Rules.
- Page 18 TV technician for help. This product does not contain any user- serviceable parts. Repairs should only be made by an authorized Garmin service center. Unauthorized repairs or modifications could result in permanent damage to the equipment, and void your warranty and your authority to operate this device under Part 15 regulations.
- Page 19 Limited Warranty Garmin’s non-aviation products are warranted to be free from defects in materials or workmanship for one year from the date of purchase. Within this period, Garmin will, at its sole option, repair or replace any components...
- Page 20 (iv) damage caused by service performed by anyone who is not an authorized service provider of Garmin; (v) damage to a product that has been modified or altered without the written permission of Garmin; or (vi) damage...
- Page 21 OTHERWISE. THIS WARRANTY GIVES YOU SPECIFIC LEGAL RIGHTS, WHICH MAY VARY FROM STATE TO STATE. IN NO EVENT SHALL GARMIN BE LIABLE FOR ANY INCIDENTAL, SPECIAL, INDIRECT OR CONSEQUENTIAL DAMAGES, INCLUDING, WITHOUT LIMITATION, DAMAGES FOR ANY TRAFFIC FINES OR CITATIONS, WHETHER...
- Page 22 Distributor warranties are only valid in the area of intended distribution. Devices purchased in the United States or Canada must be returned to the Garmin service center in the United Kingdom, the United States, Canada, or Taiwan for service.
- Page 23 將本說明書內容 , 以全部或分割部份方 式 ( 包含文字與圖片 ), 進行轉載 、 轉 印 、 影印拷貝 、 更改內容 、 掃描儲存等 行為 , 供他人使用或銷售 。 台灣國際航電股份有限公司 ( ) 擁有更改或提升 Garmin Corporation 本產品功能的所有權利 , 且不需額外特 別通知任何人及單位 ( 包含已購買及尚 未購買者 ), 若有任何功能上的問題 , 可以注意本公司的文宣資訊或上網查詢 ( 中文網站 : )。...
- Page 24 電池 。 廢電池請回收 For better environmental protection, waste batteries should be collected separately for recycling or special disposal. 軟體使用授權聲明 中文版前 , 您需 在您使用 Approach S2 同意下列有關本機台軟體之授權限制與 聲明 , 請您務必仔細閱讀下列條文 。 在您購買及使用 Approach S2 中文版接 收機時 , 台灣國際航電股份有限公司 ( ) 僅同意您使用已...
- Page 25 量或國防安全 , 美國有權在不預先通知 或公告的狀況下 , 影響整個系統的功能 或定位精度 ( ), 另外在使 ACCURACY 用本產品時 , 由於使用的場合 、 環境及 應用方式不同 , 使用者必須特別注意下 列事項或說明 : 1. Approach S2 雖然已是一個精密的電 子導航輔助儀器 , 但是仍然可能因 為使用者錯誤的操作方式 、 外在干 擾或故障因素等 , 而變得不安全 , 因此使用者需自行承擔風險 。 2. Approach S2 屬於一般導航級接收...
- Page 26 本中文操作說明書僅供使用者參 考 , 若內容及步驟與原 接收機本 身功能有所相異之處 , 則以接收機 為準 , 台灣國際航電股份有限公司 將不另外通知 , 若有疑問 , 歡迎來 電或詢問正式授權之經銷商 。 Approach S2 本中文說明書僅適用於 正體中文版 , 並不適用於其他語言 之版本 , 請注意 。 產品維護 請使用溫和的清潔劑溶液沾濕棉布 後 , 擦拭 , 再用乾布擦 Approach S2 乾 。 請勿使用可能傷害塑膠組件的...
- Page 27 標準配備 請您檢查包裝內是否已包含以下內容 : Approach S2 主機 Approach S2 充電夾 使用手冊...
- Page 28 第一章 開始使用 為裝置充電 此裝置內含鋰電池 。 有關產品警 警告 告及其他重要資訊 , 請見產品外盒所 附之安全與產品重要資訊指引 。 將 專用連接線 端與電腦 埠 連接 。 ➊ 將裝置背面傳輸接點對準充電座 ( 充電座可將裝置固定 )。 待充電完全即可開始使用 。...
- Page 29 按鍵介紹 長按可開機或關機 ➊ 按一下可開啟背光 按一下可往上瀏覽選 ➋ 單 , 球洞或是設定欄位 按一下可往下瀏覽選 ➌ 單 , 球洞或是設定欄位 選擇開啟目前畫面選單 ➍ 確認鍵...
- Page 30 鬧鈴開啟 Approach 啟動 長按 「 電源鍵 」。 開始進行高爾夫運動 。 偵測 衛星訊號 每次開機 , 會以上次關 1. Approach S2 機位置座標為參考點 , 並利用已經 儲存在機器內部的衛星軌道資料做 推估 , 藉以推算目前所在位置的上 空 , 應會有那些衛星 , 並優先接收 這些衛星信號 , 進行快速定位 ; 若 未經常使用 , 因機台內儲存的推估 衛星軌道資料已失效 , 需花費更多...
- Page 31 第二章 操作介紹 球洞觀測介紹 裝置顯示您目前所在球洞 , 並於您移動 至另一球洞時自動轉移 。 依據預設 , 裝置會計算與果嶺前 注意 方 、 中間和後方距離 。 ➊ ➍ ➋ ➎ ➌ ➏ 該球場左 右果嶺 有雙果嶺之 ➊ 球洞 進行之球洞號碼 ➋ 該球洞標準桿數 ➌ 至果嶺後方距離 ➍ 至果嶺中間距離 ➎ 至果嶺前方距離 ➏...
- Page 32 開始打高爾夫 您需待裝置取得衛星訊號後方能開始運 動 , 等待時間約 秒 。 至 「 開始球局 」。 選擇 從清單中選擇球場 。 注意 當該地球場名稱無對應使用語 系 , 裝置會以英文球場名稱為主 。 測量擊球 您可隨時測量擊球距離 。 鍵 。 長按左下角 選擇 「 測量擊球 」。 走向您的球 。 當您移動至下一洞時距離會自動重設 。 您可隨時重按 「 測量擊球 」 以重設距 離 。 查看置球點和狗腿彎距離及...
- Page 33 保留分數 開始進行分數保留前 , 需先開始計分 。 鍵 。 從球洞景象畫面長壓左下角 選擇 「 開始計分 」 會回到球洞景象 。 鍵 。 從球洞景象畫面長壓左下角 選擇 「 計分卡 」 進入各洞分數清單 按壓 或 可以選擇球洞 按壓左下角 OK 可以進入該洞資訊 按壓 或 可以調整該洞揮桿數 注意 您可自此清單中選擇任一洞以變 更該洞揮桿數 。 電腦上查看計分卡 您可於電腦上查看所有已儲存之計分 卡 。 使用充電座將裝置連接至您電腦的 連接埠...
- Page 34 使用者可以將每次進行完的 ScorecardViewer.html 複製至電腦中加 以儲存 , 以便後續做為不同時間每 場球局間的統計比較 。 使用里程計 使用者可利用里程計記錄時間和移動距 離 。 里程計會於開始與結束一局時自 動啟動與停止 , 但使用者亦可手動開 啟或停止 。 鍵 。 長按左下角 選擇 「 里程計 」 會到里程計頁面 。 在 「 里程計 」 中選擇一個選項 : 回到球洞景象 。 • 按壓一下 選擇 「 關閉 」 以停用里程 •...
- Page 35 繼續後九洞 每一球場球洞數不同 , 球道組合也不盡 相同 , 此機器會以九洞和十八洞為基 礎 , 當使用者打完九洞球道 , 機器會提 醒使用者是否要繼續進行後九洞 。 第九洞桿數記錄後 , 長按 選擇 「 • 繼續後九洞 」。 機器會列出欲前往的球道 , 並選擇 • 要打的球道 。 選擇球道後 , 機器會合併前九洞計 • 分卡和後九洞計分卡 。 開始後可看到從第十洞打起 。 •...
- Page 36 第三章 個人化設定您的裝置 設定 在未開始球局或暫停球局時可進行個人 化裝置設定及功能 。 選擇 「 設定 」, 進入後按壓一 • 按 下 可以切換設定項 時間 按壓 或 可以選擇自動或 手動 。 小時 。 格式 設定時間格式為 小時或 設定按鍵音開啟或關閉 。 聲響 設定測量距離以碼或公尺為單位 。 單位 里程計單位 設定里程計以公里或英 哩為單位 。 注意 設定頁面各項選單僅能由按壓 依序調整 。 3.2 鬧鐘設定...
- Page 37 高靈敏度接收晶片 電池種類 可充電式鋰離子電池 僅使用時間功能 : 電池壽命 週 打高爾夫 : 小時 ° ~ ° 操作溫度範圍 ° ~ ° 充電溫度範圍 公尺 ( 請勿於游泳 防水等級 時使用 ) 內建地圖 預載台灣 大陸 亞太 紐西蘭 澳洲 歐洲 高 爾夫球場資料 標準配備 Approach S2 主機 專用 傳輸線 使用手冊...
- Page 38 附錄 附錄 裝置保養 注意 : 請勿將裝置長時間放置於極端溫度 環境 , 以免造成永久性損壞 。 切勿使用堅硬或尖銳物品操作觸控 螢幕 , 否則可能造成螢幕損壞 。 避免接觸可能損害塑膠部件之化學 清潔劑或溶劑 。 裝置清潔 以沾取溫和清潔溶液之濕布輕拭裝 置 。 徹底擦乾 。 節電 閒置一段時間後裝置進入節電模式 。 此時裝置僅顯示時間及日期 , 但不使 。 若未關閉里程計則裝置不會 用 進入節電模式 。 您可按 以離開節電 模式 。...
- Page 39 入之資料 。 及 。 同時長按 選擇 「 是 」。 附錄 產品保證 台灣國際航電股份有限公司以自有品牌 「 」, 自行生產行銷全球衛星 GARMIN 定位系統接收機 , 產品面涵蓋航空 、 航海 、 資源調查 、 個人攜帶 、 陸上及應 用系統等 。 QS 9000 本公司已通過 品質管理認證之 要求 , 所有產品在出廠時 , 均經過嚴格 之品質檢測合格 , 並負責產品之售後服...
- Page 40 保證期過後之故障或損害 。 塗改本保證書之字句 。 另外 , 產品送回台灣國際航電股份有限 公司的運費 , 由使用者自行承擔 ; 回送 使用者的部份 , 則由台灣國際航電股份 有限公司負責 。 請自行填寫下列資料保存 : 購買日期 : 購買地點 : 機台序號 :...
- Page 41 Approach ® 开始安装 警告 如需产品警告和其他重要信息,请参阅 包装盒内的《安全和产品重要信息》 指南。 第一次使用本设备时,请先完成下列 工作。 为设备充电 为设备充电 。 Approach) 开启设备 开启 。 开始球局 开始打高尔夫 。 为设备充电 警告 此设备内含锂电池。如需产品警告和其 他重要信息,请参阅包装盒内的《安全 和产品重要信息》指南。...
- Page 42 注意 充电或连接至计算机前,请务必擦干连 接触点与周围区域,以免锈蚀。 将 连接线插入计算机的端口。 将充电座对准设备背面的连接触 ➊ 点,按下充电器 将其固定。 将设备充满电。 Approach 开启 第一次使用设备时,会被提示选择语 言。 注意:当您在户外时设备会自动设定日 期时间,您也可自行手动设定 手动设 定时间 。 按住 。 前往开始高尔夫球局 开始打高尔夫 。 按键介绍...
- Page 43 ➊ 长按开关机 选择开启背光。 ➋ 选择滚动菜单、球洞以 及设置选项。 ➌ 选择滚动菜单、球洞以 及设置选项。 ➍ 长按开启当前屏幕菜 单。 选择确认菜单选项以及 接收确认消息。 图示说明 低电量。 里程计正在测量距离及 时间( 开启)。 闹钟开启。 开始打高尔夫 在开始打球前,需要等待设备获取卫星 信号,等待时间约 至 秒。 长按 选择「开始新球局」。 从列表中选择球场。 设备会从与您当前位置最接近的球洞 开始。...
- Page 44 球洞查看 设备会显示您目前所在球洞,您移动至 其他球洞时会自动转移。 注意:根据旗杆位置变化,设备会计算 与果岭前方、中间和后方的距离,但并 不是旗杆实际的位置。 ➊ 目前球洞号。 ➋ 至果岭后方距离。 ➌ 至果岭中间距离。 ➍ 至果岭前方距离。 ➎ 该洞标准杆 测量击球 长按 。 选择「测量击球」。 移动到球的落点处。 您移到下一洞时,会自动重设距离。 查看置球点和狗腿弯距离 您可通过列表查看 杆洞及 杆洞的置 球点距离和狗腿弯距离。 在球洞查看页面 球洞查看 ,选择 。...
- Page 45 ➊ ➋ 置球点 和到置球点的距离 会显 示在屏幕上。 注意:已经经过的距离和位置会从 列表中移除。 保留击球成绩 开始进行分数保留前,需先开始新球局 开始打高尔夫 。 从球洞查看页面 球洞查看 ,长按 。 选择「开始计分」。 选择 或 ,设定分数。 ➊ 总分 便会更新。 设定计分方式 您可可编辑单独的分数但是不能编辑 总分数。 长按 。 选择「计分卡」。 选择 或 来选择球洞。 选择「确定」来编辑。 于计算机上查看计分卡 您可于计算机上查看所有已存储的计 分卡。...
- Page 46 使用充电座将设备连接至您计算机 的 端口。 Windows 此设备在 ® 计算机中会以可 移动磁盘的形式显示于「我的计算 机」,在 ® 计算机中则显示为挂 载的存储设备。 ScorecardViewer.html 开启 查看您的 计分卡。 使用里程计 用户可利用里程计记录时间和移动距 离。开始与结束一局时,里程计会自 动启动与停止,您也可以手动开启或 停止。 长按 。 选择「里程计」以查看或启动里程 计。 选择一个选项: • > 选择 「继续」,以继续启动里 程计。 • > 选择 「关闭」,以停止里程 计。 • > 选择 「重设」,以归零时间和 距离。...
- Page 47 个人化设定您的设备 设定 长按 ,选择「设定」。 时间:设定时间为自动或手动 手动设 定时间 。 格式:设定时间格式为 小时或 小时。 响音:开启或关闭音效。 语言:设定语言。 单位:设定测量距离以码或米为单位。 手动设定时间 根据默认设置,设备获取卫星信号时将 自动设定时间。 长按 。 > > 选择「设定」 「时间」 「手动」。 选择 和 ,设定小时及分钟。 选择 或 。 设定闹钟 长按 。 > 选择「闹钟」 「设定」。 选择 和 ,设定小时及分钟。 选择 或...
- Page 48 日出 日落 提供日出 日落信息,让您规划打球的 时间及节奏,避开昏暗的天色。 > 选择 「日出 日落」来查看日出 日 落信息。 暂停球局 暂停球局,您可以按菜单键选择「暂停 球局」来停用设备(切换至时间模式) 以节省耗电。 如果您想要继续打球,按菜单键选择「 恢复球局」以继续。 继续球局 如果已经完成了前九洞,按「继续球 局」,继续后九洞。球洞编号将会从 开始。 当您处在第九洞时,长按菜单按键来「 开始计分」。 完成并输入记录后,长按菜单按键会显 示「继续球局」,确认以存储您前九 洞计分卡。 长按菜单键进入到「继续球局」页面, 确认后会提示您来选择一个球道。 之后将会从第十洞开始。 双果岭 仅适用于亚太地区 的球道 支持双果岭 按「更换果岭」以切换果岭。 如果您所处的球道有双果岭,长按菜单 键以更换果岭。 更换将会显示在页面的左上角。...
- Page 49 附录 设备维护 注意 避免过度震动及严苛的操作,否则可能 缩短产品使用寿命。 避免在水下按压按键。 请勿使用尖锐物品清洁设备。 避免使用化学清洁剂、溶剂和驱虫剂, 以免损坏塑料组件和涂层。 设备接触氯、海水、防晒油、化妆品、 酒精或其他强烈化学物质后,请以清水 完全冲洗。长时间接触这些物质可能使 外壳损坏。 请勿将设备存放在会长时间受到高温照 射的位置,以免造成永久性损坏。 设备清洁 以沾取温和清洁溶液之湿布轻拭装 置。 彻底擦干。...
- Page 50 规格 电池类型 锂电池 电池使用 仅使用时间功能: 寿命 周 打高尔夫: 小时 注意:完全充满电的 电池的实际使用时间 视 使用时间、 背光和省电模式而有 所不同。暴露于低温 下也会缩短电池使用 时间。 -4ºF 140ºF (-20ºC 操作温度 至 60ºC) 范围 至 40ºF 104ºF (5ºC 充电温度 至 至 40ºC) 范围 (32.8 防水等级 米 英尺 注意:本设备并非设 计为游泳时使用。 省电模式 设备闲置一段时间后将进入省电模式。...
- Page 51 Garmin 在线商城或洽询 ® 经销 商,了解选购配件及替换零件的详 细信息。 完成设备注册 立即填写在线注册,协助我们改善为您 提供支持的效率。 • http://my.garmin.com.cn/ 前往 myGarmin 。 • 请将原始销售收据妥善保管。 更新软件及球道信息 您必须先在计算机上下载并安装 Garmin CourseView Updater ,接着才 http://www. 能更新设备软件。前往 garmin.com.cn/m/buzz/golfcourse/cn_golf_ courses.html ,取得更多信息。 将设备连接至充电座,并将 端 连接至计算机的 端口。 CourseView Updater 启动 。 依照屏幕上的指示进行。 软件用户许可协议 在您使用设备前,您需同意下列软件用 户许可协议之条款及细则,请您务必仔 细阅读本协议。...
- Page 52 Garmin 有权及知识产权仍均属于 和 或 其第三方供货商所拥有。 Garmin 您同意本软件为 和 或其第三方 供货商之财产,且均受到美国政府、中 华人民共和国政府与全球知识产权的相 关公约保护。您进一步同意,软件之结 构、组态及程序代码 未提供之来源码 Garmin 之商业价值均归属 和 或其第三 方供货商的商业机密,且来源码格式的 Garmin 软件均为 和 或其第三方供货商 的商业机密。您同意不自行将这个软件 或任何部分重新编译、组合、修正、转 换组合、转换工程,或降级为可供使用 者读取的格式,或从软件产生任何衍生 功能。您同意不自行出口或转口本软件 至其他尚属美国政府之出口管控法律或 任何其他适用国家之出口管控法律明文 禁运的任何国家或地区。...
- Page 55 享受三包服务。 产品主机享有自购买日起一年的保修,其他配件正品自 购买之日起三个月内予以免费保修。 下列情况不属于三包范围,为非保修产品,维修网点将 一律按照保外收费维修处理: ( )产品无购机发票和三包凭证,亦不能提供有效证据 证明产品在三包期限内,并超过出厂日期 个月。 ( )主机和发票或三包凭证上的内容与商品实物不符或被 涂改。 ( )产品主机和配件曾受到:非正常或错误使用,非正 常条件不当的存储,未经授权的拆卸或改动。事 故、不恰当的安装造成的损坏。 ( )非本公司授权维修机构及人员维修而导致的故障或损 坏。 ( )因使用不当、私自拆机、封条破损及人为等造成的 故障和损坏。 ( )因不可抗力如地震、水灾、战争等原因造成的损坏。 对于保外付费维修,修复后相同故障经维修中心检验属 实,享有 天保修期。 请客户在送修时留下准确的姓名和联系电话,以便维修 中心能及时通知取机。 三包凭证须在销售时当即填写完整,经销商盖章后方可生 效。 www.garmin.com.cn 详细的《售后服务条款》请登录 Garmin 查询, 公司对所述信息保留解释权。 Garmin 中国公司:上海佳明航电企业管理有限公司 400-819-1899 电话:...
- Page 57 享受三包服务。 产品主机享有自购买日起一年的保修,其他配件正品自 购买之日起三个月内予以免费保修。 下列情况不属于三包范围,为非保修产品,维修网点将 一律按照保外收费维修处理: ( )产品无购机发票和三包凭证,亦不能提供有效证据 证明产品在三包期限内,并超过出厂日期 个月。 ( )主机和发票或三包凭证上的内容与商品实物不符或被 涂改。 ( )产品主机和配件曾受到:非正常或错误使用,非正 常条件不当的存储,未经授权的拆卸或改动。事 故、不恰当的安装造成的损坏。 ( )非本公司授权维修机构及人员维修而导致的故障或损 坏。 ( )因使用不当、私自拆机、封条破损及人为等造成的 故障和损坏。 ( )因不可抗力如地震、水灾、战争等原因造成的损坏。 对于保外付费维修,修复后相同故障经维修中心检验属 实,享有 天保修期。 请客户在送修时留下准确的姓名和联系电话,以便维修 中心能及时通知取机。 三包凭证须在销售时当即填写完整,经销商盖章后方可生 效。 www.garmin.com.cn 详细的《售后服务条款》请登录 Garmin 查询, 公司对所述信息保留解释权。 Garmin 中国公司:上海佳明航电企业管理有限公司 400-819-1899 电话:...
- Page 59 Approach ® เริ ่ ม ต้ น ใช้ ง าน คำ � เตื อ น ดู ค ำ � แนะน ำ � ข้ อ มู ล เกี ่ ย วกั บ ผลิ ต ภั ณ ฑ์ แ ละคว�ม ปลอดภั ย ได้ ใ นกล่ อ งผลิ ต ภั ณ ฑ์ เ พื ่ อ ศึ ก ษ�คำ � เตื อ น และข้...
- Page 60 ข้ อ สั ง เกต เพื ่ อ ป้ อ งกั น ก�รผุ ก ร่ อ น ให้ เ ช็ ด หน้ � สั ม ผั ส และพื ้ น ที ่ โดยรอบให้ แ ห้ ง ก่ อ นทำ � ก�รช�ร์ จ หรื อ เชื ่ อ มต่ อ กั บ คอมพิ...
- Page 61 ปุ ่ ม ต่ า ง ๆ ➊ กดค้ � งเพื ่ อ เปิ ด และปิ ด อุ ป กรณ์ เลื อ กเพื ่ อ เปิ ด ไฟ backlight ➋ เลื อ กเพื ่ อ เลื ่ อ นผ่ � นเมนู หลุ ม ต่...
- Page 62 การเล่ น กอล์ ฟ ก่ อ นที ่ ค ุ ณ จะเล่ น กอล์ ฟ ได้ คุ ณ ต้ อ งรอจนกว่ � อุ ป กรณ์ ได้ ร ั บ สั ญ ญ�ณด�วเที ย ม ซึ ่ ง อ�จใช้ เ วล� 30-60 วิ น �ที 1 กดค้...
- Page 63 ถั ด ไป การดู ร ะยะเลย์ อ ั พ และด็ อ กเลก คุ ณ ส�ม�รถดู ร �ยก�รระยะเลย์ อ ั พ และด็ อ กเลกสำ � หรั บ หลุ ม พ�ร์ 4 และพ�ร์ 5 ได้ จ�กมุ ม มองหลุ ม (หน้ � 62), เลื อ ก ➊...
- Page 64 3. เพื ่ อ กลั บ เข้ � เกมต่ อ กดปุ ่ ม เมนู ค ้ � งเพื ่ อ เห็ น ปุ ่ ม เริ ่ ม ก�รออกรอบใหม่ ทำ า การออกรอบต่ อ ไป ห�กจบเก้ � หลุ ม แรก คุ ณ ส�ม�รถกด ทำ า การออกรอบ ต่...
- Page 65 การรี ว ิ ว คะแนน คุ ณ ส�ม�รถแก้ ไ ขคะแนนแยกแต่ ล ะคะแนนได้ แ ต่ ไ ม่ ส�ม�รถแก้ ค ะแนนรวมทั ้ ง หมดได้ 1 กดค้ � ง 2 เลื อ ก บั ต รลงคะแนน 3 เลื อ ก หรื อ เพื ่ อ เลื อ กหลุ ม 4 เลื...
- Page 66 > ทำ า ต่ อ เพื ่ อ ใช้ ง �นเครื ่ อ งวั ด ระยะ • เลื อ ก ท�งต่ อ ไป > ปิ ด เพื ่ อ หยุ ด ใช้ ง �นเครื ่ อ งวั ด ระยะ • เลื อ ก ท�ง...
- Page 67 2 เลื อ ก เกี ่ ย วกั บ ภาคผนวก การดู แ ลรั ก ษาอุ ป กรณ์ ข้ อ สั ง เกต หลี ก เลี ่ ย งก�รกระแทกอย่ � งรุ น แรงและก�รดู แ ลรั ก ษ� แบบไม่ ใ ส่ ใ จเพร�ะจะลดอ�ยุ ก �รใช้ ง �นของผลิ ต ภั ณ ฑ์ หลี...
- Page 68 ข้ อ มู ล จำ า เพาะ ประเภทของ ลิ เ ธี ย ม-ไอออน แบตเตอรี ่ อ�ยุ ก �รใช้ สำ � หรั บ น�ฬิ ก �เท่ � นั ้ น : 3 สั ป ด�ห์ ง�นแบตเตอรี ่ ก�รเล่ น กอล์ ฟ : 8 ชั ่ ว โมง หมายเหตุ...
- Page 69 • ไปที ่ www.garmin.com/intosports • ไปที ่ www.garmin.com/learningcenter • ไปที ่ http://buy.garmin.com หรื อ ติ ด ต่ อ ตั ว แทน จำ � หน่ � ย Garmin ของคุ ณ สำ � หรั บ ข้ อ มู ล เกี ่ ย วกั บ...
- Page 70 หรื อ ผู ้ ใ ห้ บ ริ ก �รที ่ เ ป็ น บุ ค คลที ่ ส �ม คุ ณ ยอมรั บ ว่ � ซอฟต์ แ วร์ น ี ้ เ ป็ น ทรั พ ย์ ส ิ น ของ Garmin และ/หรื...
- Page 71 Approach ® Untuk Memulai PERINGATAN Lihat panduan Informasi Penting Produk dan Keselamatan dalam kotak kemasan produk terkait peringatan produk dan informasi penting lainnya. Bila menggunakan perangkat untuk pertama kalinya, lakukan langkah berikut ini 1 Lakukan pengisian daya perangkat (halaman 1). 2 Nyalakan perangkat (halaman 2).
- Page 72 PEMBERITAHUAN Untuk mencegah korosi, keringkan dengan benar kontak dan area di sekitarnya sebelum melakukan pengisian atau menghubungkan ke komputer. 1 Hubungkan kabel USB ke port USB di komputer Anda. 2 Sejajarkan posisi pengisi daya dengan kontak di bagian belakang perangkat, lalu ➊...
- Page 73 Tombol ➊ Tahan untuk menyalakan dan mematikan perangkat. Pilih untuk menyalakan lampu latar. ➋ Pilih untuk berpindah- pindah antar menu, hole dan pengaturan. ➌ Pilih untuk berpindah- pindah antar menu, hole dan pengaturan. ➍ Tahan untuk membuka menu pada layar saat ini. Pilih untuk memilih opsi menu dan membaca pesan.
- Page 74 Odometer mengukur jarak dan waktu (GPS aktif) Alarm aktif. Bermain Golf Sebelum Anda dapat bermain golf, Anda harus menunggu sampai perangkat memperoleh sinyal satelit , yang mungkin memakan waktu 30-60 detik. 1 Tahan 2 Pilih Start Round. 3 Pilih lapangan golf dari daftar. Perangkat secara otomatis akan memulai pada hole (hole) yang paling dekat dengan lokasi Anda.
- Page 75 ➌ Jarak ke tengah-tengah green. ➍ Jarak ke depan green. ➎ Par untuk hole. Mengukur Pukulan 1 Tahan 2 Pilih Measure Shot. 3 Berjalan ke arah bola Anda. Jarak secara otomatis diatur ulang bila Anda pindah ke hole berikutnya Melihat Jarak Layup dan Dogleg Anda dapat melihat daftar jarak layup dan dogleg untuk par 4 dan 5 hole.
- Page 76 memeriksa informasi matahari terbit/terbenam. Jeda Babak Untuk menjeda permainan, Anda dapat menekan menu untuk fungsi Pause Round guna menonaktifkan perangkat (beralih ke mode jam) untuk menghemat baterai. Tekan Menu untuk Lanjutkan Babak jika Anda ingin melanjutkan permainan. 1. Ketika Anda berada di halaman Tampilan Hole, tahan tombol menu untuk masuk ke halaman dengan fungsi Jeda Babak.
- Page 77 4. Setelah itu, akan dimulai dari hole kesepuluh. Green Ganda Mendukung Green Ganda Tekan Change Green untuk beralih green. 1. Tahan tombol menu untuk mengganti green jika Anda berada di lapangan golf yang memiliki green ganda. 2. Perubahan akan ditampilkan pada sisi kiri atas halaman.
- Page 78 Melihat Kartu Skor di Komputer Anda dapat melihat semua kartu skor yang tersimpan di komputer Anda. 1 Hubungkan perangkat ke port USB pada komputer Anda menggunakan ayunan pengisi daya. 2 Perangkat muncul sebagai drive yang bisa dilepas pada My Computer di komputer Windows , dan sebagai volume terpasang ®...
- Page 79 Time: Mengatur waktu ke otomatis atau manual (halaman 7). Format: Mengatur format waktu ke 12- atau 24-jam. Tones: Mengaktifkan dan menonaktifkan bunyi nada. Language: Mengatur bahasa. Units: Mengatur untuk mengukur jarak dalam yard atau meter. Mengatur Waktu Secara Manual Secara standar, waktu diatur secara otomatis saat perangkat memperoleh sinyal satelit.
- Page 80 Lampiran Perawatan Perangkat PEMBERITAHUAN Hindari guncangan ekstrim dan perlakuan kasar, karena dapat memperpendek umur produk. Hindari menekan tombol di bawah air. Jangan gunakan benda tajam untuk membersihkan perangkat. Hindari pembersih kimia, pelarut, dan pengusir serangga yang dapat merusak komponen plastik dan permukaan. Bilas perangkat dengan air tawar setelah terkena klorin, air garam, tabir surya, kosmetik, alkohol, atau bahan kimia lainnya.
- Page 81 Spesifikasi Jenis Lithium-ion baterai Masa pakai Hanya jam: 3 minggu baterai Bermain golf: 8 jam CATATAN: Masa pakai baterai aktual pada baterai yang terisi penuh tergantung pada seberapa lama Anda menggunakan GPS, lampu latar, dan mode hemat daya. Dibiarkan terkena suhu yang sangat dingin juga akan mengurangi masa pakai baterai.
- Page 82 • Simpan bukti pembelian yang asli, atau fotokopinya, di tempat yang aman. Memperbarui Perangkat Lunak dan Rangkaian Kegiatan Sebelum Anda dapat memperbarui perangkat lunak, Anda harus mengunduh Garmin CourseView Updater. Kunjungi http://www. garmin.com/support /courseview_updater.html untuk informasi selengkapnya. 1 Hubungkan perangkat ke port USB pada komputer Anda menggunakan ayunan pengisi daya.
- Page 83 (“Perangkat Lunak”) dalam bentuk biner dalam operasi normal dari produk. Judul, hak kepemilikan, dan hak kekayaan intelektual dalam dan pada Perangkat Lunak tetap milik Garmin dan/atau penyedia pihak ketiga. Anda memahami bahwa Perangkat Lunak adalah milik Garmin dan/atau penyedia pihak...
- Page 84 mengekspor atau mengekspor-ulang Perangkat Lunak ke negara mana pun yang melanggar undang-undang kontrol ekspor Amerika Serikat atau undang-undang kontrol ekspor negara lain yang berlaku.
- Page 85 © 2014 Garmin Ltd. or its subsidiaries Garmin International, Inc. 1200 East 151st Street, Olathe, Kansas 66062, USA Garmin (Europe) Ltd. Liberty House, Hounsdown Business Park, Southampton, Hampshire, SO40 9LR UK Garmin Corporation No. 68, Zhangshu 2nd Road, Xizhi Dist.
Need help?
Do you have a question about the Approach S2 and is the answer not in the manual?
Questions and answers
Garmin does not recognize the golf course I am on