Table of Contents
Advertisement
Advertisement
Table of Contents

Summary of Contents for Door Controls DC-ONE V3
- Page 1 DC-ONE V3 AUTOMATIC DOOR CONTROLLER GETTING STARTED TROUBLESHOOTING GUIDE...
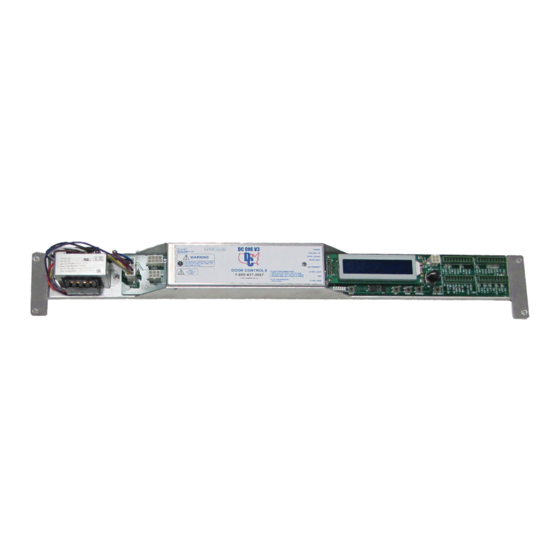
- Page 2 CONTROL LAYOUT A. Transformer B. Transformer Connector C. Power Connector D. Status LED’s E. Display Screens F. Parameter Adjustment Knob G. Encoder Status LED’s H. Encoder Connector I. J5 Sensor Connector J. J6 Multifunction Switch Connector K. J7 Special Modes Connector L.
- Page 3 PHONE NUMBER When all else fails call this number for DOOR CONTROLS USA TECH SUPPORT - 800-437-3667. Please have the following information. Controller Type, Motor Type, Firmware version, Incoming Line Voltage, & What accessories are installed (lock, sensor, ect) ...
- Page 4 OPEN DECELERATION When the door reaches the check open location, the motor is decelerated to halt motion. This parameter controls the length of time for DECELERATION. this is for HEAVY DOORS only. leave this set to default. If you need to add some deceleration, Raising this value will increase deceleration “ON”...
- Page 5 HOLD OPEN TIME ** Amount of time that the door remains open and no other activation is received. DOOR BRAKING ** When the door reaches the check location, the motor is decelerated to halt motion. This parameter is a hard DECELERATION this is for HEAVY DOORS ONLY. THIS IS NOT TO BE USED IN CONJUCTION WITH DECELERATION leave this set to default unless your door is so heavy that it will not slow for check speed and runs into the stop...
- Page 6 TROUBLE SHOOTING TIPS Before wiring any sensors into the DC One control, it is a good idea to apply power and test the door to ensure it will power open and closed when the TEST button is pressed. Use caution during this test as the sensors will not be operational The following inputs have status LEDs to help identify problems: Power...
- Page 7 The heartbeat LED should be blinking. If not, Disconnect all external devices (sensors, Multi position switches) then cycle power on the control. If the heartbeat LED is still not blinking, the control is malfunctioning and should be replaced. If programming of the control is unsuccessful, it is best to restore ...
- Page 8 If door is not dragging or binding, reset the torque setting in the programming. Start by raising the LEARN torque setting by 10%, Then raise the values of OPEN / CLOSE, OPEN / CLOSE CHECK TORQUE By 10%. Do this until the door moves properly. ...
- Page 9 J6 – Safety Beams – Pins 7 to 10 Activates the door except when in the closed position 24 VAC power to safety beam module Red LED is on when active J5 – Inner and Outer Sensors ...
- Page 10 5 POSITION SWITCH WIRING – DC-ONE V3 Control 5PSW1, 5PSW2, 5PSW3 & 5PSW4 1 Common + 2 Off 3 One Way 4 Partial Open 5 Hold Open 6 Reset 7 24 VAC 8 24 VAC Return 9 Common + x 10 Safety...
- Page 11 Contact Door Controls for further technical support when needed: Door Controls USA, Inc. 321 VZ County Road 4500 Ben Wheeler, TX 75754 Phone: 1-800-437-3667 Fax: 1-800-356-8858 Email: parts@doorcontrolsusa.com www.doorcontrolsusa.com...
Need help?
Do you have a question about the DC-ONE V3 and is the answer not in the manual?
Questions and answers