
Subscribe to Our Youtube Channel
Summary of Contents for Bell and Howell DV200HD
- Page 3 Preface Preface Preface Preface Thank you for purchasing this digital video camera. Please carefully read through this manual before using, and properly keep it for future reference. This manual was compiled based on updated information while preparing. The screen display and illustration adopted in this manual are for describing operation in more details and more visually.
- Page 4 Notice Notice Notice to to to to Users Users Users Notice Users This video camera supports SD memory card and MMC card (multimedia memory card). There is a write-protection switch on the SD memory card to avoid deleting or formatting image document.
- Page 5 ● Please do not use or keep the memory card in extremely hot or cold environment. ● Please keep the memory card clean and away from any liquid. In case of liquid on the memory card, please clean it with a piece of soft cloth. ●...
- Page 6 gently clean the lens with a piece of cloth or paper suitable for cleaning optical devices. If needed, please use lens cleanser. Organic solution is strictly prohibited for leaning the video camera. ● Do not touch lens surface with finger. System requirements System...
- Page 7 Appearance Appearance profile profile Appearance Appearance profile profile...
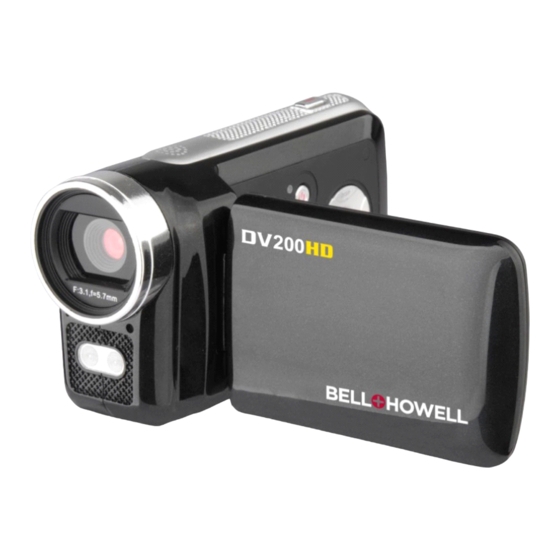
- Page 9 1.Zoom in key 2.Playback key 3.Zoom out key 4.AV interface 5.Mini-USB interface 6.Lanyard roller 7.Working indicator light 8.Power key 9.Left key 10.Up key 11.OK key 12.Right key 13.Down key 14.Speaker 15.Delete key 16.MODE key 17.MENU key 18.Shutter key 19.Microphone 20.Fill light 21.Timer light 22.Battery cover 23.Lens 24.Tripod socket 25.MicroSD Camcorder Camcorder Camcorder...
- Page 10 stops playing. Quick Deletion Button Enters into quick deletion mode. Photo/Video Indicator Lights when taking photo/video, flashes when camcorder switches on. Charging Indicator Lights for a while when the power-off camcorder enters into charging mode through its connection with charger. Starting Starting Starting...
- Page 11 Opening Opening Screen Screen Opening Opening Screen Screen Turn over the LCD to make its screen face yourself. After you press the Power button and release it, the camcorder powers on. Switching Switching Between Between Modes Modes Switching Switching Between Between the the Modes Modes...
- Page 12 with video input port and red/white port to connect with audio input port. Remember stopping recording video/sound or playing before connecting/extracting TV line. Switching Switching Switching Switching off Press the Power button to switch off the camcorder in the power off state. If the camcorder is in the idle state and there is no operation on the camcorder for more than set auto switch-off time (1 min/3 min/ 5 min), the camcorder switches off itself to save the power.
- Page 13 In the setup window, press the Left/Right key to select a desired item (date/time), and the selected item is highlighted in green. Press the Up/Down key to adjust and press OK to confirm, or press the Menu key to cancel and return; press the Menu key to exit setup. Connecting Connecting to to to to PC Connecting...
- Page 14 ◆ Screen Information in Photo/Video Mode Screen Information in Photo Mode Screen Information in Video Mode Menu Menu Menu Menu Options Options Options Options in in in in Photo Photo Photo Photo Mode: Mode: Mode: Mode: Icon Name Explanation Photo Mode Indicates that the camcorder is in the photo mode, you can press the Shutter button to take photo...
- Page 15 White Balance Indicates the current setup of the white balance Metering Mode Indicates that the camcorder is in the metering mode Exposure Indicates the current selected exposure value Image Size Indicates the current photo resolution Image Quality Indicates the current selected image quality Available photo Indicates the left available photo number...
- Page 16 menu, then press OK button to enter into the sub-menu. In the sub-menu, you can press the MENU/OK button to return to the main menu, or press the Left/Right button to select and the OK button to confirm. After returning to the main menu, you can press the MENU button to exit the menu.
- Page 17 Special Effect Normal Normal effect Black and white Black and white effect Nostalgic Nostalgic effect Negative Negative effect Red effect Green Green effect Blue Blue effect Date Stamp Close Close date/time will be printed in the file Date Date will be printed in the bottom right corner of file in photo/video mode Date and Time...
- Page 18 Spot Metering Meters with one spot as the standard Face Metering Open Opens face automatic metering, and optimizes automatically for face Close Closes face automatic metering White Balance Automation Uses automatic white balance, which is suitable for most cases Sunlight Suitable sunlight environment...
- Page 19 Red effect Green Green effect Blue Blue effect Date Stamp Close Close date/time will be printed in the file Date Date will be printed in the bottom right corner of file in photo/video mode Date and Time Date and time will be printed in the bottom right corner of file in photo/video mode Face Frame Test...
-
Page 20: Setting Menu
▲Setting Menu selected menu will highlight when choosing menu. The selected selected selected menu menu menu will will will highlight highlight highlight when when when choosing choosing choosing menu. menu. menu. Main Menu Sub-menu Explanation Sound Shutter Opens/closes Start-up Sound None/1/2/3 Key Tone Opens/closes key tone... - Page 21 Factory Reset Yes /No Resets to the factory setting Press the Left button to switch setting items when setting date and time, and press the Up/Down button to adjust. Then press the OK button to confirm, or press the MENU button to cancel setting and return to the main menu.
- Page 22 ◆ Setting Setting Setting Setting Menu Menu Menu Menu Press the MENU button to open the photo/video main menu, then press the Up/Down button to choose menu and the OK button to enter into the sub-menu. You can press the MENU button to exit the menu after returning to the main menu.
- Page 23 ▲Playback Menu Photo Photo Photo Photo Menu Menu Menu Menu Options: Options: Options: Options: Main Menu Sub-menu Explanation File Locking Lock/Unlock this Locks/Unlocks this file file Lock all files Locks all files Unlock all files Unlocks all files File Deletion Delete this file Deletes current file Delete all files...
- Page 24 your own computer hard disk. ──────────────────────────────────── Note: Don't disconnect USB when downloading files, don't extract/insert the memory card when the USB is connected, or the data may be lost. ──────────────────────────────────── Using Using Using Using Camera Camera Camera Camera After camcorder is connected with the computer, press the MODE button to enter the camera mode.
- Page 25 (The installer may take several seconds to start, depending on the PC performance. If the installation window doesn’t appear, please run “Windows Explorer”, and select “autorun.exe” in the CD.) Installing Installing Installing Installing driver driver driver driver In the installation wizard window, click the “Install Driver” button and follow the wizard to install step by step.
- Page 26 software software MAGIX MAGIX Video Video easy easy SE / / / / MAGIX MAGIX MAGIX Photo Photo Manager Manager click click Run the the software software MAGIX MAGIX Video Video easy easy SE MAGIX Photo Photo Manager Manager MX, MX, click click button...
- Page 27 Dim picture or video Poor light in shooting environment. Please shoot in environment with adequate light, or increase the brightness with the help of lights. Automatic power off Insufficient power of batteries, please replace the batteries. In order to save power consumption, over 1 minute (3 minutes or 5 minutes, vary according to different settings), without any operation, the camcorder will automatically shut according to the settings.
Need help?
Do you have a question about the DV200HD and is the answer not in the manual?
Questions and answers
my **** where i put the cd card doesn't work i cant put the cd card in it