Table of Contents
Advertisement
Advertisement
Table of Contents

Summary of Contents for WEEEMAKE WeeeBot Jeep
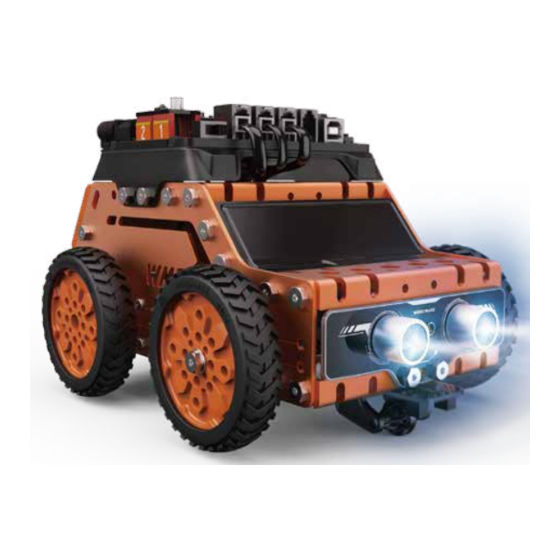
- Page 1 WeeeBot Jeep...
- Page 3 There is endless whimsy in your mind every day. Make a fan, a car, or even a robot� Nothing can limit our imagination! From now on, roll up your sleeve and create anything you want in your dream. We put the right material in your hand and then you turn your idea into reality!
- Page 4 WeeeBot Jeep Part List 1X Left Side Panel 1X LED Panel Module 2X Screw M2*4 1X Right Side Panel 1X RGB Ultrasonic Sensor 2X Screw M2*6 4X Beam 1030-100-B 1X Line-following Sensor 4X Screw M3*25 6X 56T-plastic Gear 1X Light Sensor...
-
Page 5: Battery Instruction
Battery Instruction There are two options for WeeeBot power supply: 4 x 1.5V AA batteries (Not included in package), or 2 x 3.7V 18650 Lithium battery (Not included in package). Battery information: 1. Do not crush, or throw batteries. 2. Do not use batteries near to a heat source. 3. - Page 6 Tool Instruction Screw M4*6 Screw M2 Screw M2*6 Screw M2 Screw M4 Screw M3 Screw M2*4 Screw M3*25 PH0 Screwdriver H2.5 Screwdriver M1.6-M4 Multifunction Wrench Nylon Rivets 4060 Nut M4 Nut M3...
-
Page 7: Assembly Tips
Assembly Tips Assembly Steps Assembly Path Considerations Install LED Panel Module Number of Parts Tip: Please follow the installation guide in the left side. 4X Nut M4 Parts Required 4X Screw M4*6 1X LED Panel Module Explain Steps: 1. Install 4 x Screw M4*6 and 4 x Nut M4. Do not lock them. - Page 8 Assemble WeeeBot Assemble WeeeBot Body Structure ‒ Install the front beam and side panel 2X Beam 1030-100-B 8X Screw M4*6 1X Left Side Panel 1X Right Side Panel Steps: 1. Install left side panel (The strip surface faces toward the outside), Left side panel installation diagram and two beam 1030-100-B...
-
Page 9: Install Wheels
Assemble WeeeBot Install Wheels 2X Wheel 2X Screw M2*6 Install Caster 1X Plastic Caster 1X Line-following Sensor 2X Screw M4*6... - Page 10 Assemble WeeeBot Install RGB Ultrasonic Sensor 1X RGB Ultrasonic Sensor 2X Screw M4*6 Install LED Panel Module Tip: Please follow the installation guide in the left side. 4X Nut M4 4X Screw M4*6 1X LED Panel Module Steps: 1. Install 4 x Screw M4*6 and 4 x Nut M4. Do not lock them.
-
Page 11: Install Battery
3. Slide close the cover of 18650 Battery Holder. holder, and then slide close the cover of 18650 Battery Holder. Tip: WeeeBot Jeep version only support 18650 Lithium Battery option, do not support AA Tip: “*” stands for WeeeBot standard part. - Page 12 Assemble WeeeBot Install Battery Holder (Two power supply options available) Option 1: 4 x AA Battery Option 2: 18650 Lithium Battery 6X Screw M4*6 1X AA Battery Holder 6X Screw M4*6 1X 5.5-2.1 DC Power Cord-15cm 1X Beam 1030-100-B 1X 18650 Battery Holder 1X Beam 1030-100-B Steps: Steps:...
- Page 13 Assemble WeeeBot Wiring RGB Ultrasonic Sensor LED Panel Module 3X 4P4C RJ11 Cable-20cm Steps: 1. Wiring RJ11 cable on all sensors and electronic modules, take the other open end of RJ11 cable out of WeeeBot body structure. After Step 9, connect the open end of RJ11 cable with ELF mainboard. Line-following Sensor Tips 1.
- Page 14 Assemble WeeeBot Install ELF Mainboard Tip: Port ABCD should face toward car front. 4X Screw M4*6 1X ELF Mainboard Tip: The left of the diagram is M1 motor, the right of the diagram is M2 motor. Steps: 1. Place ELF Mainboard in position (see diagram) 2.
-
Page 15: Quick Start
Quick Start 1. Take out IR Remote Control, insert CR2025 Button Cell (not included in package); 2. Switch on ELF mainboard, turn on the robot, use IR remote controller to control WeeeBot; 3. IR remote control guide: Tip: The battery of IR remote control is CR2025 button cell CR2025 Button Cell (not Avoid obstacle mode... -
Page 16: Arduino Ide
Software WeeeCode Graphical Programming Software WeeeCode is a graphical programming software that developed by WEEEMAKE on the basis of Scratch 3.0. It supports graphical programming as well as Arduino IDE code. In Weeecode, you only need to drag and drop the code modules to create lots of programs and showcases. - Page 17 Additional Assembly Guide Assemble and Disassemble the Wheels 1X 56T-plastic Gear 1X 56T-plastic Gear with Lug Boss 1X Tire 64*16 Tip: Wheels are assembled in package. You can disassemble wheels per necessity. Assemble and Disassemble LED Panel Module 1X LED Panel Protective Shield 1X LED Panel Module 2X Screw M2*4 Tip:...
- Page 18 Additional Assembly Guide Installation and Disassemble of ELF Mainboard Module 1X ELF Base Board 1X ELF Mainboard Tip: “***” stands for optional accessory Bluetooth module or 2.4G module (not included in package) 1X 328P Chip Module 1X Sound Sensor 1X Light Sensor 1X Infrared Receiver Sensor 1X ***Bluetooth 2.4G Module Instruction:...
- Page 19 Boss, another Flange Bearing 4*8*3, Aluminum stud 4*6*10 in order. 2. Lock Screw M4*30 with Nylon Locknut M4, make sure the wheel will run smoothly. 1. stands for parts included in WeeeBot Jeep, not included in WeeeBot. 2. WeeeBot Jeep only support 18650 Lithium Battery power supply option, package include 2 x 18650 Lithium Battery and charger.
- Page 20 Power Switch USB-B Port 11. Input voltage: DC6-12V. RJ11 Port WEEEMAKE ELF mainboard is designed on the basis of modular design style whose microchip is replaceable. This high-performance mainboard is designed for education. Port Name Port Label Support Module RJ11 Port A, B, C, D LED Panel Module;...
- Page 21 Sensors and Electronic Modules Guide Picture Description Features Specification Function Line-following Sensor is consist of two set of IR Able to read value of one set IR emitting LED and Operating Voltage: 5V DC Speed detection, emitting LED and sensitive phototransistor. sensitive phototransistor, high precision;...
- Page 22 Sensors and Electronic Modules Guide Picture Description Features Specification Function ATmega328P microchip is designed for ELF Anti-reverse design, easy to replace; Microchip: Mega328P-AU Microchip mainboard. Compatible with Arduino. It is an High performance, low power, reliable Operating Voltage: 5 V entry-level module to start coding, with features Mega328P microchip;...
- Page 23 Q3: I cannot connect WeeeBot to computer via USB cable nor wireless way, how can I fix it? A: Your computer hasn’ t installed the driver of the main board. Please install driver, restart the WeeeBot, and connect to computer again. For more information please visit http://www.weeemake.com. Q4: Why the WeeeBot cannot move with USB power supply? A:...
- Page 24 Q8: When do you need to replace batteries or charge batteries? A: If the speed is set to maximum value, and your robot run slowly, or keep restarting, you must replace all batteries, or charge your rechargeable batteries. Q9: How to reset the default firmware or online firmware for ELF mainboard? A:...
-
Page 25: Fcc Information
WeeeBot Robot Kit—Warranty FCC WeeeBot FCC Information This device complies with part 15 of the FCC Rules. Operation is subject to the following two conditions: (1) This device may not cause harmful interference, and (2) This device must accept any interference received, including interference that may cause undesired operation. Any Changes or modifications not expressly approved by the party responsible for compliance could void the user’... - Page 26 160000, 161000, 160001, 161001 Thank you for your interest in the products and services of WeeeMake. This Limited Warranty covers any defects in material or workmanship under normal use during one year since the date of purchase from authorized dealer. During the Warranty Period, WeeeMake will repair or replace, at no charge, products or parts of a product that proves defective because of improper material or workmanship, under normal use and maintenance;...
- Page 28 Technical Support: support@weeemake.com...
Need help?
Do you have a question about the WeeeBot Jeep and is the answer not in the manual?
Questions and answers