
Subscribe to Our Youtube Channel
Related Manuals for peret FLUO

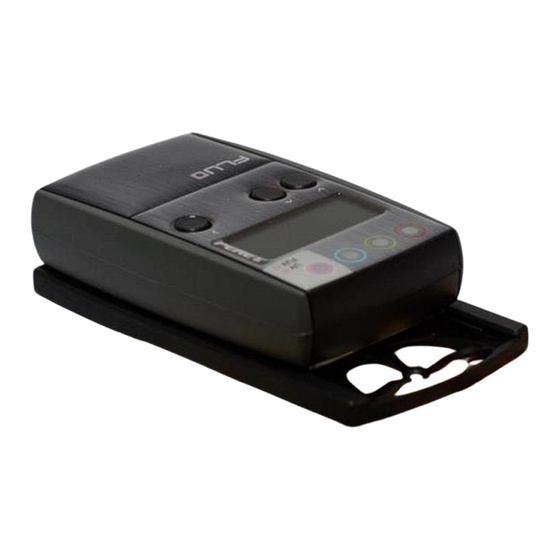
Summary of Contents for peret FLUO
- Page 1 FLUO instruction manual Firmware Version 2.02 FLUO invisible Ink Densitometer Instruction Manual FLUO Manual v2.02 GB.docx 1 / 13 6/29/2018 PERET GmbH/S.r.L www.peret.it info@peret.it...
-
Page 2: Table Of Contents
Content FLUO ....................... 3 Safety Instructions ................... 5 How to use the FLUO ..................6 RESET the FLUO ..................7 Configure the device to your needs .............. 7 Use an average solid reference ............8 Select color display or intensity display ........... 8 Exit the configuration mode .............. -
Page 3: Fluo
X (red sensitivity), Y (green sensitivity), and Z (blue sensitivity). The FLUO is supplied with a USB 2.0 cable to output data to a PC. As an optional there is offered the FLUOcol Software which connects to the device. - Page 4 FLUO Manual v2.02 GB.docx 4 / 13 6/29/2018 PERET GmbH/S.r.L www.peret.it info@peret.it...
-
Page 5: Safety Instructions
• Use original PERET spare parts and accessories only. • Use the original packaging exclusively when transporting. • The FLUO is equipped with UV LEDs. Do never look directly into the optical System of the device during measurement. Important: This manual describes the current version of the FLUO hardware and software. -
Page 6: How To Use The Fluo
During a measurement in case of FLUO 365 there will be calculated three measurement values, one for X, one for Y, and one for Z. In case of FLUO (near and far UV) there will be displayed additional X, Y, and Z values for the far UV response (280nm or 255nm). -
Page 7: Reset The Fluo
Configure the device to your needs The FLUO can be configured to your needs in a special configuration mode. Press the right key for at least 5 seconds to enter configuration mode The configuration mode is displayed by a ‘~’ in the left top corner of the LCD. -
Page 8: A) Use An Average Solid Reference
Click the right key to switch between below settings a) and b) a) Use an average solid reference The FLUO can be configured to calculate the average of a sequence of up to 10 readings on your reference patch. The number of readings that need to be... -
Page 9: Zero Reference And Target Reference Calibration
(0% or substrate) and a target fluorescent reference (100% target fluorescent ink layer). Perform the following steps 1. Zero the FLUO on an area of the substrate clean of fluorescent ink or use the black reference of the calibration target as zero reference. -
Page 10: Measure An Average Solid Reference [C 2]..[C 10
100% Measure samples in color mode [CoL] Position the FLUO with the aperture onto a fluorescent surface. Push the device to the front until the measurement result appears in the LCD. The measurement value of the currently selected color channel is displayed. -
Page 11: Measure A Sample In Intensity Mode [Int]
Position the FLUO with the aperture onto a fluorescent surface. Push the device to the front until the measurement result appears in the LCD. The measurement value of the currently selected near or far channel is displayed. -
Page 12: Underflow And Overflow Measurements
Measurement time to short Keep the FLUO in front position until the measurement number appears in the LCD. If you move the FLUO back to its parking position to early, the ‘---‘ in the LCD tells you, that measurement time was too short. -
Page 13: Replacing The Batteries
Replacing the batteries The FLUO is powered by 2 1.5V Size AA Batteries • Remove the cover from the battery compartment • Remove the old batteries • Insert the new batteries. Make sure you insert the batteries with the polarity as described on the sticker inside the compartment •...
Need help?
Do you have a question about the FLUO and is the answer not in the manual?
Questions and answers