Advertisement
Available languages
Available languages
Quick Links
L31061
Rev. 4-06
Haldex
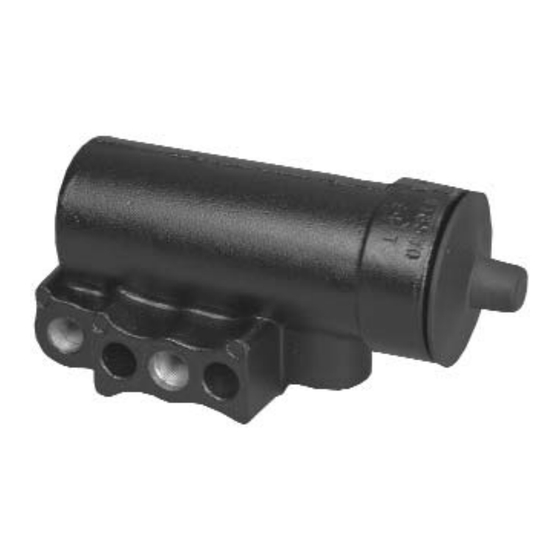
KN18530 Series
Piston Type Governor
Installation Instructions
WARNING
When working on air system components
the following precautions should be
observed.
1. Stop engine when working under a
vehicle. Always block the vehicle wheels
to prevent a fore or aft roll. Bleeding off
system pressure may cause the vehicle
to roll. Keep hands away from brake
chamber push rods and brake adjusters;
they may apply as system pressure
drops.
2. Never connect or disconnect a hose or
line containing air pressure. It may whip
as air escapes. Never remove a
component or a pipe plug unless you
are certain all system air pressure has
been exhausted.
3. Never exceed recommended working air
pressure and always wear safety glasses
when working with air pressure. Never
look directly into component ports or
direct a pressurized air flow at anyone.
4. Never attempt to disassemble a
component until you have read and
understand all recommended
procedures. Some components contain
powerful springs and injury can result if
not properly disassembled. Use only
proper tools and observe all precautions
pertaining to the use of those tools.
Remote Mount
Direct Mount
STEP 1
Disassemble Governor
A. Remove governor from its installed
position.
B. Remove the retaining ring and caged
spring assembly.
C. Remove the locknut and disassemble the
caged spring assembly.
D. Remove the piston by placing the open
bore downward on a bench and applying
a short burst of air to the reservoir port.
E. From the piston remove three o-rings
and the valve disc. A slender probe will
be required to remove the small internal
o-ring and the valve disc spring. Take
care not to damage the seal grooves or
sealing surfaces.
F. Remove the filter screen located in the
reservoir port of the body.
STEP 2
Clean and Inspect Parts
A. Clean all components in mineral spirits.
B. Use pressurized air to clean all internal
passages.
RESERVOIR
CAGED SPRING
-
PORT
O
RINGS
ASSEMBLY
RETAINING
RING
COVER
SPRING
LOCKNUT
PISTON
ASSEMBLY
STEP 3
Reassemble Governor
A. Lubricate all three o-rings with Haldex
SPEC ESM 3055 Grease and assemble
the two large o-rings to the outside
grooves and the small o-ring to the
internal groove of the piston.
B. Install valve disc and spring to the piston.
C. Lubricate the bore, outer diameter of the
piston and the exhaust stem with Haldex
SPEC ESM 3055 Grease. Install the
exhaust stem and its spring into the
piston and the piston into the bore.
D. Lubricate the adjustment screw shank
and the bass spacer. Assemble and
install the caged spring assembly into
the bore.
E. Turn the adjustment screw counter
clockwise until the caged spring
assembly can be secured with the
retaining ring.
F. Reconnect the governor to the air
compressor and adjust to the desired
pressure setting. Adjust by turning the
adjustment screw counter clockwise to
increase pressure and clockwise to
decrease pressure.
Haldex Commercial Vehicle Systems
North American Sales
North American Sales
Haldex Brake Products Corporation
Haldex Limited
10707 NW Airworld Drive
525 Southgate Drive, Unit 1
Kansas City, MO 64153-1215
Guelph, Ontario CANADA N1G 3W6
PH: (816) 891-2470
PH: (519) 826-7723
FAX: (816) 801-4198
FAX: (519) 826-9497
Rev. 4/06 5M ART L31061
Advertisement

Subscribe to Our Youtube Channel
Summary of Contents for Haldex KN18530 Series
- Page 1 When working on air system components the following precautions should be observed. A. Remove governor from its installed A. Lubricate all three o-rings with Haldex position. SPEC ESM 3055 Grease and assemble 1. Stop engine when working under a the two large o-rings to the outside vehicle.
- Page 2 A. Remueva el gobernador de su posición los componentes del sistema de aire de un A. Lubrique los tres sellos de anillo con original. lubricante Haldex SPEC ESM 3055 y vehiculo. ensamble los anillos mas grandes en los B. Remueva el anillo de retención y el 1.
Need help?
Do you have a question about the KN18530 Series and is the answer not in the manual?
Questions and answers