Table of Contents
Advertisement
Quick Links
Advertisement
Table of Contents
Troubleshooting

Summary of Contents for Biowave BiowavePRO
- Page 1 Rx Only ® user’s manual The BiowavePRO Neurostimulator is used as part of the following neuromodulation pain therapy systems: •biowavePRO Professional Neuromodulation Pain Therapy System •biowavePENS Percutaneous Electrical Nerve Stimulation ™ Designed to Block Pain...
- Page 2 BiowavePRO User’s Manual ® Biowave Corporation R ev: 11 - 180201...
-
Page 3: Table Of Contents
4.1 Set Up and Operating Instructions ................23 4.2 Rationale for Electrode Placements .................24 4.3 Focusing of the Biowave Signals and Electrode Placement ........25 4.4 Body Position During the Treatment ................26 4.5 Motion During the Treatment and Fine Tuning of the Treatment ......27... - Page 4 4.6 Electrode Placement Examples for Noninvasive Electrodes ......28 FOR PERCUTANEOUS ELECTRODE Placements, see BiowavePENS Quick Reference Guide or call Technical Support at 1-877-BIOWAVE ext 2. 4.6.1 LOW BACK PAIN - ELECTRODE PLACEMENT EXAMPLES ......29 4.6.1.1 Placement for Bilateral Low Back Pain (Pain in 2 Locations) ....29 4.6.1.2 Placement for Radiculopathies ............29...
- Page 5 (for example from Rotator Cuff Tendinitis) ........66 4.6.10.6 Placement for Shoulder Pain on the Trapezius ........ 67 4.6.10.7 Placement for 2 Locations of Pain in One Shoulder ....... 67 4.6.10.8 Placement for Bilateral Shoulder Pain (Pain in 2 Locations) ................68 (continued) Biowave Corporation...
- Page 6 4.10.3 End of Treatment..................81 4.11 Importance of Monitoring the Activity of the Neurostimulator ......82 Treatment Regimen Protocols ...............83 Treatment Regimen with Biowave Noninvasive Electrodes for Athletic Training ..83 Treatment Regimen with Biowave Noninvasive Electrodes for Physical Therapy and Postoperative Rehabilitation .............84 Treatment Regimen with Biowave Percutaneous Electrodes for Patients with Severe Chronic, Acute or Postoperative Pain ......85...
- Page 7 8.2 Other Troubleshooting Issues ..................93 8.2.1 Leadwire Cable is Unplugged During Treatment .........93 8.2.2 Electrode(s) Detach From Patient’s Body During Treatment ......93 8.2.3 Use of Non-Biowave Electrodes ..............94 8.2.4 Muscle Twitching ...................94 8.2.5 Patient Quickly Reaches Maximum Intensity ..........94 8.2.5.1 Maximum Intensity Reached Due To High Skin Impedance ..94 8.2.5.2 Maximum Intensity Reached Due To Postoperative...
- Page 8 BiowavePRO User’s Manual ® IMPORTANT! Before using this product, read the following information thoroughly. Rx Only Biowave Corporation...
-
Page 9: Indications For Use
The BiowavePENS System is comprised of a BiowavePRO Neurostimulator ® and Biowave Percutaneous Electrodes. Both the BiowavePRO and BiowavePENS Systems are indicated for: • Symptomatic relief of chronic, intractable pain, post surgical and post-traumatic acute pain • Symptomatic relief of post-traumatic acute pain •... -
Page 10: Neurostimulator Description
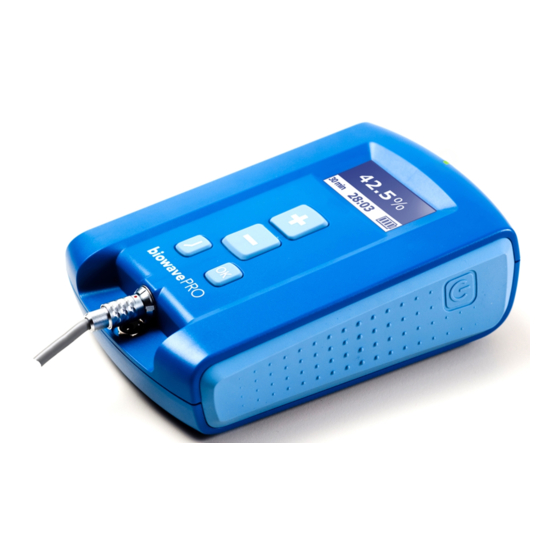
2. Neurostimulator Description BiowavePRO User’s Manual ® The BiowavePRO Neurostimulator is a ® medical device which utilizes a unique signal mixing technology to deliver electrical signals through skin to the surface of nociceptive pain fibers for inhibiting pain transmission and improving function. -
Page 11: Neurostimulator Accessories
A “Y” shaped leadwire cable connects two disposable electrodes to the BiowavePRO Neurostimulator. The single end of the leadwire cable plugs ® into the front of the neurostimulator as shown in the photo below. Plugging Single End of Leadwire Cable into BiowavePRO Neurostimulator Notch Metal Barrel Keyhole... - Page 12 BiowavePRO User’s Manual ® Removing the Leadwire Cable from the Neurostimulator To remove the leadwire cable, hold the Metal Barrel shown in the photo on the prior page with the thumb and index finger and gently pull straight back out of the neurostimulator. This will release the connector and it will slide straight out.
-
Page 13: Ac Charger
(110-240 Volts, 50-60 Hz). Leadwire Cable AC Charger The leadwire cable must first be unplugged in Plugs in Here Plugs in Here order to allow room for the AC Charger to be plugged into the neurostimulator. Biowave Corporation... -
Page 14: Electrodes
User’s Manual ® 2.2 Electrodes There are two types of Biowave Electrodes designed to work with the BiowavePRO Neurostimulator: Biowave Noninvasive Electrodes and Biowave Percutaneous Electrodes. When the neurostimulator is combined with noninvasive electrodes, the system is called BiowavePRO; when the neurostimulator is combined with percutaneous electrodes, the system is called BiowavePENS. -
Page 15: Biowave Noninvasive Reusable Electrodes (Biowavepro)
2. Neurostimulator Description 2.2.1 BIOWAVE NONINVASIVE REUSABLE ELECTRODES There are three different sized sets of Biowave Noninvasive Electrodes for ® focusing the therapeutic signals to different locations in the body: B-Set: Two round equal area electrodes BWEN01-B (2 inch diameter) for treating two locations of pain. -
Page 16: Biowave Percutaneous Electrodes (Biowavepens)
BiowavePRO User’s Manual ® 2.2.2 BIOWAVE PERCUTANEOUS ELECTRODES There are two different sized sets of Biowave Percutaneous Electrodes for ® focusing the therapeutic signals to different locations in the body: B-Set: Two round same area Percutaneous BWEP01-B Electrodes (2.5 inch diameter) are placed... -
Page 17: Neurostimulator Controls
MINUS ( – ) Button increases or decreases the treatment time in 1-minute increments. The treatment time can be set from 5 to 60 minutes. After selecting the desired treatment time, pressing the OK button sets the treatment time. Biowave Corporation... -
Page 18: Neurostimulator Indicators
BiowavePRO User’s Manual ® 2.4 Neurostimulator Indicators 2.4.1 LCD DISPLAY The LCD display on the front of the stimulator provides treatment information: • Signal Intensity as a percent of maximum intensity, is indicated by the largest number in the middle of the display. At the beginning of a treatment the intensity should read 0.0%... -
Page 19: System Indicator Light
YELLOW at the end of the treatment. The Indicator Light will flash GREEN while the battery is charging. The Indicator Light will flash YELLOW when there is an Error Condition or Problem (see Section 8 - Troubleshooting and Other Functions). Biowave Corporation... -
Page 20: When The Neurostimulator Should Not Be Used (Contraindications)
® • Keep the BiowavePRO Neurostimulator away from children. ® • Stimulation from BiowavePRO and BiowavePENS may be applied over or in the proximity of implanted orthopedic hardware, including total joint replacements, anchors, screws, pins, clips and plates. Biowave Corporation... -
Page 21: Risks/Benefits
Electrodes may be placed over healed scar tissue. 3.2.2 BENEFITS • Customers report that BiowavePRO and BiowavePENS treatments may provide the most profound treatment results for treating (i) pain from ligament and tendon related issues, for example from joint sprains, and from acute and chronic tendinopathies;... -
Page 22: Warnings
Half of one inch is the minimum spacing between electrodes on joints or extremities. • Biowave Percutaneous Electrodes are sterile and can only be used for a single treatment. • Biowave Percutaneous Electrodes must be disposed of in a sharps or biohazard disposal following the treatment. -
Page 23: Precautions
• It is important to keep this manual handy. It should be studied and reviewed periodically by users of BiowavePRO or BiowavePENS. • The neurostimulator should be maintained and serviced by Biowave personnel, or other qualified personnel approved in writing by Biowave. -
Page 24: Adverse Reactions
• Avoid use of electrodes, conductive gels, leadwires, or accessories other than those supplied with the system or recommended by Biowave. The safety of other products has not been established and their use may result in skin irritations and burns beneath the electrodes. -
Page 25: User Instructions
4. User Instructions 4.1 Set Up and Operating Instructions 1. Remove packing materials. 2. Place the BiowavePRO Neurostimulator on a hard surface. ® 3. Make sure the neurostimulator is turned OFF. Plug the power cord into the AC Charger and into a wall outlet. Then plug the cord from the AC Charger into the BiowavePRO Neurostimulator to begin charging the battery. -
Page 26: Rationale For Electrode Placements
TENS, interferential current, high volt, Russian and muscle stimulation. Biowave’s electrical signal technology is a frequency conduction pain block. Biowave discovered that when two sinusoidal high frequency signals are summed (added) together in the device and then delivered into the body through a single electrode, the signals will pass into deep tissue and affect all polarized tissues including nociceptive pain fibers. -
Page 27: Focusing Of The Biowave Signals And Electrode Placement
4.3 Focusing of the Biowave Signals and Electrode Placement With Biowave, depending on the nature and location of the painful area, the electrical signals can be focused to different parts of the body by pairing electrodes of different sizes and types with one another. If two same type electrodes of equal area are used, then two distinct volumes of tissue can be treated equally. -
Page 28: Body Position During The Treatment
BiowavePRO User’s Manual ® 4.4 Body Position During the Treatment Position of the body during the treatment is important. Generally, the tissue being treated should be a little taut or in a stretch position, which allows deeper penetration of the electrical field. Sitting upright in a supported position on a treatment table tends to be the most comfortable body position for most treatment locations on the body. -
Page 29: Motion During The Treatment And Fine Tuning Of The Treatment
The goal is to have the patient slightly shift the location of the sensation caused by the electrical field so that it focuses directly onto and encompasses the primary location of pain. This is a fine tuning of the treatment that will provide the best treatment result. Biowave Corporation... -
Page 30: Electrode Placement Examples For Noninvasive Electrodes
• There is NO maximum spacing between any electrodes. The following section shows photos of electrode placement examples ONLY for noninvasive electrodes. For PERCUTANEOUS ELECTRODE PLACEMENTS, see BiowavePENS Quick Reference Guide or call 1-877-BIOWAVE ext 2 (1-877-246-9283 ext 2) for technical support. Biowave Corporation... -
Page 31: Low Back Pain - Electrode Placement Examples
The patient can be in a supported sitting position or lying supine with their torso at 90 degrees to their legs and their knees bent and supported by a cushion. Biowave Corporation... -
Page 32: Placement For Sacroiliac (Si) Joint Pain
BiowavePRO User’s Manual ® 4.6.1.3 Placement for Sacroiliac (SI) Joint Pain Use the B-set: Both electrodes may be placed bilaterally over the sacroiliac joint covering one or two pain sites (unilateral or bilateral SI joint pain). Make sure there is at least 1.0 inch of space between the... -
Page 33: Placement For Low Back Pain In One Location
90 degrees to their legs and their knees bent and supported by a cushion. If necessary, the patient can be in a prone position during the treatment. Biowave Corporation... -
Page 34: Placement For Pain Over A Large Area On The Back (For Example For Pain From A Rotational Strain)
BiowavePRO User’s Manual ® 4.6.1.6 Placement for Pain Over a Large Area on the Back (for example for pain from a rotational strain) Use the B-set: Both electrodes should be placed over the painful area with a minimum space of about 1.0 inch between the... -
Page 35: Hip Pain - Electrode Placement Examples
Round Electrodes. There is no limit on the maximum distance the electrodes can be placed apart from one another. Body Position: For hip placements, lying supine is the most desirable (comfortable) position for the patient during the treatment. Legs should be kept straight. Biowave Corporation... -
Page 36: Rib Or Oblique Pain - Electrode Placement Examples
BiowavePRO User’s Manual ® 4.6.3 RIB OR OBLIQUE PAIN - ELECTRODE PLACEMENT EXAMPLES 4.6.3.1 Placement for Rib or Oblique Pain in One Location Use the U-set: Place the round Pain Site Electrode directly over the painful area in the mid-torso region. -
Page 37: Groin Pain - Electrode Placement Examples
If the electrodes are in close proximity to the patient’s genitals, use a barrier like a towel between the electrodes and genitals. Body Position: For groin treatments, lying supine is the most desirable (comfortable) position for the patient during the treatment. Legs should be kept straight. Biowave Corporation... -
Page 38: Placement For Interstitial Cystitis
BiowavePRO User’s Manual ® 4.6.4.3 Placement for Pain from Interstitial Cystitis Use the B-set: The recommended electrode placement for Interstitial Cystitis is to place both round Pain Site Electrodes bilaterally over the sacrum, as shown in the photo to the... -
Page 39: Quadriceps Pain - Electrode Placement Examples
Body Position: For quadriceps treatments, sitting upright on a training or physical therapy table with the knee bent at 90 degrees and the leg hanging off the table is the most comfortable position during the treatment. Biowave Corporation... -
Page 40: Placement For Quadriceps Pain Over A Large Area
BiowavePRO User’s Manual ® 4.6.5.2 Placement for Quadriceps Pain Over a Large Area Use the B-set: Both electrodes may be placed in a vertical arrangement on the quadriceps. The first electrode should be placed in a proximal location, directly over the location where the pain first presents itself. -
Page 41: Hamstring Pain - Electrode Placement Examples
Keeping the hamstring in a slightly more taut position will provide a better treatment outcome. If necessary, the patient can lie in a prone position during the treatment. Biowave Corporation... -
Page 42: Placement For Hamstring Pain Over A Large Area
BiowavePRO User’s Manual ® 4.6.6.2 Placement for Hamstring Pain Over a Large Area Use the B-set: Both electrodes may be placed in a vertical arrangement on the hamstring. The first electrode should be placed in a proximal location, directly over the location where the pain first presents itself. -
Page 43: Knee And Lower Leg Pain - Electrode Placement Examples
Pain Site Electrode. Body Position: For treatments on the anterior of the knee, the knee should be bent at approximately 90 degrees. This angle provides the strongest sensation in the knee during the treatment which will yield the best outcome. Biowave Corporation... -
Page 44: Placement For Medial Knee Pain (For Example From An Mcl Sprain, Pes Anserine Bursitis Or Osteoarthritis)
BiowavePRO User’s Manual ® 4.6.7.2 Placement for Medial Knee Pain (for example from an MCL Sprain, Pes Anserine Bursitis or Osteoarthritis) Use the E-set: For pain from an MCL sprain or pain near the medial joint line of the knee, the small round Pain Site... -
Page 45: Placement For Quadriceps Tendinitis
This angle provides the strongest sensation in the knee during the treatment which will yield the best outcome. Motion: To facilitate exercise or range of motion therapy, Biowave should be used for 8 minutes first, with the knee in flexion. After 8 minutes, reduce the intensity by 3% to take the edge off of the sensation. -
Page 46: Placement For Patellar Tendinitis
BiowavePRO User’s Manual ® 4.6.7.4 Placement for Patellar Tendinitis Use the E-set: The small round Pain Site Electrode should be placed directly over the primary source of pain, in this case, directly over the patellar tendon, as shown in both photos. -
Page 47: Placement For Lateral Knee Pain
4. User Instructions Motion: To facilitate exercise or range of motion therapy, Biowave should be used for 8 minutes first, with the knee in flexion. After 8 minutes, reduce the intensity by 3% to take the edge off of the sensation. Then while continuing the Biowave treatment, exercise or range of motion therapy can now be performed by the patient with significantly less pain. -
Page 48: Placement For Illiotibial Band (It Band) Pain
BiowavePRO User’s Manual ® 4.6.7.6 Placement for Illiotibial Band (IT Band) Pain Use the E-set for one location of pain: The small round Pain Site Electrode should be placed directly over the primary source of pain, typically on the lateral superior side of the knee, as shown in the first photo to the right. -
Page 49: Placement For Pain Throughout The Knee Or For Pain In
Motion: For patients rehabilitating from recent knee surgery, to facilitate exercise or range of motion therapy, Biowave should be used for 8 to 10 minutes first, with the knee in flexion. After 8 to 10 minutes, reduce the intensity by 5% to take the edge off of the sensation. -
Page 50: Placement For Posterior Knee Pain
BiowavePRO User’s Manual ® 4.6.7.8 Placement for Posterior Knee Pain Use the E-set: The small round Pain Site Electrode should be placed directly over the primary source of pain on the posterior side of the leg behind the knee. The bony prominence or comfortable... -
Page 51: Placement For Pain From Shin Splints
6 inches by 3 inches to be stimulated and treated. Body Position: Sitting in a supported position with the knees at about 90 degrees is typically the most comfortable position in which to receive stimulation for shin splints. Biowave Corporation... -
Page 52: Placement For Calf Pain (For Example From A Gastrocnemius Strain)
BiowavePRO User’s Manual ® 4.6.7.10 Placement for Calf Pain (for example from a Gastrocnemius Strain) Use the E-set: For calf pain, for example from a Gastrocnemius strain, the small round Pain Site Electrode should be placed directly over the primary source of pain over the calf as shown in the first photo to the right. -
Page 53: Ankle And Foot Pain - Electrode Placement Examples
If the primary pain site is on the lateral side of the foot but there is secondary compression pain on the medial side of the foot, then place the rectangular Biowave Corporation... -
Page 54: Placement For High Ankle Sprain With Only A Primary Pain Site
However, if necessary, the foot can be elevated during the treatment. The Biowave treatment may be done in combination with hot or cold therapy. 4.6.8.2 Placement for High Ankle Sprain with only a Primary Pain Site... -
Page 55: Placement For Foot Or Ankle Injury With Pain In 2 Locations
However, if necessary, the foot can be elevated during the treatment. The Biowave treatment may be done in combination with hot or cold therapy. -
Page 56: Placement For Achilles Tendinitis
BiowavePRO User’s Manual ® 4.6.8.4 Placement for Achilles Tendinitis Use the E-set: For pain occurring from achilles tendinitis, the small round Pain Site Electrode should be placed directly over the location where the pain presents itself, typically over the Achilles tendon as shown in the first photo to the right. -
Page 57: Placement For Medial Ankle Or Foot Pain
For patients rehabilitating from recent surgery or acute or chronic ankle or foot problems, Biowave may be used to facilitate exercise or range of motion therapy while simultaneously reducing pain. Biowave should be used for 8 minutes first, with the foot in the position described above. -
Page 58: Placement For Plantar Fasciitis
BiowavePRO User’s Manual ® 4.6.8.6 Placement for Plantar Fasciitis Use the E-set: For pain occurring in the bottom of the foot, for example, from plantar fasciitis, the small round Pain Site Electrode should be placed directly over the pain site as shown in the photo to the right. -
Page 59: Placement For Pain On Top Of The Foot (For Example From Phalange, Metatarsal, Neuroma Or Turf Toe Pain)
Therefore sitting in a chair with the foot flat on the floor or sitting on a training or physical therapy table with the knee bent and the foot flat on a wedge are the most ideal positions during the treatment. Biowave Corporation... -
Page 60: Neck And Cervical Pain - Electrode Placement Examples
BiowavePRO User’s Manual ® 4.6.9 NECK PAIN - ELECTRODE PLACEMENT EXAMPLES For all neck treatments, tape should be used to help hold the electrode(s) in place on the back of the neck. 4.6.9.1 Placement for Neck or Cervical Pain in One Location... -
Page 61: Dispersive Radiating Pain
This is due to stimulation of the occipital nerve. Body Position: The head should be bent slightly forward so the tissue on the back of the neck is more taut. This will provide a better treatment outcome. Biowave Corporation... -
Page 62: Placement For Neck Or Cervical Pain Over A Large Area
BiowavePRO User’s Manual ® 4.6.9.3 Placement for Neck or Cervical Pain Over a Large Area Use the B-set: For cervical pain centered over the spine over a large area, each round Pain Site Electrode should be placed over the spine in a vertical fashion directly over the painful areas. -
Page 63: Placement For Neck Or Cervical Pain In 2 Locations
This is due to stimulation of the occipital nerve. Body Position: The head should be bent slightly forward so the tissue on the back of the neck is more taut. This will provide a better treatment outcome. Biowave Corporation... -
Page 64: Shoulder Pain - Electrode Placement Examples
BiowavePRO User’s Manual ® 4.6.10 SHOULDER PAIN - ELECTRODE PLACEMENT EXAMPLES For all shoulder treatments, a wide self adhering wrap, medical tape, elastic bandage or velcro strap should be used to hold both electrodes in place, particularly if range of motion, exercise or stretching therapy is to be performed during the treatment. -
Page 65: Placement For Anterior Shoulder Pain
Motion: The patient should gently articulate the shoulder joint to shift the electrical field so that the sensation from the electrical signals focus directly over and encompasses the pain site. Biowave Corporation... -
Page 66: Placement For Posterior Shoulder Pain (For Example From An Infraspinatus Strain Or Posterior Rotator Cuff Tendinitis)
BiowavePRO User’s Manual ® 4.6.10.3 Placement for Posterior Shoulder Pain (for example from an Infraspinatus Strain or Posterior Rotator Cuff Tendinitis) Use the E-set: For pain occurring on the posterior of the shoulder, for example, from an infraspinatus strain or from posterior rotator cuff tendinitis,... -
Page 67: Placement For Sternoclavicular (Sc) Pain (For Example From An Sc Sprain)
Body Position: For treatment of the SC joint, lying in a supine position or sitting in a supported position is generally most comfortable with the arm resting near the side of the body. Biowave Corporation... -
Page 68: Placement For Pain On The Edge Of The Shoulder (For Example From Rotator Cuff Tendinitis)
BiowavePRO User’s Manual ® 4.6.10.5 Placement for Pain on the Edge of the Shoulder (for example from Rotator Cuff Tendinitis) Use the E-set: For pain occurring on the edge of the shoulder, for example, from rotator cuff tendinitis, the small round... -
Page 69: Placement For Shoulder Pain On The Trapezius
Motion: The patient should gently articulate the shoulder joint to shift the electrical field so that the sensation from the electrical signals focuses directly over and encompasses both pain sites. Biowave Corporation... -
Page 70: Placement For Bilateral Shoulder Pain
BiowavePRO User’s Manual ® 4.6.10.8 Placement for Bilateral Shoulder Pain (Pain in Two Locations) Use the B-set: For pain occurring in both shoulders, for example, bilateral trapezius pain, two 2-inch diameter round electrodes should be placed directly over each respective pain... -
Page 71: Elbow Pain - Electrode Placement Examples
Rehabilitation may be facilitated for epicondylitis patients by using Biowave during therapy. Biowave should be used for 8 minutes first to allow the effect Biowave Corporation... -
Page 72: Placement For Medial Elbow Pain (For Example, Medial Epicondylitis)
For example, it is much easier for the patient to achieve full extension during a Biowave treatment. As the patient’s body adapts to the electrical field, after each set of exercise, the patient may increase the intensity, if desired, for greater pain relief. -
Page 73: Placement For Posterior Elbow Pain (For Example, Triceps Tendinitis)
Rehabilitation may be facilitated for patients with acute or chronic tendinopathies by using Biowave during therapy. Biowave should be used for 8 minutes first to allow the effect of the electrical field to take place on the affected nerves. After 8 minutes, reduce the intensity by 8% to take the edge off of the sensation. -
Page 74: Wrist, Hand & Finger Pain - Electrode
BiowavePRO User’s Manual ® 4.6.12 WRIST, HAND AND FINGER PAIN - ELECTRODE PLACEMENT EXAMPLES For all wrist, hand and finger treatments, use a self adhering cohesive wrap, elastic bandage or a velcro strap to hold both electrodes in place, particularly if range of motion, exercise or stretching therapy is to be performed during the treatment. -
Page 75: Placement For Pain From A Triangular Fibrocartilage Complex (Tfcc) Wrist Sprain
Motion: The patient should gently articulate their wrist (rotation as well as extension and flexion) to shift the electrical field so that the sensation from the electrical signals focuses on and encompasses the pain site in the wrist. Biowave Corporation... -
Page 76: Placement For Hand Or Finger Pain
BiowavePRO User’s Manual ® 4.6.12.3 Placement for Hand or Finger Pain Use the E-set: For pain occurring at the base of the thumb, for example from a thumb or UCL sprain, the small round Pain Site Electrode is placed over the pain site at the base of the thumb. -
Page 77: Alternative Placement For The Larger Rectangular Electrode On Small Diameter Wrists
Motion: The patient should gently articulate their wrist (rotation as well as extension and flexion) to shift the electrical field so that the sensation from the electrical signals focuses on and encompasses the pain site in the wrist. Biowave Corporation... -
Page 78: Placing Biowave Noninvasive Electrodes
BiowavePRO User’s Manual ® 4.7 Placing Biowave Noninvasive Electrodes 1. Select locations for electrodes (see Section 4.6) 2. Make sure skin is clean and dry. Use soap and water to clean the skin or use a damp towel and firmly rub the skin to remove lotion, oil and/or dead dry flaky skin in the locations where each electrode is to be placed. - Page 79 1. Select locations for electrodes (see Section 4.6) and mark the center of each pain location with a Sharpie marker. 2. Use an alcohol prep to disinfect the skin in the location where the Biowave Percutaneous Electrodes are to be placed. Make sure the skin is dry (that there is no wet alcohol present) before placing the Percutaneous Electrode on the skin.
- Page 80 BiowavePRO User’s Manual ® (i) pain in a single location. For example, pain in the extremities such as the knee, ankle, foot, toe, neck, shoulder, elbow, wrist, hand and finger. The E-set can also be used to treat a single point of pain on the back, for example from a trigger point which may not be disc or spine related.
-
Page 81: Placing Biowave Percutaneous Electrodes
Line the notch up with the keyhole at 12 o’clock in the mating receptacle on the lower front side of the BiowavePRO neurostimulator. Gently plug the metal connector into its receptacle so that it clicks in place. -
Page 82: Using The Biowavepro Neurostimulator
(treatment site). This could be at an intensity level, for example, of 30 - 40% with Biowave Noninvasive Electrodes or 15 - 20% with Biowave Percutaneous Electrodes. -
Page 83: During Treatment
For treatments with Biowave Noninvasive Electrodes, remove both electrodes, place back onto their respective plastic release liners, return the electrodes into and reseal the resealable plastic bag. For treatments with Biowave Percutaneous Electrodes, at the end of the Biowave Corporation... -
Page 84: Importance Of Monitoring The Activity Of The Neurostimulator
4.11 Importance of Monitoring the Activity of the Neurostimulator Before turning on BiowavePRO and starting a treatment, it is important to make sure the leadwires are properly plugged in and electrodes are properly placed on the patient’s body. If everything is properly connected, the LCD Display shows a large 0.0% in the middle of the display. -
Page 85: Treatment Regimen Protocols
This allows the athlete to complete practice or the game more comfortably. This treatment may be completed in combination with heat if so desired. A thin waterproof plastic wrap should be placed over the Biowave Noninvasive Electrodes before placing a heating pad on top of them. -
Page 86: Treatment Regimen With Biowave Noninvasive Electrodes For Physical Therapy And Postoperative Rehabilitation
8 minutes to allow the effect of the electrical field to take place on the affected nerve fibers. BiowavePRO may be used with heat if desired. For treatments on joints, use a cohesive self adhering wrap, elastic bandage or velcro strap to help hold the electrodes in place. -
Page 87: Treatment Regimen With Biowave Percutaneous Electrodes For Patients With Severe Chronic, Acute Or Postoperative Pain
5. Treatment Regimen Protocols BiowavePRO significantly facilitates the ability of the patient to perform therapy, particularly when pain is an inhibiting factor. Additionally, because of the long carry over effect, patients have little post exercise soreness often for up to 24 hours or more following their physical therapy session. -
Page 88: Battery Indicator, Charging And Replacing The Battery
6.2 Charging the Battery First, unplug the leadwire cable from the neurostimulator, revealing the opening for the plug on the AC Charger. Make sure BiowavePRO is turned off. Plug the AC Charger into the charging port on the neurostimulator. Plug one end of the power cord into the AC Charger and the other end into an electrical wall outlet to begin charging the battery. -
Page 89: Replacing The Battery
There is no harm in leaving the stimulator plugged into the AC Charger. It is recommended that the BiowavePRO Li-ion batteries be charged up every evening. There are no memory issues with the BiowavePRO battery system and Li-ion battery systems do not need to be fully discharged prior to recharging. -
Page 90: Maintenance, Cleaning And Storage Instructions
BiowavePRO Neurostimulator, except for battery ® replacement with a specific battery that must be provided by Biowave Corporation. • Wipe the neurostimulator with a cloth or paper towel that is lightly moistened with a non-abrasive alcohol or ammonia based cleaner. The neurostimulator does not require frequent cleaning if it is handled and used with clean hands. -
Page 91: Disposal Of Waste Products
• When the Li-ion battery system is replaced in the BiowavePRO Stimulator, the old battery should be recycled appropriately. Similarly, at the end of its useful life disposal of the BiowavePRO Neurostimulator and power supply must comply with local regulations. -
Page 92: Troubleshooting And Other Functions
There are 3 connection related error conditions that can appear on the LCD Display: 8.1.1 LEADWIRE CONNECTION TO THE STIMULATOR If the BiowavePRO Stimulator is turned on and the leadwire cable is not attached, the first error condition shown is a picture of the leadwire cable with an arrow pointing to the unit as shown in the illustration to the right. -
Page 93: Electrode Connection To The Patient
Patient Has Lotion on Their Skin or Has Oily Skin Lotion, oil, ointment, disinfectants and other embrocations dramatically reduce adhesion and conductivity of the electrodes (particularly Biowave Noninvasive Electrodes) and can cause this error condition to appear. Use a washcloth with soap and water to clean the skin well and then dry thoroughly. -
Page 94: Excessive Hair On Skin
Use a new set of electrodes and place onto the cleaned skin. The start screen with 0.0% intensity should appear on the LCD display. The patient should press the Plus (+) Button to begin the treatment and continue to increase the intensity as described in Section 4.10 Using BiowavePRO ® 8.1.3.4... -
Page 95: Other Troubleshooting Issues
0.0% should appear on the display. The patient can continue the treatment by pressing the Plus (+) Button to manually increase the intensity level from zero back up to a therapeutic level as described in Section 4.10 Using BiowavePRO ®... -
Page 96: Use Of Non-Biowave Electrodes
Noninvasive or Percutaneous Electrodes. The BiowavePRO Neurostimulator ® will not work with non-Biowave electrodes and if connected, the patient may be at risk for receiving a burn. 8.2.4 MUSCLE TWITCHING The muscle is typically held in comfortable tension during the treatment without any noticeable twitching. -
Page 97: Maximum Intensity Reached Due To Postoperative Loss Of Proprioception
Patients may receive BiowavePRO treatments at locations on the body with reduced sensitivity. These patients will typically achieve higher than average intensity settings on the BiowavePRO Neurostimulator. -
Page 98: Automatic Safety Function
8.3 Automatic Safety Function 8.3.1 INTENSITY DECREASES AUTOMATICALLY AND/ OR PRESSING PLUS (+) BUTTON WILL NOT INCREASE INTENSITY As an added safety precaution, the BiowavePRO Neurostimulator has a ® patented technology that protects the patient from receiving too high a level... -
Page 99: Other Functions
60 minutes. 3. Press (OK) button to set the new treatment time. Patient can now begin pressing the PLUS (+) button to increase intensity starting the treatment. Changing the treatment time mid treatment will not interrupt the treatment. Biowave Corporation... -
Page 100: Pause Treatment Mid-Procedure
BiowavePRO User’s Manual ® 8.4.2 PAUSE TREATMENT MID-PROCEDURE Press the Power Button once to turn the intensity off and pause the treatment. A Pause symbol will appear as shown in the LCD display to the right. Electrode placement, for example, can now... -
Page 101: Technical Specifications And Classifications
10.8 V DC, 6900 mAh rechargeable Li-ion battery Provides 9.0 hours of power at 100% output into 500 Ohms; or AC Charger The BiowavePRO Neurostimulator must only be used with the AC Charger provided: Globtek Model # GTM96600-6024-6.0-T3A Power Supply, 18V, 3.3A;... -
Page 102: Classifications
K962332, K900519, K915333, K052289 and K152437. Biowave Percutaneous Electrodes Biowave Percutaneous Electrodes are comprised of a 1.5 inch diameter needle array within a 2.5 inch diameter hydrogel-based single-use sterile electrode. The needle array is comprised of 1014 needles, 0.74 mm in length, made from 316L surgical stainless steel. - Page 103 * Harmonic emissions, if any, that can impact on the electrical grid, can only occur during battery charging. During battery charging, the external power supply is the only connection to the mains. During normal use the BiowavePRO Neurostimulator has no connection to the mains. Therefore, the compliance class, as reported here, is dictated only by the compliance class of the BiowavePRO Neurostimulator’s external power supply.
- Page 104 Guidance and Manufacturer’s Declaration – Electromagnetic Immunity ® The BiowavePRO Neurostimulator is intended for use in the electromagnetic environment specified below. The customer or the user of the BiowavePRO Neurostimulator should assure that it is used in such an environment. Immunity test IEC 60601...
- Page 105 Guidance and Manufacturer’s Declaration – Electromagnetic Immunity ® The BiowavePRO Neurostimulator is intended for use in the electromagnetic environment specified below. The customer or the user of the BiowavePRO Neurostimulator should assure that it is used in such an environment. Electromagnetic Immunity test...
- Page 106 To assess the electromagnetic environment due to fixed RF transmitters, an electromagnetic site survey should be considered. If the measured field strength in the location in which the BiowavePRO Neurostimulator is used exceeds the applicable RF compliance level above, the BiowavePRO Neurostimulator should be observed to verify normal operation.
- Page 107 Neurostimulator is intended for use in an electromagnetic environment in which radiated RF disturbances are controlled. The customer or user of the BiowavePRO Neurostimulator can help prevent electromagnetic interference by maintaining a minimum distance listed in meters below, between portable and mobile RF communications equipment (transmitters) and the BiowavePRO Neurostimulator based on the maximum output power of the communications equipment.
-
Page 108: Contact Information And Warranty
To obtain warranty service, you must you must first call Biowave Corporation at 1-877-BIOWAVE x1 to receive a return manufacturer’s authorization number (RMA#). Once you have obtained an RMA#, return your BiowavePRO unit via UPS or FEDEX in either its original packaging or packaging affording an equal degree of protection to Biowave Corporation. -
Page 109: Notes
Notes Biowave Corporation... - Page 110 BiowavePRO User’s Manual ® Notes Biowave Corporation...
- Page 112 Manufactured by Biowave Corporation Norwalk, CT 1-877-BIOWAVE biowave.com Neurostimulator must only be used with power supply provided. ©2007-2018 Biowave Corporation MADE IN...
Need help?
Do you have a question about the BiowavePRO and is the answer not in the manual?
Questions and answers