Advertisement
Table of Contents
- 1 Warranty & Questions
- 2 Table of Contents
- 3 Identification Images
- 4 Battery Information
- 5 Battery Install/Replacement
- 6 On/Off Procedure
- 7 Thermometer Positioning & Programming
- 8 General Cooking Procedure
- 9 Timer Operation
- 10 Clock and Language Selection
- 11 Care & Precaution
- 12 Usda Cooking Temperatures
- 13 Transmission Collision
- Download this manual
Advertisement
Table of Contents

Related Manuals for Napoleon 70006


Summary of Contents for Napoleon 70006
- Page 1 Digital Cooking Thermometer PG.17 PG.33 DO NOT DISCARD PG.49 PG.65 PG.81 CUSTOMER SOLUTION INFORMATION PLEASE READ! N415-0282 OCT 23.17...
-
Page 2: Warranty & Questions
One Year Limited Warranty Napoleon warrants this product to be free from defects in material or workmanship for one (1) year from date of original purchase for the original purchaser, excluding batteries. It does not cover damages or wear resulting from accident, misuse, abuse, commercial use, or unauthorized adjustment and/or repair. -
Page 3: Table Of Contents
TABLE OF CONTENTS: WARRANTY & QUESTIONS .............. 2 IDENTIFICATION IMAGES ..............4 BATTERY INFORMATION ..............5 BATTERY INSTALL/REPLACEMENT ........... 6 ON/OFF PROCEDURE ..............7 THERMOMETER POSITIONING & PROGRAMMING ....8 & 9 GENERAL COOKING PROCEDURE ..........10 TIMER OPERATION ............... 11 CLOCK AND LANGUAGE SELECTION .......... -
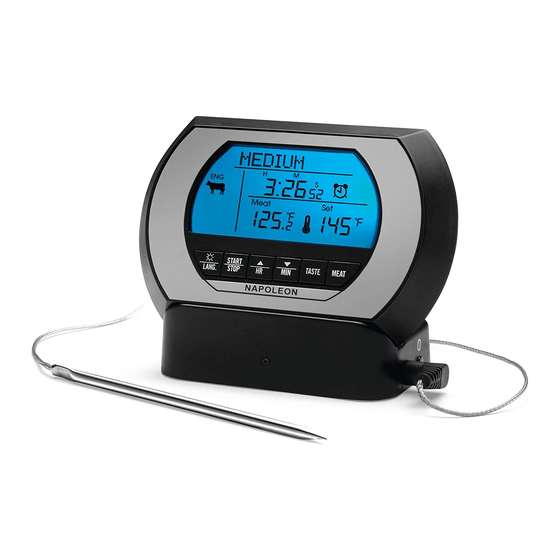
Page 4: Identification Images
Unit Identification PROBE RECEIVER BASE TRANSMITTER... -
Page 5: Battery Information
Thank you for purchasing a Napoleon Wireless Thermometer with Timer This product helps to eliminate over-cooking or under-cooking foods. Presetting the thermometer to the recommended cooking temperatures and/or cooking times is simple and ensures that food will be cooked to your preferred taste. -
Page 6: Battery Install/Replacement
To install or replace the batteries on both units: 1. Use 2 AAA batteries for each unit. Always replace both batteries at the same time; do not combine old and new batteries. 2. Remove the battery compartment cover, located on the back of the unit. 3. -
Page 7: On/Off Procedure
Operations 1. Keep the base transmitter as close as possible to the receiver sensor to ensure consistent synchronization between base transmitter and receiver. After setup is complete, keep the units within 200 feet of each other. 2. Turn on the base transmitter by pressing and holding the On/Off button for 3 seconds. -
Page 8: Thermometer Positioning & Programming
Thermometer Positioning 1. The base transmitter unit should be placed on a flat surface as far away from the grilling area as possible. 2. The receiver’s clip stand maybe used to stand the remote on a flat surface, or clip on a belt loop. The magnets maybe used to attach onto a metal surface, or it maybe placed on the base unit. - Page 9 4. Press the “Taste” Button and the set temperature display will flash, press the “Taste” button again to cycle through the various standard temperatures for each type of Meat and the varying internal temperature as defined by the USDA. (Available only in Beef and Lamb mode) 5.
-
Page 10: General Cooking Procedure
General Cooking Procedures 1. Preheat the grill or oven to desired cooking temperature. 2. Sterilize the metal probe by submerging the probe into boiling water for several minutes. Ensure the sensor plug on the end of the cord is plugged into the base transmitter. -
Page 11: Timer Operation
Timer Operation This unit is equipped with a timer mode. It can operate independently or work alongside the thermometer 1. Set the Mode toggle to Timer Mode “ ” 2. Press the “ ” button to set the hours. Press the “ ”... -
Page 12: Clock And Language Selection
Clock Feature To program the clock: 1. While the receiver is off, press and hold the “ ” button. The clock digits flash. 2. Press the “ ” button to change the hour. Press the “ ” to change the minutes. -
Page 13: Care & Precaution
Care and Precautions: 1. Always wear a heat resistant glove when touching the metal probe or cord during or just after cooking. DO NOT TOUCH WITH BARE HANDS! 2. Keep the metal probe and cord away from children 3. Sterilize the metal probe each time before use 4. -
Page 14: Usda Cooking Temperatures
Minimum Internal Cooking Temperatures as recommended by the USDA* IMPORTANT! These are the minimum internal temperatures that food must reach to be considered safe to eat, no matter how you prepare them. The following guidelines are recommended, but personal taste temperatures may differ from below: Fresh Ground Beef, Veal, Pork 160°F /71°C... -
Page 15: Transmission Collision
- Increase the separation between the equipment and receiver. Modification not authorized by the manufacturer may void users authority to operate this device. Wolf Steel Ltd. Wolf Steel USA Ltd. 24 Napoleon Road 103 Miller Drive Barrie ON L4M 0G8 Crittenden KY 41030 Canada Wolf Steel Europe BV Wolf Steel (UK) Ltd. - Page 16 Radiation Exposure Statement The device has been evaluated to meet general RF exposure requirement. The device can be used in portable exposure condition without restriction.
- Page 17 ISED Statement - English: This device complies with Industry Canada license‐exempt RSS standard(s). Operation is subject to the following two conditions: (1) This device may not cause interference, and (2) This device must accept any interference, including interference that may cause undesired operation of the device.
Need help?
Do you have a question about the 70006 and is the answer not in the manual?
Questions and answers