
Related Manuals for Pacojet Junior

Summary of Contents for Pacojet Junior
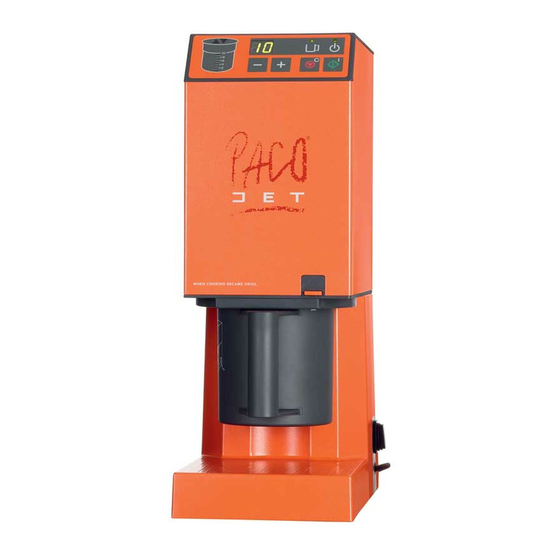
- Page 1 Pacojet Junior EN User Manual C Pacojet AG (2017)
- Page 4 Figure 2...
- Page 5 Figure 1...
- Page 8 User Manual ......................4...
-
Page 9: Table Of Contents
User Manual Table of contents About this document ................6 1.1 General information ..................6 1.2 Standards for illustrations ................6 1.3 Definition of key terms ................6 Using the Pacojet Junior ................6 Proper and improper use ................6 2.2 Aspects relating to food hygiene ...............6 Safety notes .....................7 3.1 General safety ....................7 3.2 Risk resulting from electrical current ............9 Warnings ....................9... - Page 10 Compliance with standards ...............33 11.2 EU declaration of conformity ..............33 Transport and storage ................33 12.1 Transport ....................33 12.2 Storage .......................34 Disposal ....................34 13.1 Pacojet Junior ....................34 13.1.1 Non-EU countries and countries outside Europe........34 13.1.2 European Union ..................34 13.2 Packaging ....................34 Warranty notes ..................34 Customer service ..................34...
-
Page 11: About This Document
1, 2, ... Consecutive numbers are used to present a series of consecutive steps in a process. A number inside a circle shows the a step shown in an illustration. • A bullet point at the start of a section marks the start of a list of individual aspects linked by a similar subject. Definition of key terms All main components and accessories in the Pacojet Junior that come into contact with food during the pacotizing process make up the direct food processing system. Using the Pacojet Junior Proper and improper use The Pacojet Junior is a kitchen device for commercial and private use. Pacotizing enables chefs to “micro-puree” fresh, deep-frozen foods without thawing into ultra-light mousses, naturally fresh ice creams and sorbets or aromatic soups, sauces or fillings. Any usage that goes beyond the description provided here, including the processing of other substances, can cause injuries and damage. Any improper usage as defined here is not permitted! Aspects relating to food hygiene While working with food, always observe hygiene standards and comply with any legal standards concerning food preparation. Only ever process fresh, boneless, frozen produce. Before pacotizing, produce must be frozen at a temperature of between -18 °C and -23 °C for a period of at least 24 hours. -
Page 12: Safety Notes
• The Pacojet Junior must always be used in accordance with the instructions provided in this user manual. Failure to observe this manual can result in injuries, damage to the device, and / or contamination of the food being processed. • The Pacojet Junior may only be used by persons who been instructed in how to operate it safely. • The device and its accessories must be kept away from and stored out of reach of children under the age of 8. • The device should only be used by children over the age of 8 and persons with limited physical, sensory, and mental ability if they have been instructed in how to use it and are being supervised. They must understand the risks involved in using the device. • Children must not play with the device. Children must always be supervised when cleaning the device. • The device is sealed and may only be opened, repaired, and serviced by an official service partner. • Never remove any accessories (e.g., protective and / or pacotizing beakers) while the device is running. • Only original PACOJET accessories intended for this device may be used during operation. • Never use any accessories from other devices in the Pacojet line (e.g., Pacojet 1, 2 or 2plus) if they are intended specifically for these devices. • The accessories provided must only ever be used for the purposes described in this user manual. - Page 13 • Take care when unpacking the Pacojet Junior as the device is heavy. If possible, seek assistance from another person when unpacking the device. Make sure you do not bump or injure yourself when unpacking and positioning the device. Some parts of the device have sharp edges. • The device emits noises during operation. See the emissions values in Chapter “10. Technical specifications”. • Always unplug the power supply if the device is left unsupervised for long periods of time. • Never attempt to bypass the safety switch installed on the Pacojet Junior for making sure that protective and pacotizing beakers are attached correctly. • Never start the device without a pacotizing and protective beaker. • Do not open any screwed covers or the device housing. • Never modify the device, its components, or accessories. • Before using the device for the first time, perform an initial cleaning process in accordance with Chapter “8.1.3 Initial cleaning process”. • The Pacojet Junior must never be used to process products or ingredients that release gas during processing and, as a result, cause the pressure in the pacotizing beaker to rise in an uncontrolled manner, such as liquid nitrogen (N) in its pure form or carbon dioxide (CO ) in a bound state when the product in the beaker contains carbon dioxide.
-
Page 14: Risk Resulting From Electrical Current
Risk resulting from electrical current • Before connecting the Pacojet Junior to the mains power supply, make sure that the mains voltage / frequency specified on the type plate is guaranteed. Only ever use the device with the AC current specified on the type plate. • For additional protection, we recommend installing a residual current circuit breaker with 20 mA. • If you detect any abnormalities (e.g., smoke, noises) during operation, switch off the device straight away and disconnect it from the mains (unplug the device). • Only ever use the device when it is free from technical faults. • Check the device and connecting cable for external damage before each use. Never use the device, connecting cable, and accessories if they are damaged. • If you notice any damage to the device or its accessories during operation, switch off the Pacojet Junior at the mains switch and unplug the mains plug. • Always have the device repaired by an official PACOJET service partner. Never repair the device yourself. • Never submerge the device in water. Do not expose the device to high levels of moisture. • Always unplug the power supply if the device is left unused for long periods of time. • When disconnecting the device from the mains, always take hold of the plug itself and not the connecting cable. • Never touch the connecting cable and mains plug with wet hands. • Make sure that the connecting cable does not get twisted or trapped. -
Page 15: Scope Of Delivery
Refers to a potentially dangerous situation. Failure to avoid this situation may lead to injuries. • A bullet point refers to measures that must be applied or avoided to eliminate or avoid the risk. Note Refers to a potentially dangerous situation. Failure to avoid this situation may lead to damage. • A bullet point refers to measures that must be applied or avoided to avoid damaging the device and its accessories. This symbol refers to additional information or tips on handling the device. Scope of delivery The scope of delivery comprises the following components: 1 Pacojet Junior (1) • • 1 spray guard (8), including 1 preliminary scraper (8a) • 1 pacotizing blade (9) • 1 pacotizing beaker (10) • 1 beaker lid, white (11) • 1 protective beaker (12) •... -
Page 16: Description Of The Device
The Pacojet Junior (figure 1) consists of the following elements and accessories: Item number Operating Function element / accessory Pacojet Junior Basic device Pacotizing shaft Enables the pacotizing blade to be attached securely. and blade holder Insert Enables the protective beaker to be screwed in and held securely. Enables the Pacojet Junior to be operated. Display Mains switch Switches the device on or off. “0” - Device switched off. “I” - Device switched on. Connecting cable Supplies the Pacojet Junior with power. Depressurization Enables the positive pressure produced during the button pacotizing process to be released. The device must be depressurized after each pacotizing process. Spray guard Protects the device from being splattered with food with preliminary during the pacotizing process. -
Page 17: Display
Item number Operating Function element / accessory Rinsing insert Is used in conjunction with the pacotizing blade for (green) rinsing cycles. Blue sealing ring Seals the pacotizing beaker during the cleaning process. Cleaning insert Cleans the food processing system. (blue) Is used without the pacotizing blade. Display Item Operating element Function number BEAKER Shows the current processing status: CONTENTS • Fill level of the pacotizing beaker (10) INDICATOR • Progress of the pacotizing process • Final processing status at the end of the pacotizing process Processed frozen produce is represented by a flashing bar. Unprocessed frozen produce is represented by a bar that is lit up continuously. The indicator goes out when the protective beaker (12) is removed. - Page 18 For certain types of error, this display may also contain an Error message. (See Chapter “9. Defects” on page 31). READY DISPLAY Lights up when the protective beaker (12) has been attached correctly to the device. The Pacojet Junior can now be programmed and started. POWER DISPLAY The POWER DISPLAY has two functions. 1.) A fter it is switched on, the Pacojet Junior is in “operating mode”. The device can now be programmed. 2.) I f no action is taken within 5 minutes (i.e., no buttons are operated or processes initiated), the device switches to “standby mode” and the display lights up RED. START KEY The START KEY has two functions. 1.) S witches the device from “standby mode” to “operating mode”.
-
Page 19: Getting Started
Item Operating element Function number STOP/RESET The STOP/RESET KEY has two functions. 1. Interrupt function Operating this key during the pacotizing process stops the current process. The Pacojet Junior switches to retract, the pacotizing blade (9) returns to its start position, and the device switches off automatically. This function can be used to pacotize a small quantity without any advance programming. 2. Delete function Operating the key before the start of a process deletes a pre-programmed quantity. PORTIONING These keys can be used to enter the required number KEYS “+”/“-” of portions to be processed. One pacotizing beaker (10) can hold a maximum of 10 portions. The programmed portion quantity is shown in the portion quantity indicator before and after the pacotizing process. The Pacojet Junior only processes the programmed number of portions. This quantity can be removed after processing. The produce left in the beaker can be frozen again and processed later. See also “PORTION QUANTITY INDICATOR”. -
Page 20: Checking The Scope Of Delivery
Unpack the Pacojet Junior. Remove the packaging material, adhesive strips, and protective films from the device. Store the packaging material (cardboard box and styrofoam inserts) for transport, storage, and possible returns (e.g., in the event of maintenance). Checking the scope of delivery Check the contents of the packaging to make sure all parts are complete and in a good condition (see Chapter “4. Scope of delivery” on page 10). If you notice any defects or missing accessories, please contact your PACOJET sales point or your official PACOJET service partner immediately (see Chapter “15. Customer service” on page 34). Setting up the device / underlying conditions for setup Note Damage due to overheating! A lack of ventilation may cause the device to overheat due to poor ventilation and air circulation. • Cool air must be able to be sucked into the back of the device and blown out of the bottom of the device without hindrance. • The air vents must never be obstructed or blocked. • Position the device on a safe, stable, flat, and dry surface. • Arrange the mains power cable so that it cannot be damaged by edges or hot surfaces. • The mains switch (5) must remain freely accessible Never operate the device under the following conditions: • In direct proximity to a heat source • On a vibrating base • On a hot surface •... -
Page 21: Connecting The Device To The Mains
Failure to observe the necessary specifications for electrical connections may result in damage to the device. • The Pacojet Junior must always be operated in accordance with the specifications for electrical performance listed on the type plate (see also Chapter “10. Technical specifications” on page 32). • The mains voltage must never deviate from the specified value by more than 10%. Switching the device on and off 6.5.1 Switching on the device Switch on the device by moving the mains switch (5) to position “I”. The device is in “operating mode”. The Pacojet Junior can now be programmed. 6.5.2 Standby mode If no action is taken within 5 minutes, the device switches to “standby mode”. When the “START KEY” (21) is operated, the device switches back to “operating mode”. 6.5.3 Switching off the device Switch off the device by moving the mains switch (5) to position “0”. The POWER DISPLAY (20) goes out. -
Page 22: Pacotizing Frozen Food Preparations
Pacotizing frozen food preparations Preparations Before the frozen food is pacotized, a series of preparations have to be completed. Complete the following steps: Fill the pacotizing beaker(s) (10) with the food to be processed. Fill any empty space with liquid (water, stock, etc.). Do not fill the pacotizing beaker above the maximum beaker fill line. Note Damage to property caused by incorrect filling of the pacotizing beaker! max. • Never exceed the maximum fill line (see marking). • Remember that the food preparation could potentially expand during processing. • There must not be any air pockets in the prepared food preparation. • The surface must be smooth and flat. Close the pacotizing beaker (10) with the supplied beaker lid (11) and leave the contents in a freezer at a temperature of -18 °C to -23 °C for at least 24 hours. -23°C Make sure that the pacotizing beaker is positioned upright in the freezer so that the surface of the pacotizing beaker freezes flat. -
Page 23: Pacotizing
Pacotizing Switch on the Pacojet Junior at the mains switch (5): the device switches to “operating mode”. The Pacojet Junior is ready for use. If the device is in “standby mode”, operate the “START KEY” to switch to “operating mode”. Caution Risk of injury due to incorrect handling of the pacotizing blade! • Never touch the sharp edges of the pacotizing blade (9). • Always hold the pacotizing blade with two fingers at the corners between the blades! Insert the pacotizing blade (9) into the spray guard (8) by inserting the head of the pacotizing blade into the hole in the spray guard. While doing so, make sure that the flat side of the spray guard is pointing downwards towards the pacotizing blade. Before completing this step, make sure that the preliminary scraper (8a) is attached to the spray guard and that the lip of the scraper is pointing towards the pacotizing blade. Note Damage to property caused by incorrect attachment of the pacotizing blade to the spray guard! • Never attach the combination of the pacotizing blade (9) and spray guard (8) to the protective beaker (12) / pacotizing beaker (10) before... - Page 24 Damage to the device and accessories due to food not being fully frozen! • The food preparation must not have started to thaw. • Make sure that the food preparation in the beaker has frozen evenly at between -18 °C and -23 °C for at least 24 hours and sticks firmly to the pacotizing beaker. Remove the pacotizing beaker (10) containing the frozen food preparation from the freezer. Remove the beaker lid (11). Insert the pacotizing beaker into the protective beaker (12). Note Damage to property caused by incorrect use of the protective / pacotizing beakers! • Never attach the protective beaker (12) without first inserting the pacotizing beaker (10). Attach the protective beaker (12) with the pacotizing beaker (10) to the Pacojet Junior. To do this, slide the upright protective beaker with pacotizing beaker upwards into the rounded mold on the base to center it Start this step by making sure that the handle is pointing to the right in the starting position and that the top of the pacotizing beaker is flat on the device. Turn the protective beaker from right to left approximately 90° to the left until the stop in the holder ( The handle will point forwards when the protective beaker is attached correctly.
- Page 25 Select the number of portions you wish to process. Use the PORTIONING KEYS (23) for this purpose. See also Chapter “5.3 Display” on page 12. Remember that the device needs to be in “operating mode” (see “START KEY” on page 13). Start the pacotizing process by pressing the START KEY (21). The motor starts and sets the pacotizing shaft, blade holder (2), and pacotizing blade (9) in motion. You can track the pacotizing blade’s vertical motion using the UP/DOWN DISPLAY (17). Any portions already processed are indicated by the flashing BEAKER CONTENTS INDICATOR (16). Unprocessed portions are represented by a bar that is lit up continuously. Once the pacotizing process is complete, the pacotizing shaft and blade holder (2) retracts with the pacotizing blade to the start position and comes to a stop. The motor switches off. If necessary, the pacotizing process can be interrupted or halted at any time by operating the RESET/STOP key (22). In this case, the pacotizing shaft (2) retracts to the start position. See also Chapter “5.3 Display” on page 12.
-
Page 26: Overfill Protection
Overfill protection During the pacotizing process, the volume of the frozen content in the beaker can expand by up to 30%. As a result, the food preparation in the pacotizing beaker must not be filled higher than the maximum beaker fill line (see Chapter “7.1 Preparations” on page 17). To limit the consequences of overfilling, the Pacojet Junior is equipped with a control and assistance function. The error P0 is emitted if the beaker is overfilled. The device pacotizes the mixture up to the fill limit and then retracts the shaft to the start position. The error is displayed until the beaker is removed. Despite the presence of this control and assistance function, users are required to comply with the maximum fill quantity of the pacotizing beaker at all times. After pacotizing When the device has switched itself off automatically, complete the following steps: Depressurize the pressurized pacotizing beaker (10). To do this, press and hold the DEPRESSURIZATION BUTTON (7) until all of the pressure has been released. Remove the protective beaker (12) with the pacotizing beaker (10). To do this, turn the protective beaker approximately 90° to the right and into the start position (handle pointing right) and slide it out at the bottom The spray guard (8) and pacotizing blade (9) will be attached to the protective beaker. Remove the spray guard (8) and pacotizing blade (9) from the pacotizing beaker by pulling lightly on one of the three tabs on the spray guard. -
Page 27: Refreezing
If you do not plan to use the Pacojet Junior again straight away, complete a rinsing cycle. See Chapter “8.1.4 Rinsing cycle” on page 25 for information on this process. Refreezing If there is any unpacotized mixture left in the beaker, the pacotizing beaker (10) can be frozen again at a temperature between -18 °C and -23 °C. To do this, the surface of the food preparation must smoothed flat. Then seal the pacotizing beaker with a beaker lid (11) and immediately return the beaker to the freezer in an upright position. Cleaning and maintenance Cleaning the Pacojet Junior Cleaning is particularly important because the Pacojet Junior is a food processing device. It is especially important when working with animal proteins and fats (milk, meat, fish, etc.). Consistent application of the cleaning regulations and processes described below is particularly important for: • Guaranteeing a high quality product Extending the Pacojet Junior’s service life • • Preventing the build-up of germs in the device and therefore guaranteeing the necessary hygiene standards Failure to observe the cleaning regulations will also reduce maintenance intervals. -
Page 28: Cleaning Cycles / When To Clean
Note Damage due to improper cleaning. • Never submerge the Pacojet Junior in water. • Never hold the Pacojet Junior under running water. • Never hose down the Pacojet Junior with a hose, steam cleaner, or similar. The Pacojet Junior is designed in a way that allows the direct food processing system (all components that come into contact with food) to undergo a complete cleaning process without the device having to be dismantled. The cleaning process is more or less completely automatic. 8.1.1 Cleaning cycles / when to clean The Pacojet Junior has two cleaning cycles which must be carried out in certain situations. • Rinsing cycle: In this cycle, the green rinsing insert (13) and pacotizing blade (8) are used to remove general food residue. • Cleaning cycle: In this cycle, the system is subjected to a full, hygienic clean. The cleaning cycle is made up of three steps:... -
Page 29: Cleaning Agents
• Never use toxic cleaning agents. Note Risk of damage caused by the use of unsuitable cleaning agents. • Never use foaming cleaning agents. • Never use harsh, corrosive cleaning agents (risk of dissolving aluminum, plastic, and rubber components). For the best possible hygienic cleaning results, always use a non-foaming disinfectant that has been approved for use with food. The following cleaning agent is an example of a product suitable for cleaning the Pacojet Junior: • Steinfels Easy MIC alkaline. Please contact your PACOJET sales point or your official PACOJET service partner for information about suitable cleaning agents. 8.1.3 Initial cleaning process The Pacojet Junior and its accessories must be cleaned before the device is used for the first time. Thoroughly rinse the accessories (spray guard (8), pacotizing blade (9), pacotizing beaker (10), beaker lid (11), protective beaker (12), rinsing insert (green) (13), blue sealing ring (14), and cleaning insert (blue) (15) with hot water using a commercially available washing-up liquid. After cleaning, remove any leftover cleaning agent. Furthermore, a complete cleaning cycle is also mandatory (see “8.1.5 Cleaning cycle” on page 27). -
Page 30: Rinsing Cycle
8.1.4 Rinsing cycle Complete the following steps: Switch on the Pacojet Junior at the mains switch (5). The device switches to “operating mode”. The device is ready for operation. If the device is in “standby mode”, operate the “START KEY” to switch to “operating mode”. Insert the empty pacotizing beaker (10) into the protective beaker (12). Caution Risk of injury due to incorrect handling of the pacotizing blade! • Never touch the sharp edges of the pacotizing blade (9). • Always hold the pacotizing blade with two fingers at the corners between the blades! Insert the pacotizing blade (9) into the rinsing insert (13) by inserting its hollow component into the hole in the rinsing insert. While doing so, make sure that the flat side of the rinsing insert is pointing downwards towards the pacotizing blade. - Page 31 Note Damage to the device and accessories due to incorrect attachment of the rinsing insert and pacotizing blade. • Never attach the combination of the rinsing insert (13) and pacotizing blade (9) to the protective beaker (12) / pacotizing beaker (10) before rinsing. This can result in damage to the device and its accessories! • Always attach the combination of the rinsing insert and pacotizing blade to the blade holder on the pacotizing shaft (2) before attaching the protective beaker. Secure the combination of the rinsing insert (13) and pacotizing blade (9) to the blade holder (2) on the pacotizing shaft. The blade holder must engage and hold the pacotizing blade and rinsing insert securely. You will hear a clicking noise when the pacotizing blade is secured properly. Fill the pacotizing beaker (10) with warm water (approx. 58 °C) until it reaches about 2 cm below the top of the 2 cm beaker. ~ 58°C Note Damage to property caused by incorrect use of the protective / pacotizing beakers! •...
-
Page 32: Cleaning Cycle
Attach the protective beaker (12) with the pacotizing beaker (10) to the Pacojet Junior. To do this, slide the upright protective beaker with pacotizing beaker upwards into the rounded mold on the base to center it Start this step by making sure that the handle is pointing to the right in the starting position and that the top of the pacotizing beaker is flat on the device. Turn the protective beaker from right to left approximately 90° to the left until the stop in the holder The handle will point forwards when the protective beaker is attached correctly. Press the START KEY (21). The rinsing cycle starts. Remember that the device needs to be in “operating mode” for this (see “START KEY” on page 13). During the rinsing cycle, you can press the depressurization button (7) to rinse the depressurization hose. To do this, press the depressurization button while the pacotizing shaft (2) is moving up . Make sure that you hold a container at the end of the depressurization hose in order to catch the rinse water that sprays out At the end of the rinsing cycle (the motor stops), remove the protective beaker (12) with the pacotizing beaker (10). To do this, turn the protective beaker approximately 90° to the right and slide it out at the bottom The rinsing insert (13) and pacotizing blade (9) will be attached to the protective beaker. 8.1.5 Cleaning cycle Complete the following steps: Rinsing cycle Rinse the device as described in Chapter “8.1.4 Rinsing cycle” on page 25. - Page 33 Cleaning cycle Insert the empty pacotizing beaker (10) into the protective beaker (12). Place the blue cleaning insert (15) into the pacotizing beaker (10) with the brushes pointing upwards. Then place the blue sealing ring (14) onto the pacotizing beaker. Fill the pacotizing beaker (10) with warm water (approx. 58 °C) until it reaches the bottom edge of the brushes. Add the specified quantity of cleaning agent (see Chapter “8.1.2 Cleaning agents” on page 24). Attach the protective beaker (12) with the pacotizing beaker (10) to the Pacojet Junior. To do this, slide the upright protective beaker with pacotizing beaker upwards into the rounded mold on the base to center it Start this step by making sure that the handle is pointing to the right in the starting position and that the top of the pacotizing beaker is flat on the device. Turn the protective beaker from right to left approximately 90° to the left until the stop in the holder The handle will point forwards when the protective beaker is attached correctly. Note Risk of damage caused by using the wrong accessories! • Never use the pacotizing blade (9) for the cleaning cycle.
-
Page 34: Cleaning The Surface Of The Device
Press the START KEY (21). The cleaning cycle starts. Remember that the device needs to be in “operating mode” for this (see “START KEY” on page 13). During the cleaning cycle, you can press the depressurization button (7) to rinse the depressurization hose. To do this, press the depressurization button while the pacotizing shaft (2) is moving up . Make sure that you hold a container at the end of the depressurization hose in order to catch the water that sprays out At the end of the rinsing cycle (the motor stops), remove the protective beaker (12) with the pacotizing beaker (10). To do this, turn the protective beaker approximately 90° to the right and slide it out at the bottom Remove the blue cleaning insert (15) and the blue sealing ring (14) . Empty the pacotizing beaker. Rinsing cycle Rinse the device as described in Chapter “8.1.4 Rinsing cycle” on page 25. 8.1.6 Cleaning the surface of the device The device’s cladding and base can be wiped down with a non-fuzzing cloth and commercially available cleaning agent. 8.1.7 Cleaning the accessories The components included in the following list can be cleaned in a dishwasher: • Spray guard (8) • Pacotizing blade (9) • Pacotizing beaker (10) • Protective beaker (12) •... -
Page 35: Maintenance
Place into a cleaning solution (see Chapter “8.1.2 Cleaning agents” on page 24) to kill off any germs. Then rinse off under running water or in the dishwasher. Due to its dimensional stability, the beaker lid (11) can only be used in certain dishwashers. It is resistant to temperatures between −25 °C and +85 °C. Please check the temperature used by your dishwasher before cleaning the beaker lid. Caution Risk of injury due to incorrect handling of the pacotizing blade! • Never touch the sharp edges of the pacotizing blade (9). • Always hold the pacotizing blade with two fingers at the corners between the blades! Because the pacotizing blade (9) is only stainless to a limited extent, it should be handled in the same way as a meat grinder blade to prevent the possible build-up of rust. The pacotizing blade is easy to lubricate when it has been cleaned. To do this, use a grease or oil that is approved for use with food. Furthermore, the preliminary scraper (8a) should be removed from the spray guard (8) on a regular basis so that both components can be cleaned properly and checked for damage. When placing the preliminary scraper back into the spray guard, make sure that the lip of the preliminary scraper points towards the pacotizing beaker (the spray guard’s flat bottom). Maintenance We recommend having the Pacojet Junior serviced by an official PACOJET service partner at least once a year (after around 2,000 fully processed beakers) (see Chapter “15. Customer service” on page 34). In order to guarantee a quick and seamless service process, we recommend organizing service appointments with your official PACOJET service partner in advance. What’s more, we also recommend returning the Pacojet Junior in its original packaging along with the pacotizing blade (9), the protective beaker (12), and the spray guard (8). -
Page 36: Defects
Defects If the measures described below do not successfully rectify the problem or if your issue is not described in the list below, please contact your official PACOJET service partner (see Chapter “15. Customer service” on page 34). Problem Cause Measure The Pacojet Junior stops The device has overloaded. Switch off the device at the even though the required (Overloading normally occurs mains switch (5) and then quantity has not been if a food preparation recipe switch it back on again after processed, either in full or cannot be processed.) approx. 5 seconds. in part. If the portion quantity The portion quantity indicator no longer shows indicator (18) shows “EE”. “EE”, you can start processing further beakers straight away. If the portion quantity indicator still shows “EE” when the device is switched back on, the mechanical overload protection mechanism has been activated. Contact your official PACOJET service partner. The Pacojet is not... -
Page 37: Technical Specifications
Mains voltage PJJE 220-240 V/50 Hz PJJK 220 V/60 Hz Positive pressure approx. 1 bar Transfer of power Belt drive gearbox Noise emissions Sound pressure level (LPA) 78.1 db(A) Dimensions (mm) 498 x 182 x 360 (Height x Width x Depth) Weight (kg) Pacojet Junior (1) 12.90 Spray guard (8) 0.09 Pacotizing blade (9) 0.06 Pacotizing beaker (10) 0.35 Beaker lid (11) 0.01 Protective beaker (12) 0.30 Rinsing insert (13) 0.10 Sealing ring (14) 0.03 Cleaning insert (15) 0.13... -
Page 38: Certification
Materials Pacotizing shaft and blade Stainless steel holder (2) Spray guard (8) Nitrile rubber, food safe Standard pacotizing blade (9) Cast steel Pacotizing beaker (10) Stainless steel Beaker lid (11) Polypropylene, food safe Protective beaker (12) Polyamide (15%, glass fiber reinforced) Rinsing insert, green (13) Nitrile rubber, food safe Blue sealing ring (14) Nitrile rubber, food safe Cleaning insert, blue (15) Plastic Certification 11.1 Compliance with standards Please refer to insert. 11.2 EU declaration of conformity (Copy of EU declaration of conformity) Transport and storage 12.1 Transport Note Damage due to improper transportation! -
Page 39: Storage
12.2 Storage Store the Pacojet Junior in a dry, dust-free, and cool location. Position the device on a stationary, stable surface so that it sits securely. Protect the Pacojet Junior from direct sunlight. To make sure it is protected as safely as possible, store the device in its original packaging when not in use. Disposal 13.1 Pacojet Junior 13.1.1 Non-EU countries and countries outside Europe Never dispose of electrical devices with household waste. Always collect these up separately and have them recycled in an environmentally friendly process. Always observe national and regional requirements for waste disposal when disposing of the device. Contact your local authorities or disposal companies if necessary. 13.1.2 European Union Do not dispose of the Pacojet Junior with household waste. Dispose of the device in accordance with the provisions of the European Directive “2002/96/EC on Waste Electrical and Electronic Equipment” and its application in national laws. Electrical devices / tools that are no longer fit for use must be collected up and recycled in an environmentally friendly process by a collection point. 13.2 Packaging Keep the original packaging material (cardboard box and styrofoam inserts) throughout the Pacojet Junior’s entire product life. It provides the required level of protection for... - Page 40 Switzerland PACOJET AG (Corporate headquarters) Bundesstrasse 9 CH-6300 Zug Switzerland Website www.pacojet.com Email info@pacojet.com...
- Page 41 Pacojet AG Bundesstraße 9 CH-6300 Zug Switzerland Tel .: +41 41 710 25 22 Fax.: +41 41 710 25 38 E-Mail: info@pacojet.com www.pacojet.com...
Need help?
Do you have a question about the Junior and is the answer not in the manual?
Questions and answers