Table of Contents
Advertisement
Quick Links
Advertisement
Table of Contents

Related Manuals for Proton SL mini 1220

Summary of Contents for Proton SL mini 1220
- Page 1 SL mini and SLR mini Series Speed and Length Gauges Issue 1s 5 December 2016 Proton Products International Ltd. www.protonproducts.com Page 1 of 126 Proton Products SL mini and SLR mini Series Speed and Length Gauges Instruction Manual - issue 1s...
-
Page 2: Table Of Contents
NABLE ......33 HUTTER ONTROL WITCH HUTTER NABLE NPUT AND HUTTER TATE UTPUT SHUT_EN input electrical specifications ...................... 33 Page 2 of 126 Proton Products SL mini and SLR mini Series Speed and Length Gauges Instruction Manual - issue 1s... - Page 3 Logic inputs connection ..........................86 Logic inputs configuration ........................... 87 ..........................91 OGIC UTPUTS Logic outputs connection ..........................91 Page 3 of 126 Proton Products SL mini and SLR mini Series Speed and Length Gauges Instruction Manual - issue 1s...
- Page 4 ............................126 EB SITE ........................126 NQUIRIES AND SALES .......................... 126 ERVICE ENQUIRIES ............126 ANUAL FEEDBACK AND COPYRIGHT Page 4 of 126 Proton Products SL mini and SLR mini Series Speed and Length Gauges Instruction Manual - issue 1s...
-
Page 5: Declaration Of Conformity (Ce)
The manufacturer of the above named equipment is: Proton Proton Products is an ISO9001:2008 registered company. The declaration is signed by: ……………………… Paul Alexander Sives Page 5 of 126 Proton Products SL mini and SLR mini Series Speed and Length Gauges Instruction Manual - issue 1s... -
Page 6: Declaration Of Conformity (Csa)
The manufacturer of the above named equipment is: Proton Proton Products is an ISO9001:2008 registered company. The declaration is signed by: ……………………… Paul Alexander Sives Page 6 of 126 Proton Products SL mini and SLR mini Series Speed and Length Gauges Instruction Manual - issue 1s... -
Page 7: Laser Safety Parameters
LASER S AFETY P ARAMETERS www.protonproducts.com Proton Products SL mini and SLR mini series laser speed and length gauges emit laser radiation with the following parameters: Parameter Model Minimum Typical Maximum Units Wavelength Beam diameter Spot size at standoff distance... -
Page 8: Introduction
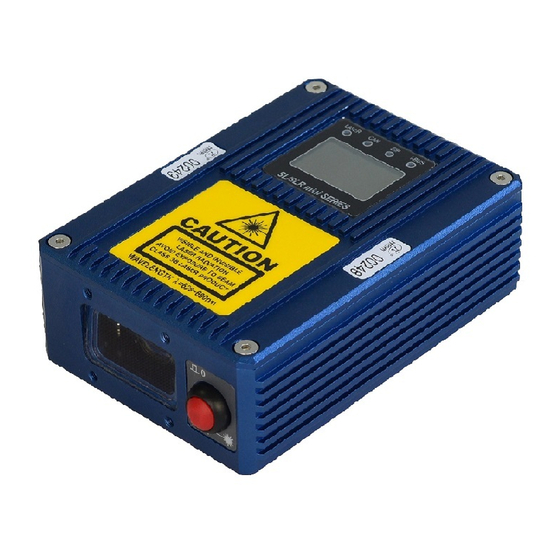
NTRODUCTION The Proton Products SL mini and SLR mini series of laser speed and length gauges provide highly- accurate, non-contact speed and length measurement. SL mini series gauges offer speed and length measurement for unidirectional production lines. SLR mini series gauges offer speed and length measurement for bidirectional production lines. The gauge senses the direction of motion and will automatically increment or decrement the length accordingly. -
Page 9: Specifications
Pulse outputs end-user configurable as: 2× independent pulse outputs 1× quadrature output Laser safety Laser enable input Open shutter input Page 9 of 126 Proton Products SL mini and SLR mini Series Speed and Length Gauges Instruction Manual - issue 1s... - Page 10 **CAN-bus protocol is proprietary and reserved for connection to other Proton Products equipment such as a CDI interface display unit. Page 10 of 126 Proton Products SL mini and SLR mini Series Speed and Length Gauges Instruction Manual - issue 1s...
-
Page 11: Dimensional Drawings
IMENSIONAL RAWINGS Page 11 of 126 Proton Products SL mini and SLR mini Series Speed and Length Gauges Instruction Manual - issue 1s... -
Page 12: Annotated Drawings
Optional air wipe / beam enclosure tube mounting holes (×4) Optical window Laser shutter control switch Switch status Laser shutter status Laser beam status Closed Blocked Open Emitting Page 12 of 126 Proton Products SL mini and SLR mini Series Speed and Length Gauges Instruction Manual - issue 1s... -
Page 13: Rear View
Nitrogen gas purge port (for factory use only; any attempt to open or connect to this port will invalidate the product warranty) Page 13 of 126 Proton Products SL mini and SLR mini Series Speed and Length Gauges Instruction Manual - issue 1s... -
Page 14: Led Indicators
Signal-to-Noise Ratio Reset button Press to reset the length to zero. Pause button Press to pause the speed measurement. Page 14 of 126 Proton Products SL mini and SLR mini Series Speed and Length Gauges Instruction Manual - issue 1s... -
Page 15: Optional Accessories
00041CB001 CAN 9DD_005M 00041CB005 CAN 9DD_010M 00041CB010 CAN 9DD_020M 00041CB020 CAN 9DD_040M 00041CB040 CAN 9DD_060M 00041CB060 CAN 9DD_100M 00041CB100 Page 15 of 126 Proton Products SL mini and SLR mini Series Speed and Length Gauges Instruction Manual - issue 1s... - Page 16 For connecting the RS232 port of the PSU-BOB mini to the 7″ Touch Screen PC. Length: 1.8m. Proton part number GP00000624 Page 16 of 126 Proton Products SL mini and SLR mini Series Speed and Length Gauges Instruction Manual - issue 1s...
-
Page 17: Power
Provides screw terminal access to all electrical input and output pins. End user cables are sealed with cable glands. Proton part number 00050MC039 Page 17 of 126 Proton Products SL mini and SLR mini Series Speed and Length Gauges Instruction Manual - issue 1s... -
Page 18: Communications
SL/SLR mini gauge to the measured object. Provides ±3° of roll and yaw adjustment. Proton part number 00050MC044 Page 18 of 126 Proton Products SL mini and SLR mini Series Speed and Length Gauges Instruction Manual - issue 1s... -
Page 19: Protection
1 - 5 μm solid particle count Water vapour pressure dew point °C Oil aerosol and vapour 0.01 mg / m Page 19 of 126 Proton Products SL mini and SLR mini Series Speed and Length Gauges Instruction Manual - issue 1s... -
Page 20: Cooling
Air or water cooled plate for installation between the gauge and mounting surface. For use in ambient temperatures up to 60°C. Proton part number 00050MC031 Page 20 of 126 Proton Products SL mini and SLR mini Series Speed and Length Gauges Instruction Manual - issue 1s... -
Page 21: Installation
The gauge is factory-purged with dry nitrogen gas to prevent condensation on the internal optics; opening of the gas purge ports (indicated below) will invalidate the gauge warranty. Page 21 of 126 Proton Products SL mini and SLR mini Series Speed and Length Gauges Instruction Manual - issue 1s... -
Page 22: Periodic Maintenance
Contain laser beam paths with laser guards which have closure switches wired to the SHUT_EN input so that the laser shutter is closed Page 22 of 126 Proton Products SL mini and SLR mini Series Speed and Length Gauges Instruction Manual - issue 1s... -
Page 23: Optical Windows
If the optical window requires cleaning, then refer to the cleaning procedure detailed below to minimise the risk of scratching the windows. Page 23 of 126 Proton Products SL mini and SLR mini Series Speed and Length Gauges Instruction Manual - issue 1s... -
Page 24: Optical Window Cleaning Procedure
NSTALLATION SEQUENCE Unpack the gauge and check for missing accessories and shipping damage. Mechanical installation: 1. Mount the gauge securely either on a user supplied mount or on an optional Proton Products mounting plate. Electrical installation: 1. Install earth connections. -
Page 25: Mechanical Installation
Stand-off distance / mm Depth-of-field / mm SL mini 1220 SLR mini 1220 SL mini 3060 SLR mini 3060 Page 25 of 126 Proton Products SL mini and SLR mini Series Speed and Length Gauges Instruction Manual - issue 1s... -
Page 26: Object Stabilisation
Incorrect Correct The end-user must provide suitable mechanisms for guiding and stabilising the motion of the measured object. Page 26 of 126 Proton Products SL mini and SLR mini Series Speed and Length Gauges Instruction Manual - issue 1s... -
Page 27: Optical Alignment
Ideal saturation for highly-reflective objects) 90° 90° 90° Incorrect Gauge Alignment Roll cosine error Yaw cosine error α 90° Page 27 of 126 Proton Products SL mini and SLR mini Series Speed and Length Gauges Instruction Manual - issue 1s... - Page 28 -0.001 0.50 0.999962 -0.004 0.75 0.999914 -0.009 0.999848 -0.015 0.999391 -0.061 0.998630 -0.137 0.997564 -0.244 0.996195 -0.381 0.984808 -1.519 Page 28 of 126 Proton Products SL mini and SLR mini Series Speed and Length Gauges Instruction Manual - issue 1s...
-
Page 29: Easurement Irection
DW12.12 logic input [Up] Inactive Positive Incrementing Positive Incrementing Down Active Negative Decrementing Negative Decrementing [ ] factory-default setting Page 29 of 126 Proton Products SL mini and SLR mini Series Speed and Length Gauges Instruction Manual - issue 1s... -
Page 30: Slr Mini Bidirectional Speed And Length Gauge
Mounting surface flatness (machined flat and even) 0.15 M5 mounting hole depth (do not allow bolts to bottom out) M5 mounting bolt torque Page 30 of 126 Proton Products SL mini and SLR mini Series Speed and Length Gauges Instruction Manual - issue 1s... -
Page 31: Electrical Installation
Ensure that the shields of cables connecting to the end user’s equipment are clamped to earth at their destination. Page 31 of 126 Proton Products SL mini and SLR mini Series Speed and Length Gauges Instruction Manual - issue 1s... -
Page 32: Laser Enable
(0V) Connection Laser diode state Laser LSR_EN Laser enable Open Off (no emission) enable Connected to DGND On (emission) Page 32 of 126 Proton Products SL mini and SLR mini Series Speed and Length Gauges Instruction Manual - issue 1s... -
Page 33: Shutter Control Switch , Shutter Enable Input And Shutter State Output
Shutter Shutter Open Emitting SHUT_EN connected to DGND control control input High state (logic 1) / Closed Blocked unconnected Page 33 of 126 Proton Products SL mini and SLR mini Series Speed and Length Gauges Instruction Manual - issue 1s... -
Page 34: Shut_St Output Electrical Specifications
The SHUT_ST output must NOT be used to directly drive high-current or inductive loads. It is recommended that the SHUT_ST output is used to drive an opto-isolated solid-state relay. Page 34 of 126 Proton Products SL mini and SLR mini Series Speed and Length Gauges Instruction Manual - issue 1s... - Page 35 Specification Minimum Typical Maximum Units Logic output to DGND voltage Current Page 35 of 126 Proton Products SL mini and SLR mini Series Speed and Length Gauges Instruction Manual - issue 1s...
-
Page 36: Power Supply
The gauge has no power switch; it may be powered off by switching off or disconnecting the power supply to the unit. Page 36 of 126 Proton Products SL mini and SLR mini Series Speed and Length Gauges Instruction Manual - issue 1s... -
Page 37: Configuration
Click “Next >” to proceed with the icon on the supplied USB flash memory drive installation. (“x.yy” will depend on the software version). Page 37 of 126 Proton Products SL mini and SLR mini Series Speed and Length Gauges Instruction Manual - issue 1s... -
Page 38: Connection And Software Start Up
Note: For gauges communicating over either optional EtherNet/IP or PROFINET communications interfaces, only input and output parameters DW0 to DW31 are visible to the PCiS software. Page 38 of 126 Proton Products SL mini and SLR mini Series Speed and Length Gauges Instruction Manual - issue 1s... - Page 39 “9600”) from the drop-down menus: If using the “Ethernet” interface, enter the IP address of the gauge: “EIP/PROFINET” Page 39 of 126 Proton Products SL mini and SLR mini Series Speed and Length Gauges Instruction Manual - issue 1s...
- Page 40 If using the “EIP/PROFINET” interface, enter the IP address of the gauge and select “Big- Endian” or “Little-Endian” data format (the factory-default is “Big-Endian”): Click the “OK” button to proceed. Page 40 of 126 Proton Products SL mini and SLR mini Series Speed and Length Gauges Instruction Manual - issue 1s...
-
Page 41: Wifi Configuration
When prompted to input a password, enter “65000” then click the “OK” button: Click the “’WIFI” button on the Communication Setting page: Page 41 of 126 Proton Products SL mini and SLR mini Series Speed and Length Gauges Instruction Manual - issue 1s... - Page 42 Note: To restore the gauge to factory-default network settings, click the “Default” button. See the table above for the factory-default values. Page 42 of 126 Proton Products SL mini and SLR mini Series Speed and Length Gauges Instruction Manual - issue 1s...
- Page 43 Open the Status window for the PC’s WIFI adapter and click the “Properties” button. Page 43 of 126 Proton Products SL mini and SLR mini Series Speed and Length Gauges Instruction Manual - issue 1s...
- Page 44 Check the tick box next to “Enable Federal Information Processing Standards (FIPS) compliance for this network” then click the “OK” button. Page 44 of 126 Proton Products SL mini and SLR mini Series Speed and Length Gauges Instruction Manual - issue 1s...
-
Page 45: Pc I S_Sl Mini Main Page
Click to enter “Preset Length β” at which the corresponding logic output is activated. Preset Length 2 The bar graph indicates the measured length relative to this preset. Page 45 of 126 Proton Products SL mini and SLR mini Series Speed and Length Gauges Instruction Manual - issue 1s... -
Page 46: Trend Graph
Double-click on the graph to open it in a larger window: Double-click on the graph to return to the main page. Page 46 of 126 Proton Products SL mini and SLR mini Series Speed and Length Gauges Instruction Manual - issue 1s... -
Page 47: Context Menu
Save an image of the graph to a file: Save Image As… Open the “Page Setup” dialog box for printing the graph: Page Setup… Page 47 of 126 Proton Products SL mini and SLR mini Series Speed and Length Gauges Instruction Manual - issue 1s... -
Page 48: Settings
Halt graph update. refresh Start Resume graph update. Settings Click the “OK” button to return to the main page. Page 48 of 126 Proton Products SL mini and SLR mini Series Speed and Length Gauges Instruction Manual - issue 1s... - Page 49 Click to enter the maximum value for this axis. Minimum Click to enter the minimum value for this axis. Page 49 of 126 Proton Products SL mini and SLR mini Series Speed and Length Gauges Instruction Manual - issue 1s...
- Page 50 Set the time interval at which data is updated on the graph; a shorter time interval will result Update interval in a more detailed graph, whilst a longer time interval is clearer at showing long-term trends. Page 50 of 126 Proton Products SL mini and SLR mini Series Speed and Length Gauges Instruction Manual - issue 1s...
-
Page 51: Measurement Configuration
When prompted, enter 6γ000 for the password and click the “OK” button: Configure the gauge as required and click the “Exit” button when complete: Page 51 of 126 Proton Products SL mini and SLR mini Series Speed and Length Gauges Instruction Manual - issue 1s... - Page 52 0.000 0.0000 See the section below for information on “Object [OFF] Object 0.11 Detection” mode. Detection Page 52 of 126 Proton Products SL mini and SLR mini Series Speed and Length Gauges Instruction Manual - issue 1s...
- Page 53 “Preset Speed”. Page 53 of 126 Proton Products SL mini and SLR mini Series Speed and Length Gauges Instruction Manual - issue 1s...
-
Page 54: Normal Operation Mode
DW6-7 and DW12-13 respectively. The current segment number may be read from output parameter DW10. Page 54 of 126 Proton Products SL mini and SLR mini Series Speed and Length Gauges Instruction Manual - issue 1s... -
Page 55: Object Detection Mode
Maximum leading edge reaction Line speed time: 1ms delay after the object blocks the laser beams) Object detected Line speed Page 55 of 126 Proton Products SL mini and SLR mini Series Speed and Length Gauges Instruction Manual - issue 1s... - Page 56 When an object is not detected, the gauge will NOT hold the last speed measurement (or accumulate length). Page 56 of 126 Proton Products SL mini and SLR mini Series Speed and Length Gauges Instruction Manual - issue 1s...
-
Page 57: Standard Communications Interfaces
CANbus low CAN-bus LED indicator LED status Indication Flashing green Online CAN-bus communications Flashing red Communication error Extinguished No communication Page 57 of 126 Proton Products SL mini and SLR mini Series Speed and Length Gauges Instruction Manual - issue 1s... -
Page 58: Can-Bus Configuration
Click the “Comms” button on the main page: When prompted, enter 65000 for the password and click the “OK” button: Page 58 of 126 Proton Products SL mini and SLR mini Series Speed and Length Gauges Instruction Manual - issue 1s... - Page 59 Input parameters Comment Unit Range/Remark Default CAN address 0~255 0=250 1=500 CAN baud rate 2=1000 other=500 0=Off CAN terminator 1=On Page 59 of 126 Proton Products SL mini and SLR mini Series Speed and Length Gauges Instruction Manual - issue 1s...
-
Page 60: Communications
Cable length range / m Maximum Baud rate / s 115200 38400 19200 9600 4800 Page 60 of 126 Proton Products SL mini and SLR mini Series Speed and Length Gauges Instruction Manual - issue 1s... -
Page 61: Rs-232 Communications Configuration
Click the “Comms” button on the main page: When prompted, enter 65000 for the password and click the “OK” button: Page 61 of 126 Proton Products SL mini and SLR mini Series Speed and Length Gauges Instruction Manual - issue 1s... -
Page 62: Rs-232 Printing
Ensure that the RS-232 baud rate (input parameter DW23) is configured to the same value as set on the printer (9600 by default). Page 62 of 126 Proton Products SL mini and SLR mini Series Speed and Length Gauges Instruction Manual - issue 1s... - Page 63 Connect the PC to the Zebra ZM400 printer using the USB cable supplied with the printer. Run the “Zebra Designer” software and open the “PROTON.lbl” sample label layout file: Page 63 of 126 Proton Products SL mini and SLR mini Series Speed and Length Gauges Instruction Manual - issue 1s...
- Page 64 The label layout must be designed to accommodate the above 3 strings in sequence: Export the “PROTON.lbl” file to the Zebra ZM400 printer by clicking “File → Export to Printer” in the “Zebra Designer” software and then selecting “Internal Flash” and clicking the “OK” button: The Zebra ZM400 printer may be triggered to print a ticket by activating the “End of Reel”...
-
Page 65: Proton Standard Rs232 Parameter Access Protocol
Line feed Request Format β: (e.g.: ?β β ‘ENTER’) Input Parameter number Space Length of string Carriage return Line feed Page 65 of 126 Proton Products SL mini and SLR mini Series Speed and Length Gauges Instruction Manual - issue 1s... - Page 66 The request and reply format is identical to the # format given below except that # is replaced by ~. Page 66 of 126 Proton Products SL mini and SLR mini Series Speed and Length Gauges Instruction Manual - issue 1s...
-
Page 67: Modbus Parameter Access Protocol
Number of data bits Parity Number of stop bits Flow control Default baud rate None None 9600 bit / s Page 67 of 126 Proton Products SL mini and SLR mini Series Speed and Length Gauges Instruction Manual - issue 1s... - Page 68 Preset data Preset data (Input parameter value) (Input parameter value) byte byte The response is an echo of the query. Page 68 of 126 Proton Products SL mini and SLR mini Series Speed and Length Gauges Instruction Manual - issue 1s...
- Page 69 (corresponds to input DW3) byte The response contains the starting input parameter address and the count of input parameter words written. Page 69 of 126 Proton Products SL mini and SLR mini Series Speed and Length Gauges Instruction Manual - issue 1s...
- Page 70 The response contains the output parameter values requested in the query; its length is dependent on the number of output parameters requested. Page 70 of 126 Proton Products SL mini and SLR mini Series Speed and Length Gauges Instruction Manual - issue 1s...
-
Page 71: Ethernet Communications
Online and connected Ethernet communications Flashing green Online but not connected Continuous red Critical link failure Flashing red Connection timeout Page 71 of 126 Proton Products SL mini and SLR mini Series Speed and Length Gauges Instruction Manual - issue 1s... -
Page 72: Ethernet Configuration
Click the “Comms” button on the main page: When prompted, enter 65000 for the password and click the “OK” button: Page 72 of 126 Proton Products SL mini and SLR mini Series Speed and Length Gauges Instruction Manual - issue 1s... - Page 73 1=EIP protocol 0=Disabled DHCP 1=Enabled C0A8016E IP address x.x.x.x (192.168.1.110) FFFF0000 Subnet mask x.x.x.x (255.255.255.0) C0A80001 Gateway x.x.x.x (192.168.1.1) Page 73 of 126 Proton Products SL mini and SLR mini Series Speed and Length Gauges Instruction Manual - issue 1s...
-
Page 74: Input Parameter Write Disable
Click the “Comms” button on the main page: When prompted, enter 65000 for the password and click the “OK” button: Page 74 of 126 Proton Products SL mini and SLR mini Series Speed and Length Gauges Instruction Manual - issue 1s... - Page 75 Click to disable writing of all associated input parameter DW words. Click to exit this page and return to the “Communication Setting” page. Exit Page 75 of 126 Proton Products SL mini and SLR mini Series Speed and Length Gauges Instruction Manual - issue 1s...
-
Page 76: Udp Protocol
Click the “Comms” button on the main page: When prompted, enter 65000 for the password and click the “OK” button: Page 76 of 126 Proton Products SL mini and SLR mini Series Speed and Length Gauges Instruction Manual - issue 1s... - Page 77 0=Disable UDP output UDP destination IP Note: the UDP destination port address (last octet only) number is fixed at 1111 Page 77 of 126 Proton Products SL mini and SLR mini Series Speed and Length Gauges Instruction Manual - issue 1s...
-
Page 78: Optional Communications Interfaces
PROFIBUS LED indicator LED status Indication i-BUS Continuous green Online PROFIBUS communications Continuous red Communication error Extinguished No communication Page 78 of 126 Proton Products SL mini and SLR mini Series Speed and Length Gauges Instruction Manual - issue 1s... -
Page 79: Profibus Configuration
When prompted, enter 65000 for the password and click the “OK” button: Configure the PROFIBUS interface as required and click the “Exit” button when complete: Page 79 of 126 Proton Products SL mini and SLR mini Series Speed and Length Gauges Instruction Manual - issue 1s... -
Page 80: Ether Net / Ip Or Profinet Communications
Shield Shield Shield Connect to cable and plug shields IBUS1 Ethernet/IP or IBUS2 PROFINET IBUS3 Industrial bus IBUS4 Page 80 of 126 Proton Products SL mini and SLR mini Series Speed and Length Gauges Instruction Manual - issue 1s... -
Page 81: Ethernet / Ip Or Profinet Led Indicator
Click the “Comms” button on the main page: When prompted, enter 65000 for the password and click the “OK” button: Page 81 of 126 Proton Products SL mini and SLR mini Series Speed and Length Gauges Instruction Manual - issue 1s... - Page 82 C0A8016E IP address x.x.x.x (192.168.1.110) FFFF0000 Subnet mask x.x.x.x (255.255.0.0) C0A80001 Gateway x.x.x.x (192.168.1.1) 1=Little endian Endianess 0=Big endian Page 82 of 126 Proton Products SL mini and SLR mini Series Speed and Length Gauges Instruction Manual - issue 1s...
-
Page 83: Device Net Communications
DeviceNet LED indicator LED status Indication i-BUS Continuous green Online DeviceNet communications Continuous red Communication error Extinguished No communication Page 83 of 126 Proton Products SL mini and SLR mini Series Speed and Length Gauges Instruction Manual - issue 1s... -
Page 84: Devicenet Configuration
Click the “Comms” button on the main page: When prompted, enter 65000 for the password and click the “OK” button: Page 84 of 126 Proton Products SL mini and SLR mini Series Speed and Length Gauges Instruction Manual - issue 1s... - Page 85 This interface may be configured by writing to the following input parameters: Input parameters: Comment Unit Range/Remark Default DeviceNet address 0~63 0=125K DeviceNet baud rate 1=250K 2=500K Page 85 of 126 Proton Products SL mini and SLR mini Series Speed and Length Gauges Instruction Manual - issue 1s...
-
Page 86: Standard Electrical Interfaces
For 24V signals (such as from a PLC), the power dissipation in the 820Ω resistor can be reduced by connecting another 820Ω in series between the pull-up signal source and logic input. Page 86 of 126 Proton Products SL mini and SLR mini Series Speed and Length Gauges Instruction Manual - issue 1s... -
Page 87: Logic Inputs Configuration
Click the “Interface” button on the main page: When prompted, enter 64000 for the password and click the “OK” button: Page 87 of 126 Proton Products SL mini and SLR mini Series Speed and Length Gauges Instruction Manual - issue 1s... - Page 88 The pulse outputs are NOT affected by this function and will continue to correspond to the object speed. Page 88 of 126 Proton Products SL mini and SLR mini Series Speed and Length Gauges Instruction Manual - issue 1s...
- Page 89 Logic input 2 function 1=Length hold 0=Active low Logic input 2 polarity 1=Active high 0=Direction Logic input 3 function 1=Length hold Page 89 of 126 Proton Products SL mini and SLR mini Series Speed and Length Gauges Instruction Manual - issue 1s...
- Page 90 0=Count up only when no logic input 1=Count down for direction) Not used Must be 1 1=New format logic inputs Page 90 of 126 Proton Products SL mini and SLR mini Series Speed and Length Gauges Instruction Manual - issue 1s...
-
Page 91: Logic Outputs
It is recommended that the logic outputs are used to drive opto-isolated solid-state relays. Specification Minimum Typical Maximum Units Logic output to DGND voltage Current Page 91 of 126 Proton Products SL mini and SLR mini Series Speed and Length Gauges Instruction Manual - issue 1s... -
Page 92: Logic Outputs Configuration
Click the “Interface” button on the main page: When prompted, enter 64000 for the password and click the “OK” button: Page 92 of 126 Proton Products SL mini and SLR mini Series Speed and Length Gauges Instruction Manual - issue 1s... - Page 93 Threshold configured to the “Good Reading” condition. * factory-default values are shown in enclosed in [ ]. Page 93 of 126 Proton Products SL mini and SLR mini Series Speed and Length Gauges Instruction Manual - issue 1s...
- Page 94 3=Preset length 2 / Batch number 4=Good reading 8~15 Not used 5=Object detected 6=Gauge too hot Good Reading threshold 1=1% Page 94 of 126 Proton Products SL mini and SLR mini Series Speed and Length Gauges Instruction Manual - issue 1s...
-
Page 95: Ulse Utputs
In independent mode, “Pulse output 1” and “Pulse output 2” run independently and may be configured with different pulse rates: Page 95 of 126 Proton Products SL mini and SLR mini Series Speed and Length Gauges Instruction Manual - issue 1s... -
Page 96: Pulse Outputs Electrical Specifications
Pulse output external power supply (POUT +V) Pulse output frequency * reduced with increasing cable length in accordance with RS-422 standards. Page 96 of 126 Proton Products SL mini and SLR mini Series Speed and Length Gauges Instruction Manual - issue 1s... - Page 97 Click the “Interface” button on the main page: When prompted, enter 64000 for the password and click the “OK” button: Page 97 of 126 Proton Products SL mini and SLR mini Series Speed and Length Gauges Instruction Manual - issue 1s...
- Page 98 When “Pulse 1 β Mode” is set to “Quadrature”, this parameter sets the rate for the quadrature pulse output across both “Pulse output 1” and “Pulse output β”. Page 98 of 126 Proton Products SL mini and SLR mini Series Speed and Length Gauges Instruction Manual - issue 1s...
- Page 99 1~65535 1000 3=1000 2=100 1=10 Pulse output rate resolution -1=0.1 -2=0.01 -3=0.001 Pulse reset during reset 0=Off length 1=On Page 99 of 126 Proton Products SL mini and SLR mini Series Speed and Length Gauges Instruction Manual - issue 1s...
- Page 100 The “Circuit” page of the PCiS_SLmini displays various performance indicators and gauge circuit parameters. Click the “Circuit” button on the main page: Page 100 of 126 Proton Products SL mini and SLR mini Series Speed and Length Gauges Instruction Manual - issue 1s...
- Page 101 80% is recommended to maintain good length accuracy. Long length (> 5 m) accuracy Short length (0 ~ 5 m) accuracy Page 101 of 126 Proton Products SL mini and SLR mini Series Speed and Length Gauges Instruction Manual - issue 1s...
- Page 102 For use by Proton Products authorized service °C Temperature personnel only. Amplitude DC Level (mV) APD Bias Voltage Filter Band Frequency Page 102 of 126 Proton Products SL mini and SLR mini Series Speed and Length Gauges Instruction Manual - issue 1s...
-
Page 103: Data Logging
MS Excel and other spreadsheet software. Click the “Start Logging” button on the main page: Page 103 of 126 Proton Products SL mini and SLR mini Series Speed and Length Gauges Instruction Manual - issue 1s... - Page 104 Click to commence data logging. Stop Click to stop data logging. Exit Click to close this dialog box and return the main page. Page 104 of 126 Proton Products SL mini and SLR mini Series Speed and Length Gauges Instruction Manual - issue 1s...
-
Page 105: Connector Pin Outs
Connect to cable and plug shields Industrial bus option Functional Designation Ethernet group PROFIBUS DeviceNET EtherNet/IP IBUS1 Industrial IBUS2 IBUS3 CANH IBUS4 CANL Page 105 of 126 Proton Products SL mini and SLR mini Series Speed and Length Gauges Instruction Manual - issue 1s... -
Page 106: Optional Psu-Bob Mini
Connector type: DB9 female (socket) PC DB9 serial Designation Comment port pin TXD1 RXD1 GND_R Ground reference is not isolated from earth. Page 106 of 126 Proton Products SL mini and SLR mini Series Speed and Length Gauges Instruction Manual - issue 1s... -
Page 107: I -Bus
RJ45 socket are wired in parallel; either one or the other connector may be used depending on the available cable plug type. Page 107 of 126 Proton Products SL mini and SLR mini Series Speed and Length Gauges Instruction Manual - issue 1s... -
Page 108: Screw Terminals
/LSR_EN (14) terminal. * screw terminal numbering corresponds to the pin numbering for the DB25 INTERFACE connector on the gauge. Page 108 of 126 Proton Products SL mini and SLR mini Series Speed and Length Gauges Instruction Manual - issue 1s... -
Page 109: Key Switch
Page 109 of 126 Proton Products SL mini and SLR mini Series Speed and Length Gauges Instruction Manual - issue 1s... -
Page 110: Dimensional Drawing
IMENSIONAL DRAWING Page 110 of 126 Proton Products SL mini and SLR mini Series Speed and Length Gauges Instruction Manual - issue 1s... -
Page 111: Input Parameters
1=Length hold 0=Active low Logic input 2 polarity 1=Active high 0=Direction Logic input 3 function 1=Length hold 2=Display hold Page 111 of 126 Proton Products SL mini and SLR mini Series Speed and Length Gauges Instruction Manual - issue 1s... - Page 112 Pulse output rate resolution -1=0.1 -2=0.01 -3=0.001 Good Reading threshold 1=1% Pulse reset during reset 0=Off length 1=On Profibus address 0~125 Page 112 of 126 Proton Products SL mini and SLR mini Series Speed and Length Gauges Instruction Manual - issue 1s...
- Page 113 Note: the UDP destination port address (last octet only) number is fixed at 1111 1=Little endian Endianess 0=Big endian Page 113 of 126 Proton Products SL mini and SLR mini Series Speed and Length Gauges Instruction Manual - issue 1s...
-
Page 114: Output Parameters
Logic input 2 state 1=Active 0=Count up Direction 1=Count down Length hold 1=Hold Display hold 1=Hold Speed hold 1=Hold Page 114 of 126 Proton Products SL mini and SLR mini Series Speed and Length Gauges Instruction Manual - issue 1s... - Page 115 2=DeviceNET 3=Ethernet/IP 4=PROFINET 0=Enable DHCP 1=Disable IP address x.x.x.x Subnet mask x.x.x.x Gateway x.x.x.x Not used Not used Page 115 of 126 Proton Products SL mini and SLR mini Series Speed and Length Gauges Instruction Manual - issue 1s...
-
Page 116: Appendix High Accuracy Length Measurement Of Discrete Objects Application Note
The gauge thus measures the length of the object minus a section corresponding to the distance between LB1 and LB2: Object length = L + (gauge measured length) Page 116 of 126 Proton Products SL mini and SLR mini Series Speed and Length Gauges Instruction Manual - issue 1s... -
Page 117: Implementation
LB1). A momentary pulse may be sent to the third logic input on the gauge to reset the length measurement once it has been read out by other production control equipment. Page 117 of 126 Proton Products SL mini and SLR mini Series Speed and Length Gauges Instruction Manual - issue 1s... -
Page 118: Connections To The Sl / Slr / Sl Mini / Slr Mini Gauge
In addition to screw terminal 15, an additional Digital Ground (DGND) terminal is provided on the PSU-BOB-SL screw terminal board. Page 118 of 126 Proton Products SL mini and SLR mini Series Speed and Length Gauges Instruction Manual - issue 1s... -
Page 119: Logic Input Electrical Characteristics
2. Configure both light barrier logic input active states to active when the light barriers are clear (no object): Page 119 of 126 Proton Products SL mini and SLR mini Series Speed and Length Gauges Instruction Manual - issue 1s... - Page 120 Logic input 3 polarity 1 = active high (pulled up) Comments Unit Range Value Set to distance “L” Length offset 1=0.1m{ft}{yds}{inch} 3000.0~3000.0m{ft}{yds}{inch} Page 120 of 126 Proton Products SL mini and SLR mini Series Speed and Length Gauges Instruction Manual - issue 1s...
-
Page 121: Example Implementation Using Banner Qs18 Laser Emitters And Qs186Le Npn Sensors
Navigate to the “Measurement” menu and then navigate to the following submenu: Length offset: Set a positive value corresponding to distance “L”. Page 121 of 126 Proton Products SL mini and SLR mini Series Speed and Length Gauges Instruction Manual - issue 1s... -
Page 122: Sl Mini / Slr Mini Configuration
SL mini / SLR mini configuration Configuration via the PCiS_SLmini software: Click the “Interface” button on the main page: Page 122 of 126 Proton Products SL mini and SLR mini Series Speed and Length Gauges Instruction Manual - issue 1s... - Page 123 Active Low Logic Input 2 Function Length Hold Polarity Active Low Logic Input 3 Function Reset Polarity Active Low Page 123 of 126 Proton Products SL mini and SLR mini Series Speed and Length Gauges Instruction Manual - issue 1s...
- Page 124 Configure the “Length Offset” to the distance between the light barriers and then click the “Exit” button: Input Label Value* Description -3000.0 ~ Length Offset 3000.0 Set the required length offset value. m{ft}{yds}{inch} Page 124 of 126 Proton Products SL mini and SLR mini Series Speed and Length Gauges Instruction Manual - issue 1s...
- Page 125 Not used Must be 1 1=New format logic inputs Comment Unit Range/Remark Default Length offset 1=0.1m{ft}{yds}{inch} -3000.0~3000.0m{ft}{yds}{inch} Page 125 of 126 Proton Products SL mini and SLR mini Series Speed and Length Gauges Instruction Manual - issue 1s...
- Page 126 This device complies with Part 15 of the FCC Rules. Operation is subject to the following two conditions: (1) this device may not cause harmful interference, and (2) this device must accept any interference received, including interference that may cause undesired operation. The users manual or instruction manual for an intentional or unintentional radiator shall caution the user that changes or modifications not expressly approved by the party responsible for compliance could void the user's authority to operate the equipment.
-
Page 127: Ontact Details For Enquiries Sales And Service
Proton Products is not responsible for consequential or incidental damage related to the provision or use of the information contained in this manual. The information contained in this manual is the property of Proton Products and may not be circulated or distributed to third parties. ...
Need help?
Do you have a question about the SL mini 1220 and is the answer not in the manual?
Questions and answers