
Related Manuals for MAGINON WLR-755 AC


Summary of Contents for MAGINON WLR-755 AC
- Page 1 User Manual Manual del usuario WIFI RANGE EXTENDER AMPLIFICADOR WIFI English ....05 Español ..... 63 ID: #07177...
-
Page 2: Table Of Contents
Contents Overview ..................3 Device Parts ..................4 Product contents/device parts ............5 General .....................9 Safety ....................12 Start ....................19 Overview ..................21 Quick start instructions ..............22 Installation via App ...............29 Set-up .....................35 Use ....................42 Storing ....................52 Cleaning..................52 Technical specification ..............55 Declaration of conformity ............ -
Page 5: Product Contents/Device Parts
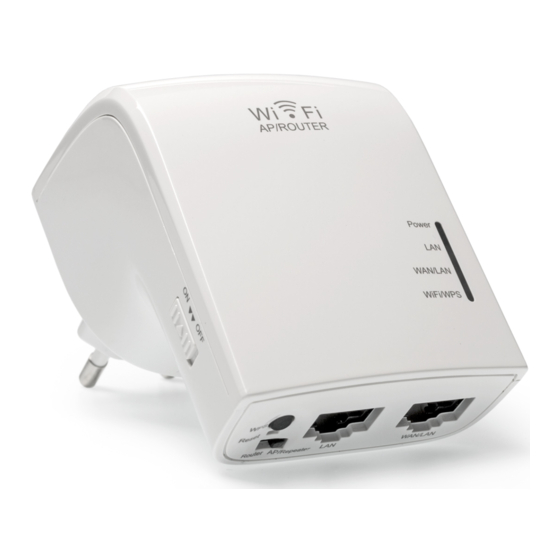
Product contents/device parts Maginon WLR-755 AC WiFi/WPS-LED RJ 45 LAN cables 2x RJ 45-LAN connections On/Off switch Mode switch Power-LED Reset button LAN LED WPS button WAN/LAN LED... -
Page 6: Contenido Del Producto/Piezas Del Dispositivo
Contenido del producto/piezas del dispositivo Maginon WLR-755 AC LED de WiFi/WPS Cables LAN RJ 45 2 conexiones LAN RJ 45 Interruptor de encendido/ Interruptor de modo apagado LED de encendido Botón de reinicio LED de LAN Botón WPS LED de WAN/LAN... - Page 7 Contents Contents Overview ....................3 Device Parts .................... 4 Product contents/device parts ............. 5 General ....................9 Read and keep Operating Instructions ............9 Explanation of symbols ................10 Safety ..................... 12 Correct use ...................... 12 Safety information ..................13 Start .......................19 Check device and contents of box ..............
- Page 8 Contents Set up as WiFi Range Extender ..............36 Set up using the WPS button ..............40 Installation as Access Point ................41 Use ......................42 Manually setting up WLAN connection ............43 Installation of WLAN connection using the WPS button ......44 Manually setting up the LAN connection ..........
-
Page 9: General
General General Read and keep Operating Instructions These Operating Instructions belong to this WiFi Range Extender. They contain important information about the start-up and handling. Study these Operating Instructions and, in particular the Safety information in detail prior to using the WiFi Range Extender. Non- observance of these Operating Instructions can lead to damage to the WiFi Range Extender. -
Page 10: Explanation Of Symbols
General Explanation of symbols The following symbols and signal words are used in these Operating Instructions, on the device or on the packaging. DANGER! These signal words indicate a high-level hazard which could cause death or serious injury if not avoided. WARNING! This signal word indicates a medium-level hazard which could cause death or serious injury if not avoided. - Page 11 General CAUTION! This signal word indicates a low-level hazard which could cause slight or moderate injury if not avoided. NOTE! This signal word warns against potential material damage. This symbol provides useful additional information about the assembly or operation.
-
Page 12: Safety
Safety Declaration of conformity (see chapter “Declaration Of Conformity”): Products containing this symbol comply with all Community legislation of the European Economic Area. Safety Correct use The WiFi Range Extender is designed to only be used as WiFi Range Extender. WiFi Range Extender is only suitable for private and not for commercial use. -
Page 13: Safety Information
Safety Safety information This equipment complies with FCC radiation exposure limits set forth for an uncontrolled environment. This equipment should be installed and operated with minimum distance of 7.9 inches (20cm) between the radiator and your body. This transmitter must not be co-located or operating in conjunction with any other antenna or transmitter WARNING! - Page 14 Safety − The 110 V socket used or the WiFi Range Extender must be freely acces- sible at all times, so that it can be quickly disconnected from the mains when necessary. − Do not operate the WiFi Range Extender if it is visibly damaged. −...
- Page 15 Safety − Never immerse WiFi Range Extender or plug in water or other fluids. − Never touch WiFi Range Extender with wet hands. − Install LAN cable in such a way that it does not become a trip hazard. − Do not kink LAN cable and do not install it over sharp edges.
- Page 16 Safety − Do not use the WiFi Range Extender if plastic or metal parts of the device show cracks or tears or are deformed. Replace damaged parts only with original spare parts. − Do not leave the WiFi Range Extender unintended during operation. WARNING! Hazard for children and persons with reduced physical, sensory or mental abilities (such as partially disabled,...
- Page 17 Safety understand hazards resulting therefrom. Children may not play with the WiFi Range Extender. The WiFi Range Extender may not be cleaned or maintained by children without supervision. − Keep WiFi Range Extender away from children below the age of 8. −...
- Page 18 Safety NOTE! Danger of damage! Incorrect use of the WiFi Range Extender can damage the device. WiFi Range Extender with care to avoid dama- − Please handle the ges.
-
Page 19: Start
Start Start Check device and contents of box NOTE! Danger of damage! If the packaging is carelessly opened with a sharp knife or other pointed objects, the WiFi Range Extender can be easily damaged. − Please open packaging carefully. 1. Remove WiFi Range Extender from packaging and check whether the equipment or parts are damaged. -
Page 20: Basic Cleaning
Start Basic cleaning − Remove packaging material and all protective foil. − Prior to using for the first time, clean all parts of the WiFi Range Exten- der as described in the section Cleaning. NOTE! Danger of damage! Incorrect use of cleaning products can damage the WiFi Range Extender . -
Page 21: Overview
Overview Overview This WiFi Range Extender quickly and effectively extends the range of an existing WLAN network. It supports WLAN standards 802.11 b/g/n in the 2.4 GHz- range and WLAN standards 802.11 a/n in the 5.0 GHz range. Transmission speed is up to 733 Mbit/s. Due to the WPS button, the device can be simply configured by pressing the button. -
Page 22: Quick Start Instructions
Quick start instructions Quick start instructions The WiFi Range Extender can be installed in a few steps, manually or via App. For manual installation, follow the below steps. The installation via App is described from page 28 onwards. 1. Plug the WiFi Range Extender into a socket close to the router. Slide the mode switch on the base of the WiFi Range Extender to “AP/Repeater”... - Page 23 Quick start instructions 5. Enter address “192.168.10.1“ in address line of Internet Browser. 6. The green start page of the configuration of the WiFi Range Extender appears. 7. Select the desired language.
- Page 24 Quick start instructions 8. Enter “admin” as user name and “admin” as password. Enter correctly (all in lower case). Select “Login”.
- Page 25 Quick start instructions 9. From the top left of the displayed page select option “Repeater Assistant”.
- Page 26 Quick start instructions 10. On the page “Repeater Assistant” the WiFi Range Extender will search for WiFi networks available in the vicinity. This may take a moment. 11. After completion of the search select WiFi network to be amplified by repeater. The network is then shown under “Connect to”.
- Page 27 Quick start instructions 12. Enter a new name for the WiFi network in field “SSID” generated after successful installation of the WiFi Range Extender. 13. In field “WiFi key” enter WiFi security key of WiFi network to be amplified by WiFi Range Extender (the password of your home network).
- Page 28 Quick start instructions available. Connect your device to this WiFi network. When the device connects to the WiFi network for the first time, the WiFi security key must be entered again.
-
Page 29: Installation Via App
The below instructions refer to an installation using the Android App. The display on the iOS App can differ from the shown screen shots. 1. Install the free App “Maginon WiFi repeater” on your Smartphone. 2. Plug the WiFi Range Extender into a socket close to the router. - Page 30 Quick start instructions (Fig.1) (Fig.2)
- Page 31 Installation via App 4. Connect your Smartphone to the open WiFi network of the WiFi Range Extender. Select option “Connect” (Fig. 2). It can take a few seconds to establish the connection. Then return to App. And confirm connection by selecting “Continue”...
- Page 32 Installation via App 6. Next enter a name (SSID) for the network which will be generated by your repeater after installation for amplification (Fig. 4). Also enter the WiFi key of your home network to be amplified by the repeater. Ensure that you enter the (Fig.4) WiFi key correctly.
- Page 33 Installation via App 7. Confirm input by clicking on “Continue” . (Fig.5) 8. Your entry is transmitted to the repeater. (Fig.6) 9. The repeater now connects to the Home network. Please wait until the repeater has carried out a restart. (Fig.7) (Fig.6)
- Page 34 Installation via App 10. Open the WiFi settings of your Smartphone and connect to the WiFi network created in section 5. Check that you can access the Internet from your mobile phone using the new WiFi connection. 11. If no Internet reception is available, please use the reset button of the repeater and restart the installation.
-
Page 35: Set-Up
Set-up Set-up The MAGINON WiFi Range Extender serves to extend the range of your existing WLAN network. For this purpose, the WiFi Range Extender is connected to the router of the WLAN by cable or wireless and then carries out the function of transmitter and receiver for other wireless systems. -
Page 36: Set Up As Wifi Range Extender
Set-up Set up as WiFi Range Extender In its function as WiFi Range Extender the device extends the range of your wireless network. To set up the WiFi Range Extender proceed as follows: 1. Set the mode selection switch to “AP/repeater”. 2. - Page 37 Set-up • Cable connection: Plug the supplied network cable into the computer and WiFi Range Extender. 5. Enter address http://192.168.10.1 in Browser to set up a connection to the WiFi Range Extender. If it is not possible to activate the WiFi Range Extender by entering 192.168.10.1 note the following information.
- Page 38 Set-up 7. At the top of the main menu click on “Repeater Assistant”.
- Page 39 Set-up 8. All existing wireless networks are detected and listed. Select the network to be connected to the WiFi Range Extender, clicking on “Send”. 9. Now enter the WiFi key (Security key) for the network. Leave other parameters unchanged. Click on “Send”. The name of the network (SSID) and the network key must correspond to the information saved in the WLAN router.
-
Page 40: Set Up Using The Wps Button
Set-up If the computer does not automatically connect to the WiFi Range Extender, the network must be manually set up by entering the following (open the network settings of your computer): IP address: 192.168.10.x (with x in range 2-254) Subnet mask: 255.255.255.0 Standard gateway: 192.168.10.1... -
Page 41: Installation As Access Point
Set-up 3. Press PBC/WPS key on router. (Further information for activating the router can also be found in the Operating Instructions of your router). 4. Hold down the WPS button on the WiFi Range Extender for at least 6 seconds. 5. -
Page 42: Use
4. Click on “Send“, to accept the settings. Once restarted, the WiFi Range Extender can be used as Access Point. Once the MAGINON WiFi Range Extender has been set up, you can connect a computer to the WiFi Range Extender using the wireless... -
Page 43: Manually Setting Up Wlan Connection
Manually setting up WLAN connection In order to set up a wireless connection between a computer and a WiFi Range Extender, proceed as follows: 1. On the computer connected to the WiFi Range Extender, click on the Wireless connection symbol at the bottom left of the Desktop. 2. -
Page 44: Installation Of Wlan Connection Using The Wps Button
Installation of WLAN connection using the WPS button If the WLAN adaptor of the computer contains a WPS button for quick configuration, it can also be used to set up the wireless connection to the WiFi Range Extender: 1. Start the computer. 2. -
Page 45: Manually Setting Up The Lan Connection
Manually setting up the LAN connection You can connect an individual computer to the WiFi Range Extender using a network cable. 1. Plug the supplied network cable into the computer and WiFi Range Extender. 2. To check that the computer is connected to the network click on computer and Start and select System Controls. -
Page 46: Basic Settings
IP address: 192.168.10.x (with x in range 2-254) Subnet mask: 255.255.255.0 Standard gateway: 192.168.10.1 Where several computer are connected to the network of the WiFi Range Extender, ensure that the used IP address is not used by another computer. Basic settings This sections explains the basic settings of the WiFi Range Extender in detail. -
Page 47: Security Settings
Security settings In order to configure the WLAN connection, select “WiFi Management” from the window and option “Standard settings” from the “WiFi” field. Next enter the encryption type (security type) and enter the required network key. Available encryption types are OPEN, Wep, WPA-PSK, WPA2-PSK and WPA/WPA2 mixed. -
Page 49: Changing The Password
Changing the password The default password and password after a RESET of the WiFi Range Extender is “admin”. This password must be changed as wireless access is otherwise not adequately protected. On the page “WiFi Management” select option “Password Settings” and change the user name and password for the user interface of the WiFi Range Extender. -
Page 50: Updating The Firmware
Updating the firmware Any new firmware available for the WiFi Range Extender can be installed using the Settings menu. On the page “WiFi Management” select option “Update firmware” and follow the instructions on the monitor. − Do not interrupt installation of firmware! −... -
Page 51: Saving And Loading Settings
Saving and loading settings The WiFi Range Extender allows you to store your settings in a file and to subsequently load them This allows you to not only use various configurations but also to produce back-up copies. On the page “WiFi Management” select option “Save/load settings”. Using the function “Default setting”, the repeater can be returned to its factory settings. -
Page 52: Storing
Storing Storing When not in use please disconnect the WiFi Range Extender from the power supply and store it in a clean and dry place outside of the reach of children. Cleaning WARNING! Burn hazard! The WiFi Range Extender becomes hot during operation! −... - Page 53 Cleaning WARNING! Danger of short circuit! Any water that has entered the housing can cause a short circuit. − Never immerse WiFi Range Extender or plug in water or other fluids. − Ensure that no water enters the housing. NOTE! Danger from incorrect operation! Incorrect use of the WiFi Range Extender can damage the WiFi Range Extender.
- Page 54 Cleaning − Never place the WiFi Range Extender in dishwasher. This would dest- roy the device. 1. Prior to cleaning, switch off WiFi Range Extender and pull plug out of mains socket. 2. Let WiFi Range Extender cool down completely! 3.
-
Page 55: Technical Specification
Technical specification Technical specification Model: MAGINON WLR-755 AC Connection: Wireless & Network cable Data transmission rate: Up to 733 Mbps Wireless standard: IEEE 802.11 ac/a/b/g/n Operating modes: Access point and repeater Encoding: Wep (64/128 Bit), WPA-PSK, WPA2-PSK and WPA/WPA2 mixed... -
Page 56: Declaration Of Conformity
Declaration of conformity Declaration of conformity The EC Declaration of Conformity can be requested from the address specified on the Warranty card (at the end of these Instructions). The Manufacturer hereby declares that the CE marking was applied to the product in accordance with the basic requirements and other relevant provisions of the following European Directives: 1999/5/EC R&TTE Directive 2009/125/EG ErP Directive... - Page 57 Declaration of conformity This device complies with Part 15 of the FCC Rules. Operation is subject to the following two conditions: (1)This device may not cause harmful interference, and (2)This device must accept any interference received,including interference that may cause undesired operation Warning: Changes or modifications to this unit not expressly approved by the party responsible for compliance could void the user’s authority to operate the equipment.
- Page 58 Declaration of conformity However, there is no guarantee that interference will not occur in a particular installation. If this equipment does cause harmful interference to radio or television reception, which can be determined by turning the equipment off and on, the user is encouraged to try to correct the interference by one or more of the following measures: −...
-
Page 59: Disposal
Disposal Disposal Dispose of packaging For disposal, separate packaging into different types. Cardboard and board must be disposed of as paper and foil must be recycled. Disposal of used device (Applicable in European Union and other European countries using systems for separate collection of recyclables) - Page 60 Disposal Do not dispose of used devices in household waste! If the devices can no longer be used each consumer is legally obliged to dispose of used head sets separately from domestic waste, e.g. at a collecting point of the municipality/district. This ensures that used equipment is recycled correctly and that negative effects on the environment are avoided.
-
Page 61: License And Sourcecode Information
Foto-Elektronik-Vertriebs-GmbH Denisstrasse 28A, 67663 Kaiserslautern, Germany (or by e-mail to: Info@supra-elektronik.com) Subject: “Source code, Maginon WLR-755 AC”... - Page 62 License and Sourcecode information To the extent the product includes proprietary software components, which stem from us and are linked with a library under the GNU Reader or Library General Public License, we allow the reengineering of these proprietary software components for debugging of changes and for making changes for your own use.
- Page 63 Contenido Contenido Descripción general ................3 Piezas del dispositivo ................4 Contenido del producto/piezas del dispositivo ........6 Generalidades ..................65 Leer y guardar las instrucciones de funcionamiento ......65 Explicación de los símbolos ................ 66 Seguridad ..................... 69 Uso correcto ....................69 Información de seguridad ................
- Page 64 Contenido Configurar el amplificador WiFi ..............93 Configurar con el botón WPS ...............97 Instalación como punto de acceso ............98 Uso ......................99 Configuración manual de la conexión WLAN .........100 Instalación de la conexión WLAN con el botón WPS ......101 Configuración manual de la conexión LAN ..........
-
Page 65: Generalidades
Generalidades Generalidades Leer y guardar las instrucciones de funcionamiento Estas instrucciones de funcionamiento pertenecen a este amplificador WiFi. Contienen información importante acerca de su puesta en marcha y manejo. Estudie estas instrucciones de funcionamiento y, en particular la información de seguridad en detalle, antes de usar el amplificador WiFi. -
Page 66: Explicación De Los Símbolos
Generalidades Guarde las instrucciones de funcionamiento para su uso posterior. Si va a entregar el amplificador WiFi a terceros, incluya también estas instrucciones de funcionamiento. Explicación de los símbolos Los siguientes símbolos y palabras de advertencia se utilizan en estas instrucciones de funcionamiento, en el dispositivo o en el embalaje. - Page 67 Generalidades ¡ADVERTENCIA! Esta palabra de advertencia indica un peligro de nivel medio que podría causar la muerte o lesiones graves si no se evita. ¡PRECAUCIÓN! Esta palabra de advertencia indica un peligro de nivel bajo que podría causar lesiones leves o moderadas si no se evita. ¡AVISO! Esta palabra de advertencia avisa sobre posibles daños materiales.
- Page 68 Generalidades Este símbolo proporciona información adicional útil sobre el ensamblaje o funcionamiento. Declaración de conformidad (ver el capítulo "Declaración de conformidad"): Los productos que contengan este símbolo cumplen con todas las legislaciones comunitarias las Áreas Económicas Europeas.
-
Page 69: Seguridad
Seguridad Seguridad Uso correcto El amplificador WiFi está diseñado solo para utilizarse como tal. Sólo es apto para el uso privado y no para el uso comercial. Sólo utilice el amplificador WiFi como se describe en las instrucciones de funcionamiento. Cualquier otro uso se considera incorrecto y puede causar daños materiales. - Page 70 Seguridad del cuerpo. Este transmisor no debe ubicarse ni utilizarse junto a otra antena o transmisor. ¡ADVERTENCIA! ¡Riesgo de electrocución! Las instalaciones eléctricas defectuosas o una tensión principal excesiva pueden causar la electrocución. − Sólo conecte el amplificador WiFi si el voltaje del tomacorriente coincide con el voltaje especificado en la etiqueta de clasificación.
- Page 71 Seguridad evitar el sobrecalentamiento. − No abra la carcasa sino que haga que la reparación la lleve a cabo un experto. Póngase en contacto con un taller especializado. Todas las reclamaciones de responsabilidad y de garantía se anularán en caso de reparaciones realizadas por los usuarios, conexión incorrecta o uso indebido.
- Page 72 Seguridad − Instale el cable LAN de forma tal que no haya riesgo de tropiezos. − No retuerza el cable LAN ni lo instale sobre bordes afilados. − Mantenga el amplificador WiFi alejado de llamas abiertas y super- ficies calientes. −...
- Page 73 Seguridad − No utilice el amplificador WiFi si las piezas plásticas o metálicas de este muestran fracturas o fisuras o están deformadas. Reemplace las piezas dañadas únicamente con piezas de repues- to originales. − No deje el amplificador WiFi sin supervisión cuando esté en funci- onamiento.
- Page 74 Seguridad Este amplificador WiFi puede ser utilizado por niños mayores de 8 años de edad y por personas con disminución en sus capacidades físicas, sensoriales o mentales o con falta de experiencia o conocimientos técnicos siempre que estén supervisados o hayan sido instruidos sobre cómo usar de forma segura el buscador de frecuencia y entiendan los peligros provenientes del mismo.
- Page 75 Seguridad ¡Este dispositivo es solo para uso en interiores! ¡AVISO! ¡Peligro de daños! El uso incorrecto del amplificador WiFi puede ocasionarle daños a este. − Por favor, use amplificador WiFi con cuidado para evitar daños.
-
Page 76: Para Comenzar
Para comenzar Para comenzar Verificación del dispositivo y los contenidos ¡AVISO! ¡Peligro de daños! Si el embalaje se abre descuidadamente con un cuchillo afilado u otros objetos puntiagudos, el amplificador WiFi se puede dañar con facilidad. − Abra el embalaje con cuidado. 1. -
Page 77: Limpieza Básica
Para comenzar 2. Compruebe de que el contenido del paquete está completo (vea la figura A). Limpieza básica − Retire el material de embalaje y todos los papeles de aluminio protectores. − Antes del primer uso, limpie todas las piezas del amplificador WiFi como se indica en la sección Limpieza. -
Page 78: Descripción General
Descripción general Descripción general Este amplificador WiFi extiende de forma rápida y eficaz el alcance de una red WLAN existente. Es compatible con normas WLAN 802.11 b/g/n en la frecuencia de 2.4 GHz y normas WLAN 802.11 a/n en la frecuencia de 5.0 GHz. -
Page 79: Introducción
Introducción Introducción Puede instalar el amplificador WiFi en pocos pasos de forma manual o con la aplicación. Para la instalación manual, siga los pasos a con- tinuación. La instalación con la aplicaciones e describe a partir de la página 28. 1. - Page 80 Introducción 5. Ingrese la dirección "192.168.10.1" en la línea de dirección del navegador. 6. Aparecerá la página de inicio verde de la configuración del amplificador WiFi. 7. Seleccione el idioma deseado.
- Page 81 Introducción 8. Ingrese "admin" como nombre de usuario y "admin" como con- traseña. Debe escribirlo correctamente (todo en minúscula). Seleccione "Inicio de sesión“.
- Page 82 Introducción 9. Seleccione la opción "Repetidor Asistente" en la esquina superi- or izquierda de la página.
- Page 83 Introducción 10. En la página "Asistente repetidor" el amplificador WiFi buscará redes WiFi disponibles en las cercanías. Puede llevar un minuto. 11. Tras completar la búsqueda seleccione la red WiFi que desee amplificar. La red aparecerá bajo "Conectar con“.
- Page 84 Introducción 12. Ingrese un nombre nuevo para la red WiFi en el campo "SSID" tras la conexión exitosa del amplificador WiFi. 13. En el campo "Clave WiFi" ingrese la clave de seguridad WiFi de la red WiFi que desea amplificar (la contraseña de la red doméstica). En general la clave de seguridad (contraseña) está...
- Page 85 Introducción Conecte el dispositivo a esta red WiFi. Cuando el dispositivo se conecte a la red WiFi por primera vez, debe ingresar la clave de seguridad WiFi de nuevo.
-
Page 86: Instalación Con La Aplicación
Android. La pantalla en la aplicación de iOS pue- de ser diferente a la que se muestra en las imágenes. 1. Instale la aplicación gratuita "Maginon WiFi repeater" en su smartphone. 2. Conecte el amplificador WiFi a un tomacorriente cerca del enru- tador. - Page 87 Instalación con la aplicación (figura 1) (figura 2)
- Page 88 Instalación con la aplicación 4. Conecte el smartphone a la red WiFi abierta del amplificador WiFi. Selec- cione la opción "conectar" (figura 2). Puede llevar un tiempo que se esta- blezca la conexión. Luego regrese a la aplicación. Y confirme la conexión seleccionando "continuar"...
- Page 89 Instalación con la aplicación 6. Ingrese un nombre (SSID) para la red que el amplificador generará tras la instalación (figu- ra 4). También ingrese la clave WiFi de su red doméstica a amplificar. Asegúrese de ingresar la clave WiFi correcta. (figura 4) (figura 5)
- Page 90 Instalación con la aplicación 7. Confirme la entrada tocando en "continuar" . (figura 5) 8. Su ingreso se trasmite al amplifi- cador. (figura 6) 9. El amplificador ahora se conecta a la red doméstica. Espere que el repe- tidor se reinicie. (figura 7) (figura 6)
- Page 91 Instalación con la aplicación 10. Abra los ajustes WiFi de su smartphone y conéctelo a la red WiFi creada en la sección 5. Verifique que pueda acceder a Internet desde el teléfono con la conexión WiFi nueva. 11. Si no hay recepción de Internet dis- ponible, use el botón de reinicio del amplificador y reinicie la instalación.
-
Page 92: Instalación
Instalación Instalación El amplificador MAGINON WLAN sirve para extender el alcance de su red WLAN existente. Con este propósito, el amplificador WiFi se conecta al enrutador de WLAN por cable o de forma inalámbrica y luego funciona como transceptor para otros sistemas inalámbricos. -
Page 93: Configurar El Amplificador Wifi
Instalación Configurar el amplificador WiFi En modo de amplificador WiFi, el dispositivo extiende el alcance de su red inalámbrica. Para configurar el amplificador WiFi haga lo siguiente: 1. Coloque el interruptor de selección de modo en "AP/repeater". 2. Conecte el amplificador WiFi al tomacorriente. 3. - Page 94 Instalación • Conexión por cable: Conecte el cable de red suministrado a la computadora y al amplificador WiFi. 5. Ingrese la dirección http://192.168.10.1 en el navegador para es- tablecer una conexión al amplificador WiFi. Si no es posible activar el repetidor WLAN a través de 192.168.10.1 ten- ga en cuenta la información siguiente.
- Page 95 Instalación 7. En la parte superior del menú principal haga clic en "Repetidor...
- Page 96 Instalación asistente". 8. Se detectan y enumeran todas las redes inalámbricas existentes. Seleccione la red para conectar al amplificador WiFi, haga clic en "Aplicar". 9. Ahora ingrese la clave WiFi (clave de seguridad) de la red. Deje los demás parámetros sin alterar. Haga clic en "Aplicar". El nom- bre de la red (SSID) y la clave de red deben corresponder a la información guardada en el enrutador WLAN.
-
Page 97: Configurar Con El Botón Wps
Instalación Si la computadora no se conecta automáticamente al amplificador WiFi, la red se debe establecer manualmente ingresando lo si- guiente (abra los ajustes de red de su computadora): Dirección IP: 192.168.10.x (siendo x de 2 a 254) Máscara de subred: 255.255.255.0 Puerta de enlace 192.168.10.1... -
Page 98: Instalación Como Punto De Acceso
Instalación apagado. El LED de encendido debe prenderse. 3. Presione el botón WPS en el enrutador. Puede encontrar más información para activar el enrutador en las instrucciones de funcionamiento de este. 4. Mantenga pulsado el botón WPS en el amplificador WiFi por al menos 6 segundos. -
Page 99: Uso
4. Haga clic en "Aplicar" para aceptar los ajustes. Una vez que se reinicie podrá utilizar el amplificador WiFi como punto de acceso. Una vez que el amplificador MAGINON WLAN esté configurado, puede conectar una computadora al amplificador WiFi de forma inalámbri-... -
Page 100: Configuración Manual De La Conexión Wlan
Configuración manual de la conexión WLAN Para establecer una conexión inalámbrica entre una computadora y un amplificador WiFi, haga lo siguiente: 1. Haga clic en el símbolo de conexión inalámbrica en la parte in- ferior izquierda del escritorio en la computadora conectada al amplificador WiFi. -
Page 101: Instalación De La Conexión Wlan Con El Botón Wps
Instalación de la conexión WLAN con el botón WPS Si el adaptador WLAN de la computadora contiene un botón WPS de configuración rápida, también puede usarlo para configurar la co- nexión inalámbrica al amplificador WiFi: 1. Inicie la computadora. 2. Mantenga pulsado el botón WPS en el amplificador WiFi por al menos 6 segundos. -
Page 102: Configuración Manual De La Conexión Lan
Configuración manual de la conexión LAN Puede conectar una única computadora al amplificador WiFi con un cable de red. 1. Conecte el cable de red suministrado a la computadora y al amplificador WiFi. 2. Para comprobar que la computadora está conectada a la red, haga clic en Inicio y seleccione Panel de control. -
Page 103: Ajustes Básicos
Puerta de enlace 192.168.10.1 estándar: Cuando haya varias computadoras conectadas a la red del amplifi- cador WiFi, asegúrese de que otra computadora no esté usando la dirección IP. Ajustes básicos Esta sección detalla los ajustes básicos del amplificador WiFi. Abra el menú... -
Page 104: Ajustes De Seguridad
Ajustes de seguridad Para configurar la conexión WLAN, seleccione "WiFi Management" (gestión WiFi) en la ventana y la opción "Configuración básica" en el campo "WiFi". Luego ingrese el tipo de cifrado (Tipo de seguridad) y la clave de red requerida. Los tipos de cifrado disponibles son abier- ta, Wep, WPA-PSK, WPA2-PSK y WPA/WPA2 mixta. -
Page 105: Cambiar La Contraseña
Cambiar la contraseña La contraseña por defecto y la contraseña tras reiniciar el amplifi- cador WiFi es "admin". Debe cambiar la contraseña ya que de lo cont- rario el acceso inalámbrico no será seguro. -
Page 106: Actualizar El Firmware
En la página "WiFi Management" (gestión WiFi) seleccione la opción "Password Settings" (ajustes de contraseña) y cambie el nombre de usuario y contraseña de la interfaz del usuario del amplificador WiFi. Actualizar el firmware Cualquier firmware nuevo disponible para el amplificador WiFi se puede instalar desde el menú... -
Page 107: Guardar Y Cargar Ajustes
Guardar y cargar ajustes El amplificador WiFi le permite almacenar sus ajustes en un archivo y luego volver a cargarlos. Esto le permite no solo usar varias configu- raciones sino también generar copias de respaldo. En la página "WiFi Management" (gestión WiFi) seleccione la opción "Save/load settings"... -
Page 108: Almacenamiento
Almacenamiento Almacenamiento Desconecte el amplificador WiFi de la red eléctrica cuando no se uti- lice y almacénelo en un lugar limpio y seco fuera del alcance de los niños. Limpieza ¡ADVERTENCIA! ¡Peligro de quemaduras! ¡El amplificador WiFi se calienta cuando está encendido! −... - Page 109 Limpieza ¡ADVERTENCIA! ¡Peligro de cortocircuito! Si entra agua en la carcasa puede provocar un cortocircuito. − Nunca sumerja el amplificador WiFi o el enchufe en agua u otro líquido. − Asegúrese de que no entre agua en la carcasa. ¡AVISO! ¡Peligro por mal funcionamiento! El uso incorrecto del amplificador WiFi puede dañarlo.
- Page 110 Limpieza metal o nailon u objetos de limpieza afilados o metálicos, tales como cuchillos, espátulas duras y similares. Estos pueden dañar la superficie. − Nunca coloque el amplificador WiFi en un lavavajillas. Esto destru- iría el dispositivo. 1. Antes de limpiarlo, apague el amplificador WiFi y desconéctelo del tomacorriente.
-
Page 111: Especificaciones Técnicas
Especificaciones técnicas Especificaciones técnicas Modelo: MAGINON WLR-755 AC Conexión: Inalámbrica y por cable Velocidad de transmisión: Hasta 733 Mbps Estándar inalámbrico: IEEE 802.11 ac/a/b/g/n Modos de funcionamiento: Punto de acceso y amplificador Codificación: Wep (64/128 Bit), WPA-PSK, WPA2-PSK y WPA/WPA2 mixta... -
Page 112: Declaración De Conformidad
Declaración de conformidad Declaración de conformidad La Declaración de conformidad CE se puede so- licitar en la dirección especificada en la tarjeta de garantía (al final de estas instrucciones). El fabricante declara por el presente que la marca CE se aplicó al producto de acuerdo con los requisitos básicos y otras disposiciones pertinentes de las siguientes directivas europeas: 1999/5/EC R&TTE Directive... - Page 113 Declaración de conformidad Este dispositivo cumple la Parte 15 de las Normas de la FCC. Su funcio- namiento está sujeto a las dos condiciones siguientes: (1) este dispositivo no puede causar interferencias perjudiciales y (2) este dispositivo debe aceptar cualquier interferencia recibida, incluyendo las interferencias que puedan causar un funciona- miento no deseado Advertencia: Los cambios o modificaciones a esta unidad no apro-...
- Page 114 Declaración de conformidad de acuerdo con las instrucciones, puede causar interferencias mo- lestas en las comunicaciones de radio. Sin embargo, no hay garantía de que no se produzcan interferencias en una instalación en particular. Si este equipo causa interferencias molestas en la recepción de radio o televisión, lo cual puede deter- minarse apagando y encendiendo el equipo, se recomienda intentar corregir la interferencia por medio de una o más de las siguientes medidas:...
-
Page 115: Eliminación
Eliminación Eliminación Eliminación del embalaje Para su eliminación, separe el embalaje según los diferentes tipos. El envase y láminas de cartón de- ben eliminarse como papel y el papel de aluminio debe reciclarse. Eliminación del dispositivo usado (Aplicable en la Unión Europea y en otros países europeos que utili- zan sistemas de recogida selectiva de reciclables). - Page 116 Eliminación ¡No deseche los dispositivos usados en la basura doméstica! Si el dispositivo ya no se puede utilizar más, cada consu- midor está legalmente obligado a desechar el disposi- tivo usado separadamente de los residuos domésticos, por ejemplo, en un punto de recogida del municipio/ distrito.
-
Page 117: Información De Código Fuente Y Licencia
Información de código fuente y licencia Información de código fuente y licencia Este producto incluye componentes de software bajo licencia por los propietarios de los derechos como software gratuito o de código abierto. Encontrará las notas del copyright y los textos de la licencia aquí: http://gpl.supra-elektronik.com/ Podemos mandarle un dispositivo de almacenamiento con el código... - Page 118 Información de código fuente y licencia Tema: "Código fuente, Maginon WLR-755 AC" En cuanto al producto que incluye componentes de software priva- do derivados de nosotros y están vinculados a una biblioteca bajo Licencia de lector GNU o Licencia pública general de biblioteca, per- mitimos la ingeniería inversa de ciertos componentes del software...
- Page 119 DISTRIBUTED BY • DISTRIBUIDO POR: ALDI INC., BATAVIA, IL 60510 www.aldi.us AFTER SALES SUPPORT • 93787 SERVICIO POSVENTA 1 800 270 5071 info@supra-electronics.com YEARS WARRANTY MODEL/MODELO: AÑOS DE GARANTÍA WLR-755 AC 10/2016...
Need help?
Do you have a question about the WLR-755 AC and is the answer not in the manual?
Questions and answers