
Summary of Contents for JDW HF-636P
- Page 1 HF-636P 20042017 MIDI Hi-Fi System Instruction Manual Model Ref: HF-636P / Cat No: MM335...
- Page 2 Introduction Thank you for choosing this MIDI Hi-Fi System. This product is manufactured to the highest standards of performance and safety. Before use, please read this manual carefully. It gives important instructions about safety, use and maintenance of your device. Remove all packaging material.
-
Page 3: Important Safety Information
13. Only use the attachments/accessories supplied with the product or recommended by JDW. 14. If the supply cord is damaged, it must be replaced by a qualified service agent in order to avoid a hazard... - Page 4 15. Only use this appliance for its intended domestic use. JDW will not accept any liability if the appliance is subject to improper use, or failure to comply with these instructions. 16. Keep the appliance and its power supply cord away from heat or sharp edges that could cause damage.
- Page 5 PRODUCT OVERVIEW...
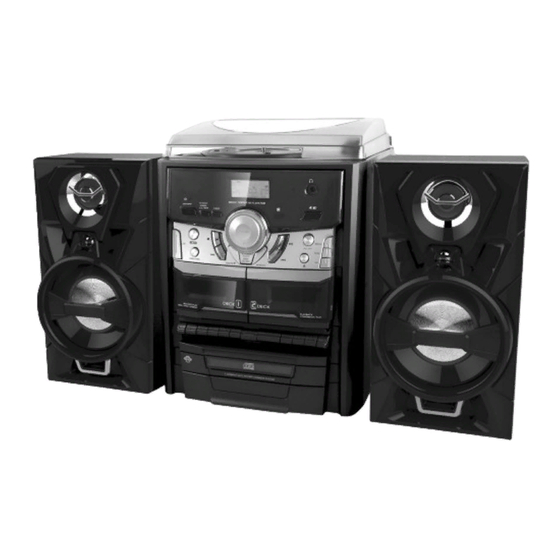
- Page 6 HI-FI CONTROLS 1. Dust Cover 19. Remote Sensor 2. LCD Display 20. Preset EQ Button 3. Volume Up-Down Button 21. CD Play / Pause Button 4. Extra Bass Control 22. Disc Skip Button Button 23. Phono / Tuner / Tape 5.
-
Page 7: Before Use
BEFORE USE • Unpack all parts and remove protective material. • Do not connect the unit to the mains before checking the mains voltage and before all other connections have been made. • Do not cover any vents and make sure that there is a space of several centimeters around the unit for ventilation CONNECTION... - Page 8 SETTING THE CLOCK 1. Set unit in standby mode by On/Standby button (7). 2. Press the “Mem/clk-adj” button (14), the first second digit of “00” is flashing. press button (12/25) to set the correct hour. Press ”Mem/clk-adj” button (14) to store the correct hour.
- Page 9 NOTE: when using battery, take off the AC cable from Boombox. CAUTION: Remove batteries if they are flat or not being used for a long period of time. Batteries contains chemical substances, so they should be disposed of properly. Preset stations You can store up to total of 20 radio stations in the memory.
- Page 10 Radio Data System (RDS) (On remote control) This are the features that display the information released from the radio broadcast which will be shown on the LCD display. RDS mode: Press to active the RDS function and the program service station name (PS) is being displayed. Rds search: Press to select the program type you want to listen, then press the Tuning up/down button (20/21) to start RDS searching and the unit can automatically detect a...
- Page 11 Program type identification (PTY) PTY allows selection by one of 15 program types rather than by a station. Radio text (text) Information such as the cast list of a play or the title of a song is shown on the display. Clock-Timer (CT) CT function provides an accurate clock signal.
- Page 12 • Be sure that the tone arm is being detached from the tone arm rest before operating, and re-secured again afterwards. 1. Press Phono button (23) 2. Set the speed selector (30) to the proper position depending on the record to be played. 3.
- Page 13 loading out the other disc compartment. 5. Press the CD tray open/close button (24) to close the CD door. 6. CD search is performing, the display will show the total number of disc, number of tracks & playing time of disc. Note: CD searching will be performed every time when switching to CD mode or closing the CD door.
- Page 14 is pressed. It will go back to the beginning of the track, original track no. is display and remain the play or pause mode. 3. After step 2, press skip down button (12) again will go to the previous track and remain the play or pause mode. Search Mode (Search Up / Search Down 1.
- Page 15 LISTENING TO TAPE General operation Stop / Eject key Press to stop all deck operation. Press again to open the cassette door. Fast forward key & Press to start rapid tape winding in Fast rewind key either forward or reverse direction. Press stop / fast rewind key eject keys when the cassette spools stop turning.
- Page 16 RECORDING A. Recording from tape (deck 2 to deck 1) This unit enables you to duplicate a pre-recorded tape to another tape. It is performed only one way from deck 2 (playback) to deck 1 (recording). Dubbing at normal speed •...
- Page 17 B. Recording from radio • Press Tuner button (23) to active radio mode • Tune to the desired station and insert a blank cassette tape in deck 1. • Press Record & Play key to start recording. • Press Pause keys and then “Stop/Eject” key when finish. C.
- Page 18 MORE FEATURES A. Sleep setting 1. Press & hold the Sleep/Timer button (11), to active & adjust the sleep timer in the order of 90 > 80 >70….10 minutes automatically. 2. System will stop and go to standby mode automatically after the selected timing.
- Page 19 • Active/de-active timer function 1. Press the Sleep/Timer button (11) once & the timer indicator is shown on LCD (1). 2. To cancel alarm function by press again Sleep/Timer button until the timer indicator “ ” disappear. C. Presets EQ function This unit provides 5 differences sound mode to enhance your listening experience.
- Page 20 REMOTE CONTROL TRANSMITTER CONTROL FUNCTIONS Battery installation The infra-red transmitter require 2 x AAA batteries for operation (not included) Button description Open/ Press to open & close Close the CD door Press to switch the Standby system into standby mode Disc 1,2,3 Press to select the disc for playback directly...
- Page 21 Tuner Press to activate radio Tuner mode Volume -/+ Volume control up and down Play.Pause In CD mode, press once to start playback. Press again to stop the dic play temporarily. Stop In CD mode: press to terminate CD playback In Tuner Mode: Press to select the radio band Repeat/ In CD mode: press to activate the repeat...
- Page 22 JD Williams Ltd.
Need help?
Do you have a question about the HF-636P and is the answer not in the manual?
Questions and answers
How do you open cd player which has 3 CDs to play in order
@kenneth Borrett
To play three CDs in order on the JDW HF-636P CD player, follow these steps:
1. Press the CD tray open/close button (24) to open the CD door.
2. Place the first CD with the printed side facing up in the tray.
3. Press the Disc Skip button (22) to rotate the tray to the next disc compartment.
4. Repeat steps 2 and 3 to load the second and third CDs.
5. Press the CD tray open/close button (24) again to close the CD door.
6. Wait about 5 seconds for CD searching to complete.
7. Press the Play/Pause button (21) to start playback from the first track of the first disc.
8. To switch to the next CD, press the Disc Skip button (22).
The system will play the CDs in the order they were loaded.
This answer is automatically generated