Table of Contents
Advertisement
Available languages
Available languages
Quick Links
Advertisement
Table of Contents

Summary of Contents for walimex Niova 60 Plus Bi Color
- Page 1 Niova 60 / 100 / 200 Plus Serie Niova 60 / 100 / 200 Plus series WALSER GmbH & Co. KG Senefelderstrasse 23 86368 Gersthofen Germany info@walser.de www.walser.de Made in China Fabricado en China Fabbricato in Cina Gebrauchsanleitung Instruction Manual...
-
Page 2: Table Of Contents
8.2.2 Dimming function Niova 100 / 200 Plus Daylight on the device ......38 8.3 Einstellen der Farbtemperatur am Gerät (nur Niova 60 Plus Bi Color Modell) ..16 8.3 Adjusting the color temperature on the device (for Niova 60 Plus Bi Color model only) 38 8.4 Einstellen des Fernsteuerungskanals am Gerät............17 8.4 Setting the remote - control channel on the device ...........39... -
Page 3: Hinweise Zum Verständnis Dieser Gebrauchsanleitung
Gebrauchsanleitung Symbol Bedeutung Wir freuen uns, dass Sie sich für ein Walimex pro Produkt aus dem Hause WALSER entschieden haben. Weist auf sicherheitsrelevante Informationen und eventuelle Folgen hin. Die Walimex pro Niova 60/100/200 Plus LED Studioleuchten sind ideal für Foto- und Video- projekte aller Art. -
Page 4: Gerät Auspacken Und Prüfen
WARNUNG WARNUNG Schneid- und Splittergefahr durch zerbrechende Leuchtmittel Stromschlaggefahr und Brandgefahr durch Kurzschluss Leuchtmittel können brechen und splittern, wenn sie gegen die Flächenleuchte stoßen. Ein Kurzschluss kann u. a. durch defekte Kabel und durch Feuchtigkeit oder Nässe verur- Splitter können Augen und Haut verletzen. sacht werden. -
Page 5: Led Niova 60 Plus Bi Color
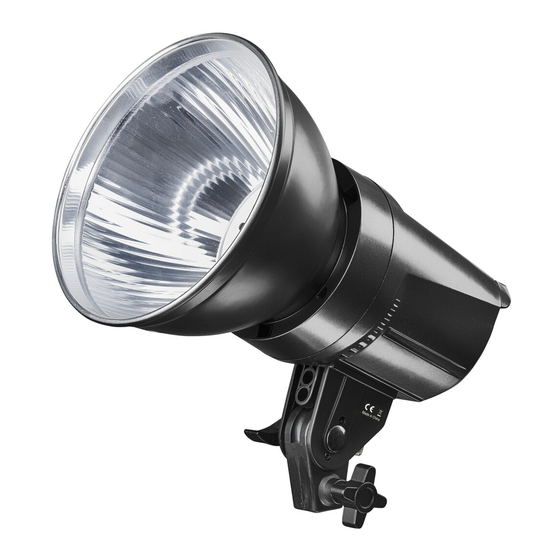
Übersicht über Bestandteile und Bedienelemente 4.2 Niova 100 Plus Daylight 4.1 LED Niova 60 Plus Bi Color 13 14 Leuchte Niova 60 Plus: Leuchte Niova 100 Plus: 1. LED Leuchtmittel 11. Bedienknopf Dimmer/Farbtemperatur/Kanal- 1. LED Leuchtmittel 16. Befestigungsschraube Leuchtenhalterung 2. Kühlkörper inkl. Schutzabdeckung wahl <Push for Menu>... -
Page 6: Niova 200 Plus Daylight
Gerät für den Einsatz vorbereiten 6.1 Montage Reflektor Die Walimex pro Niova 60/100/200 Plus Studioleuchten können mit oder ohne Reflektor betrie- ben werden. Sollte kein Reflektor eingesetzt werden, findet keine Bündelung des Lichtkegels statt und die Leuchte produziert einen sehr breiten, ungebündelten Lichtstrahl. Für die Errei- chung einer größeren Leuchtstärke auch auf längere Distanzen empfehlen wir den Einsatz des... -
Page 7: Montage Auf Einem Stativ/Halterung
6.2 Montage auf einem Stativ / Halterung 6.3 Montage Soft-Diffusor Durch die Montage des im Lieferumfang enthaltenen Kunstfaser Soft-Diffusors wird die Licht- • Lösen Sie die Befestigungsschraube der Leuchtenhalterung (16) soweit, dass die Halterung charakteristik nochmals weicher und das Licht wird stärker gestreut. Der Einsatz des Soft-Dif- in den Befestigungsadapter eines passenden Lampenstativs/Deckenhalterung eingesetzt fusors führt hierbei auch zu einer deutlichen Streuung... -
Page 8: Stromversorgung Herstellen
Stromversorgung herstellen - Farbtemperatur Menu 7.1 Stromversorgung Niova 60 Plus Bi Color - Netzteilanschluss • Schalten Sie das Gerät am EIN/AUS Schalter (9) auf <OFF> aus. • Stecken Sie den Rundstecker des mitgelieferten Netzteils in die mit <DC 12-17V> gekenn- zeichnete Stromanschlussbuchse (12) auf der Rückseite der Leuchte. -
Page 9: Einstellen Der Helligkeit (Dimmfunktion) Am Gerät
8.4 Einstellen des Fernsteuerungskanals am Gerät ratatur und der Kanalwahl zu wechseln (siehe obenstehende Übersicht). 8.4.1 Einstellen des Fernsteuerungskanals bei Niova 60 Plus Bi Color • Stellen Sie den Dimmmodus ein, die blaue Status LED (D) leuchtet. • Schalten Sie das Gerät am EIN/AUS Schalter (9) ein <ON> (falls noch nicht erfolgt). -
Page 10: Funktionstasten / Anzeigen Der Fernbedienung / Menübeschreibung Der Fernbedienung
Diese unterscheiden sich äußerlich nicht. Beachten Sie, dass Sie beim Einsatz mehrerer • Durch ein längeres Drücken (ca. 2 - 3 Sekunden) des <EIN/AUS> Knopfes der Fernbedienung Leuchten der Walimex pro Niova 60/100/200 Plus Modellserie zwar mit einer Fernbedienung können Sie die Leuchte ausschalten und in den Standby Modus versetzen. -
Page 11: Einstellen Der Helligkeit (Dimmfunktion) Per Fernbedienung
Gerät transportieren, lagern 8.8 Einstellen der Helligkeit (Dimmfunktion) per Fernbedienung • Drücken Sie den EIN/AUS Knopf der Fernbedienung einmal kurz um die Fernbedienung zu WARNUNG aktivieren. Brandgefahr durch heiße Geräteteile. Lassen Sie das Gerät vollständig abkühlen. • Stellen Sie sicher, das das Gerät und die Fernbedienung korrekt miteinander verbunden und auf die gleichen Kanäle eingestellt sind. -
Page 12: Gerät Instand Halten Und Reinigen
In unserem Webshop unter www.foto-walser.de finden Sie das optimale Zubehör zu Ihrem Gerät wie z.B. Synchrone Steuerung meh- rerer Leuchten • 12138 walimex pro WT-806 Lampenstativ, 256 cm • 21424 walimex pro GN-806 Lampenstativ 215 cm Flickerfrei • 17679 walimex pro Durchlichtschirm weiß, 109 cm Lebensdauer LED (Std.) - Page 13 WALSER ist bekannt für seine hochwertige Verarbeitung, beste Funktionalität und einen kun- Kanäle dennahen Service. Um unserem außergewöhnlichen Serviceniveau zusätzlichen Ausdruck zu verleihen, geben wir für dieses Walimex pro Produkt eine Garantie von 2 Jahren. Diese Garan- Standby Zeit >1 Jahr tie ist nur in Verbindung mit Ihrem Kaufbeleg gültig.
-
Page 14: En Instruction Manual
We are pleased that you have chosen a Walimex pro product by WALSER. The Walimex pro Niova 60/100/200 Plus LED studio light series is ideal for photo and video Draws your attention to the dealing with and the effect of safety projects of all kinds due to it´s very high light power and modern featured equipment. -
Page 15: Unpacking And Checking The Device
WARNING WARNING Danger of cutting and splintering caused by bursting illuminant Danger of electric shock, fire through short-circuit Illuminants can break or splinter when banging against the floodlight. Splinters can cause eye A short-circuit could be caused through defect cables and through humidity or moisture. A and skin injuries. -
Page 16: Overview Of Components And Control Elements
Overview of components and control elements 4.2 Niova 100 Plus Daylight 4.1 LED Niova 60 Plus Bi Color 13 14 LED light Niova 60 Plus: LED light Niova 100 Plus: 1. LED bulbs (COB-LED) 11. Select button dimmer/color temperature/ 1. LED beads (COB-LED) 15. -
Page 17: Niova 200 Plus Daylight
Preparing the device for use 6.1 Mounting the lamp reflector The Walimex pro Niova 60/100/200 Plus studio foto video light can be operated with or without the Bowens standard reflector. If no reflector is used, there is no bundling of the light cone and the lamp produces a very wide, unbounded light beam. -
Page 18: Mounting The Light On A Lamp Stand
6.2 Mounting the light on a lamp stand 6.3 Mounting the soft - diffusor By mounting the supplied soft diffuser the light characteristic is even softer and the light is more • Loosen the fastening screw of the lamp holder (16) until the mount can be inserted into the scattered. -
Page 19: Power Supply
Status LED blue <D> = dimmer menu Power supply 7.1 Power supply Niova 60 Plus Bi Color – connection to the power adapter Status LED orange <C>= • Switch the device <OFF> with the ON/OFF switch (9) on the device. -
Page 20: Setting Brightness (Dimmer Function) On The Device
8.4 Setting the remote - control channel on the device • If necessary, press the control knob <Push for Menu> (11) to switch between the brightness 8.4.1 Setting the remote - control channel on the Niova 60 Plus Bi Color device and the color temperature mode. -
Page 21: Function Buttons / Display Data / Menu Description Of The Remote Control
NOTE: the lamp with the remote control. Please note that in case of using several devices of Walimex pro Niova 60/100/200 Plus model • The remote control has an automatic switch off function. To reactivate the display, please series, you can control all devices by Bi Color remote control version. But it´s not possible to press the <ON/OFF>... -
Page 22: Setting Brightness (Dimmer Function) Via The Remote Control
Transporting, storing the device 8.8 Setting brightness (dimmer function) via the remote control • Press the ON/OFF button on the remote control once briefly to activate the remote control. WARNING • Ensure that the device and the remote control have been correctly paired up and the same Danger of fire caused by hot parts of the equipment. Allow the device to cool down completely. channels set. -
Page 23: Maintaining The Device And Cleaning
10-100 % You find optimal accessories for your device in our webshop: www.foto-walser.de. Synchronous control of • 12138 walimex pro WT-806 lamp stand, 256 cm several item • 21424 walimex pro GN-806 lamp stand 215 cm • 17679 walimex pro Translucent Umbrella white, 109cm Flickerfree •... - Page 24 To highlight our exceptional service level, we offer a 2 year warranty for this Standby Time >1 year Walimex pro product. This warranty is only valid in combination with your purchase receipt. If you would like to utilize our warranty, contact us by email at info@foto-walser.de. Our compre- Dimensions (LxWxH) 85 mm x 45 mm x 55 mm hensive guarantee as well as its scope the can be found at www.foto-walser.de/en/warranty.
Need help?
Do you have a question about the Niova 60 Plus Bi Color and is the answer not in the manual?
Questions and answers