Advertisement
Advertisement

Subscribe to Our Youtube Channel
Summary of Contents for DR Power Equipment PILOT
- Page 1 ® PILOT TRIMMER/MOWER™ SAFETY & OPERATING INSTRUCTIONS DR Power Equipment Toll-free phone: 1-800-DR-OWNER (376-9637) Serial No. Fax: 1-802-877-1213 Order No. Website: www.DRpower.com Read and understand this manual and all instructions before operating the DR PILOT TRIMMER/MOWER.
- Page 2 ® PILOT TRIMMER/MOWER...
-
Page 3: Table Of Contents
Additional Information and Potential Changes DR Power Equipment reserves the right to discontinue, change, and improve its products at any time without notice or obligation to the purchaser. The descriptions and specifications contained in this manual were in effect at printing. Equipment described within this manual may be optional. -
Page 4: Chapter 1: General Safety Rules
Keep bystanders at least 50 feet away from your work area at all times. The tips of the cutting cords on the DR PILOT TRIMMER/MOWER can throw sticks, small stones, gravel, and bits of debris over long distances at great velocity. Do not travel over loose materials such as gravel or mulch with the trimmer head spinning. - Page 5 Your DR PILOT TRIMMER/MOWER is a powerful tool, not a plaything. Exercise extreme caution at all times. The design of your machine is for trimming and mowing grass, weeds, and other growth as specified in this manual. Do not use it for any other purpose.
- Page 6 No list of warnings and cautions can be all-inclusive. If situations occur that are not covered by this manual, the operator must apply common sense and operate this DR PILOT TRIMMER/MOWER in a safe manner. Contact us at www.DRpower.com or call 1-800-DR-OWNER (376-9637) for assistance.
-
Page 7: Chapter 2: Setting Up The Dr Pilot Trimmer/Mower
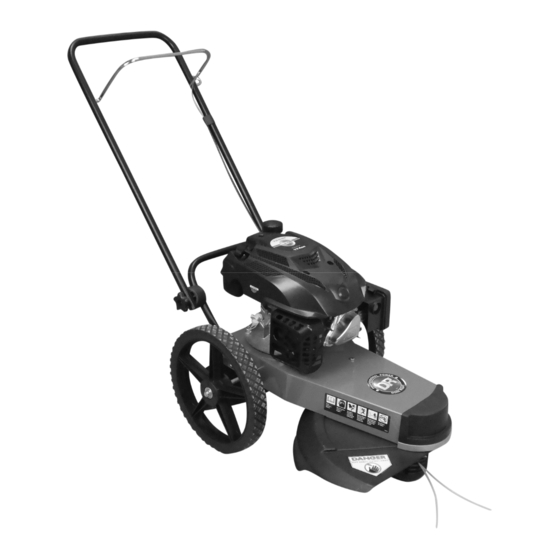
Chapter 2: Setting Up The DR PILOT TRIMMER/MOWER It may be helpful to familiarize yourself with the controls and features of your DR PILOT TRIMMER/MOWER as shown in Figure 1 If you have any questions at all, please feel free to contact us at www.DRpower.com. - Page 8 Frame using a 1/2" Wrench (Figure 3). Hardware The Handlebar folds down for easy storage and the DR PILOT TRIMMER/MOWER is shipped to you with them folded. Note: Ensure that the teeth of the Handlebar Adjusters mesh correctly as you tighten the Knobs in the following step.
- Page 9 1. Loosen both the Adjustment Knobs and move the Handlebar up or down Notches until the Notches on the Adjusters are aligned on both sides and tighten the Lined Up Knobs (Figure 4). This puts the Handlebar at a comfortable operating Upper position for many people.
- Page 10 Be careful not to overfill. Fill the fuel tank outdoors or in a well-ventilated area, away from sparks, open flames, pilot lights, heat, and other ignition sources. 3. Fill the Fuel Tank with fresh, unleaded gas (with a minimum of 85 Octane Figure 8 and no more than 10% Ethanol), to not more than 1/4"...
-
Page 11: Chapter 3: Operating The Dr Pilot Trimmer/Mower
Disconnect the spark plug wire, keeping it away from the spark plug. Before Starting the Engine Fuel Fill 1. Check the oil level every time you use the DR PILOT TRIMMER/MOWER (Figure 9). 2. Check the fuel level. - Page 12 For more detailed information refer to “Installing The Cutting Cords” section in Chapter 2. Note: After you install the Cords, and before trimming, run the engine for a few Cord Ends seconds so the Cords pull tight and are set into the Line Plates. Figure 13 ® PILOT TRIMMER/MOWER...
- Page 13 Cord Tips We ship two (2) thicknesses of Cutting Cord with your DR PILOT TRIMMER/MOWER. The Cords are Blue (175-mil) and Green (155-mil). Because conditions and vegetation vary so much, you should experiment with Cord weights (diameters) to discover what works best for your particular mowing and trimming situations. Here are a few things to keep in mind: ...
- Page 14 Obstacles Dealing with obstacles in the terrain is easy with your new DR PILOT TRIMMER/MOWER. The following section explains how to approach most common obstacles. The trimmer engine's power can easily throw stones, sticks, and other debris at great velocity, which could cause personal injury or property damage.
- Page 15 Windrows The DR PILOT TRIMMER/MOWER Cutting Cords cut even tall grass in just one pass, so you can collect clippings and leaves for mulch without raking. The machine ejects cut material to its right side, so you can use it like a lawn broom to make windrows for easy clean-up.
-
Page 16: Chapter 4: Maintaining The Dr Pilot Trimmer/Mower
Chapter 4: Maintaining The DR PILOT TRIMMER/MOWER Regular maintenance is the way to ensure the best performance and long life of your machine. Please refer to this manual and the engine manufacturer's owner's manual for maintenance procedures. Service intervals listed in the checklist below supersede those listed in the engine manufacturer's owner's manual. - Page 17 ® 4. Looking down at the top of the Frame, turn the Mow-Ball clockwise until it unscrews completely from the Bearing Housing. ® Note: If the Mow-Ball continues to turn, but does not come off, check to be sure that you locked the Screwdriver into the shaft. If the Mow-Ball will not turn by hand a 9/16"...
- Page 18 2. Remove the Locknut using a 5/8" Wrench (Figure 22). Pulley 3. Slide the Wheel off the Axle. Figure 21 4. Install the new Wheel and secure with the Locknut. Axle 5. Repeat for the other Wheel. Wheel Plastic Locknut Figure 22 ® PILOT TRIMMER/MOWER...
- Page 19 Changing the Engine Oil Note: Remove the oil when the Engine is warm. Warm oil vacuums more quickly and completely. Preferred Method Tools and Supplies needed: SAE 30 HD Oil (refer to your Engine Owner’s Manual for quantity required) ...
-
Page 20: Chapter 5: Troubleshooting
Owner’s Manual for detailed information. Clean the Engine cooling fins and the carburetor housing if they are dirty. If the Engine still smokes, visit our web site at www.DRPower.com or call 1-800-DR-OWNER (376-9637) for assistance. ® PILOT TRIMMER/MOWER... - Page 21 If none of the above helps, visit our web site at www.DRPower.com or call 1-800-DR- OWNER (376-9637) for assistance. ® The Mow-Ball You may be pushing the Trimmer Head down into the ground. The DR PILOT wearing too quickly. ® TRIMMER/MOWER works best with a light touch, with the Mow-Ball resting easily on the ground or slightly raised.
-
Page 22: Chapter 6: Parts Lists And Schematic Diagrams
Chapter 6: Parts Lists and Schematic Diagrams Parts List – Main Frame Assembly Note: Part numbers listed are available through DR Power Equipment. Ref# Part# Description Ref# Part# Description 38778 Frame w/Labels 31099 Spacer, .680" X .984" X .310", ZP 10000030750 Engine w/Labels, DR 7.0 TQ MS... - Page 23 Schematic – Main Frame Assembly CONTACT US AT www.DRpower.com...
- Page 24 Parts List – Handlebar and Axle Assembly Note: Part numbers listed are available through DR Power Equipment. Ref# Part# Description Ref# Part# Description 31117 Bolt, HWH, 1/4 - 20 X .75", Taptite 19135 Adjuster, Handlebar, Inside 31107 Axle, Welded 14373...
- Page 25 Schematic – Handlebar and Axle Assembly CONTACT US AT www.DRpower.com...
- Page 26 Notes: ® PILOT TRIMMER/MOWER...
- Page 27 Terms and Conditions The DR PILOT TRIMMER/MOWER is warranted for two (2) years against defects in materials or workmanship when put to ordinary and normal consumer use; ninety (90) days for any other use. The engine manufacturer warrants the engine separately.
- Page 28 Never store the DR PILOT TRIMMER/MOWER with fuel in the fuel tank inside a building where ignition sources are present, such as hot water and space heaters, clothes dryers and the like. If you are going to drain the fuel tank, do this outdoors. Allow the engine to cool before storing in any enclosure.
Need help?
Do you have a question about the PILOT and is the answer not in the manual?
Questions and answers