
Related Manuals for Pettersson D1000X


Summary of Contents for Pettersson D1000X
- Page 1 ULTRASOUND DETECTOR D1000X USER’S MANUAL Firmware version 2 Pettersson Elektronik AB Uppsala Science Park S-751 83 Uppsala, Sweden Phone:+46 1830 3880 Fax:+46 1830 3840 info@batsound.com www.batsound.com...
-
Page 2: Table Of Contents
Playing files Which recording settings to use in different situations Managing the recorded files The microphone The serial input Using a GPS receiver Battery life guidelines The D1000X Utility software Trouble-shooting Error messages Specifications What's new in firmware version 2? - Page 3 If the customer uses or sells the products for use in any such applications: (1) the customer acknowledges that such use or sale is at the customer's sole risk; (2) the customer agrees that Pettersson Elektronik is not liable, in whole or in part, for any claim or damage arising from such use;...
-
Page 4: Introduction
CF card installed in the CF slot of the detector. Before using the CF card in the D1000X, the card has to be formatted in the detector or in a PC. -
Page 5: Powering The Detector
Remove the batteries from the D1000X if you do not plan to use it for more than two weeks. -
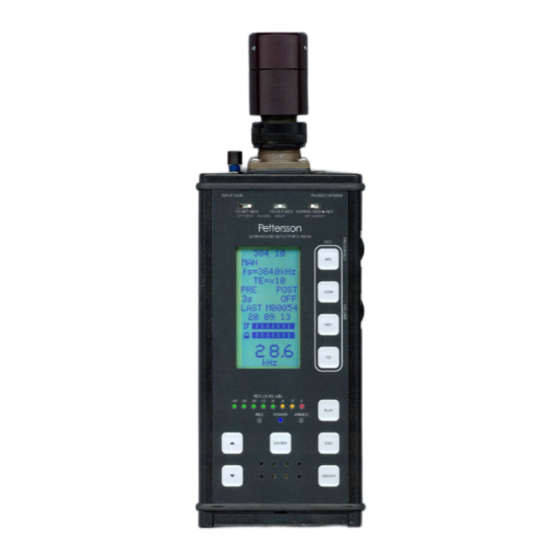
Page 6: Top Panel Overview
NORMAL MEM file from the memory (CF card). LEFT /SPKR PH ONES RIGHT HET SOURC E Pettersson Thumb-wheel knobs to adjust the ULTRASOUND DETECTOR D 1000X heterodyne tuned frequency and the loudspeaker/headphones volume. Keys to start/stop recording to CF card. - Page 7 Front panel overview Microphone connector HF/MEM output Phones output jack Input gain control jack Rear panel overview DC IN jack 7-10V CF card slot (center pin = +) Suitable plug for DC jack: EIAJ RC-.5320, class 2 (O.D. 4.0 mm I.D.
-
Page 8: Display Overview
LEV 7 When booting the D1000X, a message saying "Release key" will be shown. Pressing the PLAY button immediately after releasing the key (just when the display has changed from "Booting" to "BOOTING") will allow the user to format the card and to set the clock. Pressing/holding ESC before releasing the key will allow the user to upgrade the firmware. -
Page 9: Getting Started
The D1000X can play files from the CF card either one by one or from a “play list”. The D1000X Utility can be used to generate a play list with a number of files to be played in a sequence. The name of the play list file should have six characters. The extension .LST will be added by the D1000X utility. - Page 10 D1000X. To access the CF card slot, open the hinged door on the rear of the D1000X. The door is opened by gently pressing the hinge upwards (1) while pulling the door open (2) (see below).
- Page 11 Formatting is recommended for any CF card that you suspect contains corrupted files or for newly purchased CF cards. Before starting a format operation in the D1000X, make sure the batteries are fresh or use a reliable external power supply. Interruption of power to the detector during the format operation results in improper formatting, making it impossible to use the card.
-
Page 12: Using The Detector The First Time
Next the text “SEARCHING GPS” is displayed. For more information on using a GPS receiver with the D1000X, please refer to the section “Using a GPS receiver” in this manual. When the main screen is shown (see picture), the detector is ready to be used. - Page 13 Note: Changing the recording parameters as described above is usually not the preferred method in the field. Preparing the desired profiles on the CF card using the D1000X Utility gives you a much quicker way to change the settings and is the recommended method in most cases.
-
Page 14: Setting The Clock
Note: The D1000X expects the CF card to have the FAT32 file system. If the CF card that you wish to prepare in the D1000X is new and you are unsure which file system it has, you should first format the CF card in a PC, selecting FAT 32 as file system. -
Page 15: Ultrasound Conversion Methods
There are several different principles to convert ultrasound into audible sound. As mentioned above, one of the systems in the D1000X is based on the heterodyne principle. This technique means that a limited frequency range is selected for conversion into the audible range. If the frequency control is set to 30 kHz, the range from approximately 25 to 35 kHz will be transformed. - Page 16 playing the desired sound file. The signal is then replayed at its original speed and frequency regardless of the time expansion factor (TE) setting. Note: In order not to interfere with the continued streaming of samples to the CF card at high sampling frequencies, the update and display of the tuned frequency and clock as well as the update of the battery indicator is disabled while recording with the two highest sampling frequencies, 750 and 768 kHz.
- Page 17 Since the signal is stretched out in time, it is also possible to hear details in the sound, not audible with other ultrasound conversion systems. In the D1000X the time expansion function is a part of the recording system described in the next section.
-
Page 18: The Recording And Playback System
If the CF card in the D1000X has a file with external profiles, the user will be prompted at power-on of the D1000X whether to use the external or internal set of profiles. If you confirm the question “LOAD INI-FILE?”... - Page 19 The theoretical upper signal frequency limit is half the sampling frequency. In practice, the upper signal frequency limit is lower than that. The D1000X has an adaptive anti-aliasing filter that allows aliasing-free sampling up to about 0.4 x f .
- Page 20 The actual pre and post trigger time that is obtained may differ slightly from the value chosen in the D1000X settings. More information on this is found in the section “The details of the triggering parameters”.
- Page 21 The jack is located above the Input Gain control on the front panel. This jack is an optional feature and is not available on the standard version of D1000X. The signal terminal is the tip and the ground terminal is the sleeve.
-
Page 22: The Details Of The Triggering Parameters The Manual Recording Mode
The details of the triggering parameters The manual recording mode The manual recording mode is selected in the settings menu. In this mode, the recording is started by pressing the desired recording key. In order to record the ultrasonic signal from the microphone, press the MIC key and the recording starts. - Page 23 Press MIC Level trig Press MIC Triggering Recording moment starts Buffering Capturing time PRE time (2 sec.) File beginning File end Manual recording mode with PRE = 2 seconds and POST = OFF. Yet another alternative is setting the POST time to MAN. In this case the actual file end is determined by pressing the MIC key a third time.
- Page 24 Press MIC Recording starts Recording time POST time (3 sec.) File beginning File end Manual recording mode with PRE = OFF and POST = 3 seconds. In order to obtain manual control over the recording process, PRE should be set to OFF and POST to MAN.
-
Page 25: The Automatic Recording Mode
The automatic recording mode In the automatic recording mode, it is possible to make unattended, automatic recordings using a level-triggering mechanism. The automatic recording mode is selected in the settings menu. The signal level above which the system is triggered can be changed each time a new recording session is initiated (the MIC key is pressed). - Page 26 Triggering signal is received Press MIC Press ENTER Triggering Set trigger Recording moment threshold starts Buffering Armed Recording Waiting PRE time (2 sec.) POST time (3 sec.) File 1 beginning File 1 end Triggering Press MIC signal is to exit received automatic recording...
-
Page 27: Tips For Making Better Recordings
Tips for making better recordings While making recordings is very simple with the D1000X, there are a few things to think of in order to obtain the highest quality. The recording level indicator, shows the actual signal level at the analog-to-digital converter (ADC). -
Page 28: Playing Files
Playing files The D1000X can play any file that has been saved on the CF card. The replay sampling frequency is determined by 1) the sampling frequency that was used when the file was recorded, 2) the TE (time expansion) factor setting and 3) the setting of the switch “Heterodyne source”. - Page 29 D1000X. Please note that this will result in a different time expansion factor than the expected. This only affects what is being played by the detector. The sound file on the CF card is recorded with the correct sampling frequency.
-
Page 30: Which Recording Settings To Use In Different Situations
CF card. If the CF card in the D1000X has a file with external profiles, the user will be prompted at power-on of the D1000X whether to use the external or internal set of profiles. If you confirm the question “LOAD INI-FILE?”... - Page 31 4) “300 20”. Same as 3) except the time expansion factor is 20. Suitable for studying bats using higher frequencies. 5) “200 10”. Same as 1) except the sampling frequency is 200 kHz. The maximum signal frequency is 80 kHz. 6) “AUTO”.
- Page 32 8) “MAN 384”. Same as 1) except the recording is started by pressing the MIC key and stopped by pressing the same key a second time. MAN 384 fs=384.0kHz TE=x10 POST PLAY AUTO PROMPT TRIG LEDINT 3 9) “MAN 500”. Same as 8) expect the sampling frequency is 500 kHz. 10) “AUDIO”.
-
Page 33: Managing The Recorded Files
D1000X Utility program can also be used to remove these first samples. It is possible to erase the most recently made recording in the D1000X. To do this, press the ESC key. The text "Erase file Mxxxxx.WAV NO/YES" appears. Use the UP/DOWN arrow keys to set the frame around YES and then press ENTER to actually erase the file (this may take a few seconds - the "standard screen"... -
Page 34: The Microphone
The serial input is located beneath the CF card slot and is used to connect a GPS receiver to the D1000X. This should be done only with a cable supplied by Pettersson Elektronik or a cable manufactured according to instructions from Pettersson Elektronik. -
Page 35: Using A Gps Receiver
The GPS receiver should be connected to the D1000X and turned on before the D1000X is turned on. The D1000X will check for a connected GPS receiver each time it is turned on (the text “Searching GPS…” is shown) and if a GPS receiver is found, the GPS position information and time will briefly be displayed and the GPS function in the D1000X will be enabled until the D1000X power is turned off or the GPS receiver is disconnected/turned off. -
Page 36: Battery Life Guidelines
• Avoid using unnecessarily high sampling frequencies. • Avoid recording continuously. • Use headphones rather than the built-in loudspeaker * When a GPS receiver is connected to the serial input of the D1000X the battery life is approximately 25% shorter. -
Page 37: The D1000X Utility Software
• Transfer D1000X firmware upgrade files to the CF card The first step in using the D1000X Utility is to select the drive that has the CF card. This is done in the “Select CF card” section in the D1000X Utility main window. Please make sure you select the correct drive or the following operations will be performed on a disk in a drive you did not intend. - Page 38 Ctrl-C to copy the highlighted section to the Windows clipboard. The Copy & Rename function is used to copy one or more D1000X files from the CF card to the computer’s hard disk. Optionally the files can also be renamed. The Rename function can also be used to add the time and date to the original file name.
- Page 39 D1000X from the CF card. To create a new profile, click on New file and Add new. This will open the D1000X recording profile window. First, enter the desired name for the profile. The name can have up to ten characters.
- Page 40 Play list handling The D1000X can be used to play a single file or to play files from a play list. Before you make a “play list card”, make sure that it's empty by formatting it. A play list card should only ever contain the sound files (starting with the letter 'P') included in the play lists and the play list files themselves.
-
Page 41: Trouble-Shooting
CF indicator). further recording. The CF card has been "prepared" for use with D1000X firmware version 1. In such case, format the card. The detector shuts down when I try to make a The D1000X will automatically shut down if recording/play a file. -
Page 42: Error Messages
Error messages. Message Meaning/possible cause DISKERR A Disk Error (a problem with the CF card) has been detected. This can be because there is no card in the CF slot. The card in the CF slot can also be defective or the card may need to be formatted. -
Page 43: Specifications
In order to copy the files from the CF card to a PC, a Windows 7/8/10 operating system and a CF card reader is required. The D1000X accepts type I CF cards. Although any CF card with sufficient read and write speed should work, the following card types have been tested with good results: •... -
Page 44: What's New In Firmware Version 2
What's new in firmware version 2? * No preparation of the CF cards with D1000X Utility necessary (actually, it must not be done!). Works with just FAT32 formatted cards. * New "Play loop" function allows for continous playback of a single file in a loop...
Need help?
Do you have a question about the D1000X and is the answer not in the manual?
Questions and answers