Wolf Gourmet WGCM100S Use & Care Manual
Hide thumbs
Also See for WGCM100S:
- Use & care manual (20 pages) ,
- Use & care manual (64 pages) ,
- User manual
Table of Contents

Related Manuals for Wolf Gourmet WGCM100S


Summary of Contents for Wolf Gourmet WGCM100S
- Page 1 U S E & C A R E G U I D E G U I D E D ’ U T I L I S A T I O N E T D ’ E N T R E T I E N G U I A D E U S O S Y C U I D A D O S Le invitamos a leer cuidadosamente este instructivo antes de usar su aparato.
- Page 2 WOLF GOURMET Coffee System Welcome Thank you for your purchase of this Wolf Gourmet product. We look forward to being part of your kitchen for years to come. Wolf is a third-generation family-owned company that has a personal stake in the preparation of your food. With family ownership comes a great attention to detail and an uncompromised dedication to creating exceptional products.
-
Page 3: Customer Care
Contents Customer Care Safety Precautions As a Wolf Gourmet owner, you can count Wolf Gourmet Coffee System on our support. Our customer care center Parts and Features is available 24 hours a day, seven days a Getting Started week and is staffed by product experts at our headquarters in Madison, Wisconsin. -
Page 4: Important Safeguards
SAFETY PRECAUTIONS IMPORTANT SAFEGUARDS When using electrical appliances, basic safety precautions should always be followed to reduce the risk of fire, electric shock, and/or injury to persons, including the following: Read all instructions. • This appliance is not intended for use by persons (including children) with •... -
Page 5: Save These Instructions
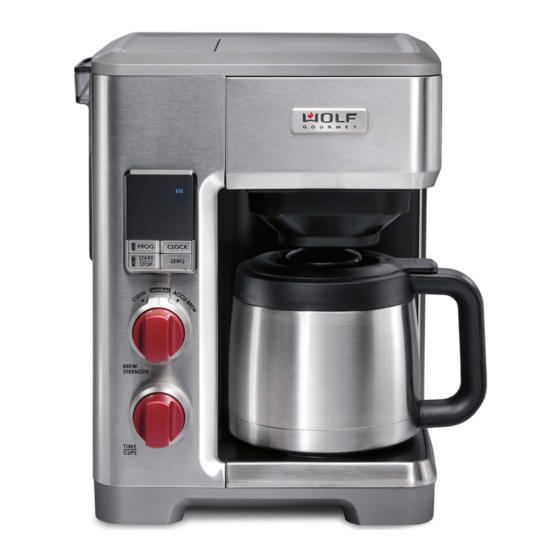
SAFETY PRECAUTIONS IMPORTANT SAFEGUARDS continued To disconnect Coffee System, turn controls to OFF. Remove plug from wall • outlet. WARNING! To reduce the risk of fire or electric shock, do not remove the • bottom cover. No user-serviceable parts are inside. Repair should be done by authorized service personnel only. - Page 6 WOLF GOURMET COFFEE SYSTEM PARTS AND FEATURES BEFORE FIRST USE: Wash all removable parts in hot, soapy water. Rinse and dry. Brew one cycle with water and discard water. PARTS AND FEATURES Water Reservoir Lid BREW STRENGTH Knob Water Filter Holder...
-
Page 7: Parts And Features
WOLF GOURMET COFFEE SYSTEM PARTS AND FEATURES Parts and Features Water Reservoir Lid: The lid is used to keep dust and other contaminants from the water in the water reservoir. Water Filter Holder: Used to easily lift the water filter out of the water reservoir. - Page 8 Unit can be used normally if cleaning is not performed as recommended. Icon will also appear when CLEAN cycle is utilized. Wolf Gourmet Logo - Unit is in standby mode. Water Filter - A reminder to change the water filter. 840298500 EN v08.indd 8...
- Page 9 WOLF GOURMET COFFEE SYSTEM PARTS AND FEATURES CONTROL PANEL BUTTONS & KNOBS Button/Knob Function Brew Modes MANUAL Press and hold for more than 1/2 second to ACCU-BREW activate the Set Start Time function. Press and quickly release to toggle between enabling and disabling the Start Time function.
-
Page 10: Getting Started
Getting Started WARNING Burn Hazard. To avoid hot coffee overflowing from the filter basket: • When using decaffeinated coffee, do not exceed the coffee manufacturer’s recommended serving amount. • If filter basket overflow occurs, unplug Coffee System and allow coffee in filter basket to cool before removing filter basket. CHOOSING A BREWING MODE MANUAL mode allows you to use the Coffee System like a traditional drip coffee maker. - Page 11 GETTING STARTED CHANGE CLOCK FROM 12-HOUR TO 24-HOUR FORMAT After the time has been set, the clock can be toggled between 12-hour and 24-hour format by pressing and holding the CLOCK button for more than 2 seconds. INSTALLING THE WATER FILTER Remove the filter pod from the packaging.
- Page 12 GETTING STARTED MANUAL BREW MODE Turn brew Mode Selector Bezel to MANUAL. Lift up to remove water reservoir from Coffee System. Remove water reservoir lid and fill the reservoir with enough cold water to brew the desired number of cups of coffee. Replace water reservoir lid onto water reservoir.
- Page 13 GETTING STARTED ACCU-BREW MODE Turn brew Mode Selector Bezel to ACCU-BREW. Lift up to remove water reservoir from Coffee System. Remove water reservoir lid and fill the reservoir with enough cold water to brew the desired number of cups of coffee. Replace water reservoir lid onto water reservoir.
- Page 14 GETTING STARTED Press the ZERO button to reset the coffee scale to zero. ADD COFFEE will flash next to the coffee scale. Add coffee until the scale icon is displayed. If too much coffee is added to the filter basket, the display will flash bars above the top of the scale.
- Page 15 GETTING STARTED USING THE PROGRAM START TIME FUNCTION The START TIME function allows you to program the Coffee System to brew at a later time. If you have not set the current time of day, please follow the steps shown in “Setting the Time of Day for the First Time.” Press and hold the PROG button for greater than 1/2 second to activate the Set Start Time function.
- Page 16 Care Recommendations WARNING Electrical Shock Hazard: Do not clean with metal scouring pads. Pieces can break off pad and touch electrical parts, causing a risk of electric shock. Your Coffee System should be cleaned regularly for best performance and long life. Regular cleaning will also reduce the risk of fire hazard.
- Page 17 CARE RECOMMENDATIONS USING THE CLEAN FUNCTION After 300 cycles, the CLEAN function will appear in the display as a reminder to clean the inside of the Coffee System. The Coffee System will perform 3 stages of cleaning. Cycle 3 performs a 20 minute soaking cycle to help remove mineral deposits. Cycles 2 and 1 rinse the vinegar from the Coffee System.
- Page 18 CARE RECOMMENDATIONS Press START/STOP. The display will show 2 and start a timer for 5 minutes. During this time the Coffee System will brew the water through the system to remove the residual vinegar. At the end of the cycle the display will show ADD WATER and 1.
-
Page 19: Troubleshooting
LCD displays “WATER FILTER” • Water filter needs to be replaced. See “Wolf Gourmet Coffee System Parts and Features” page for instructions on how to order a new filter. • WATER FILTER reminder will not disappear from display until the counter is reset. To reset WATER FILTER reminder, turn Mode Selector Bezel to CLEAN, and hold down the ZERO button until WATER FILTER reminder is removed. - Page 20 Carafe was not emptied since the last use . Wolf, Wolf & Design, Wolf Gourmet, W & Design and the color red as applied to knobs are registered trademarks and service marks of Wolf Appliance, Inc. Sub-Zero, Sub-Zero & Design, Dual Refrigeration, The Living Kitchen, Great American Kitchens, The Fine Art of Kitchen Design, and Ingredients are registered trademarks and service marks of Sub-Zero, Inc.
- Page 21 LIFETIME LIMITED WARRANTY This Wolf Gourmet product warranty applies only to cookware and cutlery products. Wolf Gourmet warrants cookware and cutlery to be free of defects in materials or workmanship for the lifetime of the product. Minor imperfections and discolorations are normal and are not considered defects.
- Page 22 60 Hz 900 W A107 WGCM100S Los modelos incluídos en el instructivo de Uso y Cuidado pueden ir seguidos o no por un sufijo correspondiente a una o varias letras del alfabeto y sus combinaciones, separadas o no por un espacio, coma, diagonal, o guión.
Need help?
Do you have a question about the WGCM100S and is the answer not in the manual?
Questions and answers
Coffee maker will not turn on
The Wolf Gourmet WGCM100S coffee maker may not turn on for the following reasons:
1. The water reservoir is empty — the Add Water icon will display, and the Program light will not come on.
2. The appliance is not plugged in or the outlet is not grounded properly.
3. The power cord or plug is damaged.
4. The appliance has malfunctioned or been damaged.
5. The bottom cover has been removed or tampered with (no user-serviceable parts inside).
Ensure the reservoir has water, the unit is on a flat surface, and the plug is securely connected to a working grounded outlet.
This answer is automatically generated