Table of Contents
Advertisement
Quick Links
Advertisement
Table of Contents
Troubleshooting

Summary of Contents for Artromick NX15
- Page 1 NX15 Mobile Computing Workstation Product Manual...
- Page 2 Artromick, its affiliated companies or its or their licensors, and may not be used for any unauthorized purpose, or disclosed to others without the prior written permission of the applicable Artromick entity.
-
Page 4: Table Of Contents
Overview Contents Overview ......................1 About the Artromick NX15 Workstation ..............1 Cart Features and Specifications ................2 Warnings and Cautions ....................5 Customer and Technical Support ................6 About This Manual ...................... 6 Setting Up the Cart ..................... 9 Overview ........................ - Page 5 Replace the Plug Hanger..................53 Replace the NX Scanner Bracket Assembly ............54 Replace the NX Mouse Holder ................. 55 Warranty ......................57 Warranty Statement ....................57 Index ..........................59 Artromick NX15 Workstation © 2010 Artromick | Proprietary + Confidential -iv-...
-
Page 6: Overview
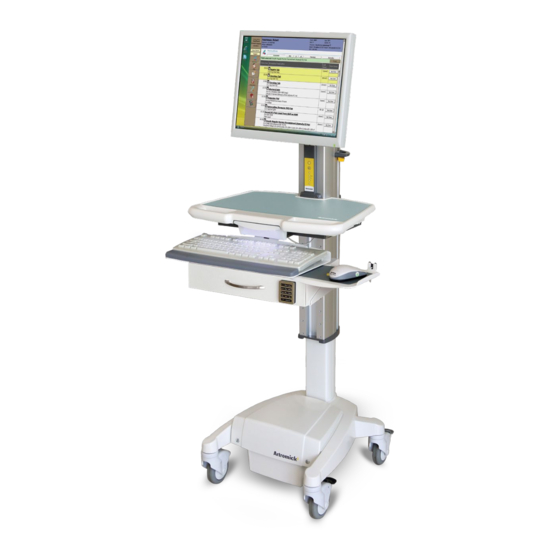
Each unit comes with an integrated monitor, keyboard, and mouse ready to accept almost any current Windows laptop computer system. The Artromick NX15 Workstation may also be ordered with an All in One computer system in lieu of the integrated monitor. -
Page 7: Cart Features And Specifications
Overview Cart Features and Specifications The Artromick NX15 Workstation combines the latest cart design with proven mobile computing and point-of-care technology solutions. This section describes the features and specifications of the cart. Cart Features/Components Rechargeable Battery: The rechargeable, sealed lead acid battery provides the extended run time required in demanding work environments. - Page 8 4” Locking Casters Battery and Charger Tracking Caster Artromick NX15 Workstation The Artromick NX15 Workstation comes in three basic computer configurations along with optional accessories. The three basic configurations are: 1. Laptop and Monitor 2. All in One 3. Thin Client and Monitor The Laptop and Monitor configuration is the standard configuration available.
- Page 9 Shipping and Storage Humidity: 10–95% non-condensing Electrical Safety Class I Equipment and Internally Powered No applied parts Equipment not suitable for use in the presence of flammable mixtures Continuous operation Artromick NX15 Workstation © 2010 Artromick | Proprietary + Confidential...
-
Page 10: Warnings And Cautions
Warning: Do not attempt to substitute a different computer, since power requirements vary. Substituting a different computer can cause damage to the computer and the cart. Please consult Artromick Technical Support when replacing the computer with a different model. ... -
Page 11: Customer And Technical Support
If the battery is not performing as expected, it may need to be replaced. Customer and Technical Support Artromick Customer and Technical Support is available 24 hours a day, seven days a week at 800-848-6462 When you call for technical support, please have the following information available: ... - Page 12 Bold Type—Indicates a selection that you are instructed to make or clear by pressing the appropriate button on the cart’s keypad Italics—Used for emphasis or to cross reference topics that contain additional information. Artromick NX15 Workstation © 2010 Artromick | Proprietary + Confidential...
-
Page 14: Setting Up The Cart
8. Inspect the cart again for shipping damage. Note: Some models may be shipped in more than one container. If so, follow the applicable steps for each container. Contact Artromick Customer Support if you identify any damage. Artromick NX15 Workstation © 2010 Artromick | Proprietary + Confidential... -
Page 15: Transport And Storage
Long-Term Unit Storage You must charge the batteries at least once every 30 days or as needed. Improper care may cause damage to the power system. For more information, contact Artromick Technical Support. Setting Up Your Cart Initial Setup Procedure To set up your cart, complete the following procedure: 1. -
Page 16: Using The Cart
Warning: If the grounding of the AC receptacle is compromised, do not insert the AC plug into the receptacle. If the hospital-grade cord is damaged, do not use the cord. Call Artromick Customer Support to order a replacement cord. Artromick NX15 Workstation ©... - Page 17 NX Articulating Keyboard Tray Serial Number NX Slotted Shelf Customer Supplied Assembly or locking Computer shelf Spiral Power Cord NX Base Cover Battery and Charger 4” Locking Casters Tracking Caster Artromick NX15 Workstation © 2010 Artromick | Proprietary + Confidential -12-...
- Page 18 Front of Cart Communication Port—The communication port is normally used by service technicians and Artromick personnel to set up and service the cart. Serial #—Located on front left of the work surface. A second label is located under the base cover Artromick NX15 Workstation ©...
- Page 19 LED Keyboard Light Key—The LED keyboard light key toggles the keyboard light on and off. LED Keyboard Light Toggle Key Battery Alarm Silence Battery Display Status Display and Functions Artromick NX15 Workstation © 2010 Artromick | Proprietary + Confidential -14-...
- Page 20 LED Keyboard Light Key—The LED keyboard light key toggles the keyboard light on and off. Notice: LED keyboard light should not be used as a primary light source. Swivel adjustment set screw Tilt adjustment set screw Artromick NX15 Workstation © 2010 Artromick | Proprietary + Confidential -15-...
-
Page 21: Powering Up The Cart
Full LED will be on and the three center LEDs will continue to cycle. Note: The cart will charge with the switch in the OFF position, however, the display will not show the status. Artromick NX15 Workstation © 2010 Artromick | Proprietary + Confidential -16-... - Page 22 The battery alarm silence key will still work. The battery alarm will continue its beeping cycle until the battery alarm silence key is pressed and held down or the cart is plugged in. Artromick NX15 Workstation © 2010 Artromick | Proprietary + Confidential -17-...
-
Page 23: Nx Drawer Cabinet
Using the Cart NX Drawer Cabinet The drawer accessory for the NX15 cart comes in 3" and 6" versions. The drawers may be configured with a key lock, or a keyless lock mechanism. One or more drawers may be installed on the NX15 Cart. - Page 24 Note: The drawer will automatically relock when the drawer is closed. NX Shelf The NX15 comes with a slotted shelf for holding the customer supplied laptop computer. The shelf has an access hole in the rear for easy connection of the power, video and mouse cables to the computer or other peripheral devices.
- Page 25 Using the Cart The figures below show a locking shelf assembly in both the closed position (locked) and in a semi-open position. Locking Shelf (Closed) Locking Shelf (Semi-Open) Artromick NX15 Workstation © 2010 Artromick | Proprietary + Confidential -20-...
-
Page 26: Nx Column Accessories
2. Remove the drawer or cabinet assembly from the column if required. 3. Remove the four mounting bolts holding the accessory to the column and set it aside. 4. Repeat steps 1 through 4 above to install a replacement accessory. Artromick NX15 Workstation © 2010 Artromick | Proprietary + Confidential -21-... -
Page 27: Nx Accessory Bracket Assembly And Nx Rear Mount Bracket Assembly
NX Rear Mount Bracket 1. Position the NX Rear Mount Bracket over the NX Accessory Bracket aligning the screw holes. 2. Insert and tighten the two Phillips head screws. Artromick NX15 Workstation © 2010 Artromick | Proprietary + Confidential -22-... -
Page 28: Attaching Accessories To The Nx Accessory Bracket
A mouse holder attached to a shelf is shown in the figure below. NX Mouse Holder Note: Mounting holes are available on both the left- and right- hand sides. Artromick NX15 Workstation © 2010 Artromick | Proprietary + Confidential -23-... -
Page 29: Attaching The Nx Iv Pole
Note: Step 1 may not be needed since the IV Pole comes as a complete kit. Procedure 1. Attach the IV Pole brackets to the NX15 accessory brackets as previously described with two Phillips head screws for each attachment. 2. Install two NX Accessory Brackets on the desired side or back of the column as previously described. -
Page 30: Maintenance
Allow your cart to dry completely before plugging the power plug into a wall outlet. Routinely maintain your cart to ensure proper function and performance. Artromick NX15 Workstation © 2010 Artromick | Proprietary + Confidential -25-... -
Page 32: Troubleshooting
This section provides General Tips Troubleshooting Guide For additional information contact your supervisor or Artromick Technical Support 24/7 at 800-848-6462 General Tips If the cart does not function properly, try the following: Make sure the power switch is in the ON position. -
Page 33: Troubleshooting Guide
Verify that the battery voltage is greater than 10.5 V unplugged Check for obstructions Cart hard to push or Unlock the locking casters swivel Casters may need to be replaced Artromick NX15 Workstation © 2010 Artromick | Proprietary + Confidential -28-... - Page 34 Try adjusting the tension on the pivot mount Monitor does not pivot Replace the pivot mount properly or at all Power plug hanger no Replace the power plug hanger longer will hold power plug Artromick NX15 Workstation © 2010 Artromick | Proprietary + Confidential -29-...
-
Page 36: Repair
Note: Should you wish to lay the cart on the floor, use two people to lower it. NEVER lay the cart on its front. Caution: When working on electronic components, use a ground strap to prevent static discharge. Artromick NX15 Workstation © 2010 Artromick | Proprietary + Confidential -31-... - Page 37 In addition a multi-meter may be required to measure battery voltage and for troubleshooting open and short circuits in cable connections. Other standard shop tools may be required depending on customer supplied or optional accessories installed. Artromick NX15 Workstation © 2010 Artromick | Proprietary + Confidential -32-...
-
Page 38: Parts Lists
Repair Parts Lists Replaceable Parts List The following list gives the most common field replaceable parts. Should the part you need not be listed below, call Artromick Technical Support for advice or service. Standard Parts Part Number Description 18085 Monitor, 17”, LCD, IIY... - Page 39 Monitor pivot mount, std, complete 20573 NX Keyboard Palm Rest, Full 20607 NX Drawer Cabinet Divider 20151 10” Keyboard drawer slides 20735 NX entry drawer, 3”, Assembly 20736 NX entry drawer, 6”, Assembly Artromick NX15 Workstation © 2010 Artromick | Proprietary + Confidential -34-...
-
Page 40: Replace 12V Battery
8. Using a #2 Phillips screwdriver, unscrew the two screws from the battery restraining bracket holding the battery in place. 9. Set the battery bracket aside. Battery Access Base Cover Artromick NX15 Workstation © 2010 Artromick | Proprietary + Confidential -35-... - Page 41 18. Test the base cover by trying to lift it in the rear. It should be held in position. 19. Plug the black spiral power plug into an AC outlet and charge the battery for at least three hours prior to use. Artromick NX15 Workstation © 2010 Artromick | Proprietary + Confidential -36-...
-
Page 42: Replace Casters
Invert the locked caster making sure the black lever is facing out. This will allow for easy locking/unlocking once the caster is installed. 6. Using two people, return the unit to its upright position. Artromick NX15 Workstation © 2010 Artromick | Proprietary + Confidential -37-... -
Page 43: Remove The Work Surface Of The Cart
4. Using pressure with the thumbs, slide the tray forward approximately 1/2”. 5. Lift the tray and set it aside. 6. To re-install the work surface, reverse the above steps. Artromick NX15 Workstation © 2010 Artromick | Proprietary + Confidential -38-... -
Page 44: Replace The Keyboard Palm Rest
9. Press the cables within the top structure and attach to the cable clip on the bottom of the top structure. 10. Replace the work surface as previously described. Mouse or Keyboard Artromick NX15 Workstation © 2010 Artromick | Proprietary + Confidential -39-... -
Page 45: Replace The Mouse Tray Assembly
5. Reposition the keyboard and mouse tray in their respective positions. Artromick NX15 Workstation © 2010 Artromick | Proprietary + Confidential -40-... -
Page 46: Replace The Keyboard Tray Assembly
6. Install the new keyboard tray assembly. With the tray fully extended, install the bumper stop. 7. Plug the keyboard back into the USB hub and place the keyboard and mouse back onto the appropriate trays. Keyboard Tray Assembly Artromick NX15 Workstation © 2010 Artromick | Proprietary + Confidential -41-... -
Page 47: Replace Keyboard Tray Track Assembly
1. Remove keyboard tray assembly 2. Using a #2 Phillips screwdriver, unscrew the six track assembly screws 3. Replace with new track 4. Replace keyboard tray assembly Keyboard Tray Track Assembly Artromick NX15 Workstation © 2010 Artromick | Proprietary + Confidential -42-... -
Page 48: Replacing Drawer And Cabinet Slides
4. Remove the four screws (two on each side) that hold the drawer slides to the drawer. 5. Remove the old slides from the drawer. 6. Position the replacement drawer slides and reattach them to the drawer with four screws. Drawer Slides Artromick NX15 Workstation © 2010 Artromick | Proprietary + Confidential -43-... - Page 49 11. Test to verify that the drawer slides in and out with a smooth motion and that the drawer is stopped in the fully open position. Artromick NX15 Workstation © 2010 Artromick | Proprietary + Confidential -44-...
-
Page 50: Replace The Monitor
6. Reattach the replacement monitor. Monitor Locking Knob Back of Cart Showing Monitor 7. Reconnect the monitor video and power cables to the monitor. Artromick NX15 Workstation © 2010 Artromick | Proprietary + Confidential -45-... -
Page 51: Replace The Spiral Power Cord
3. Lower the access panel and slide the power cord strain relief out of the slot. Caution: Be careful not to put strain on or damage the attached circuit breaker. Artromick NX15 Workstation © 2010 Artromick | Proprietary + Confidential -46-... - Page 52 7. Reinstall the NX Base Access Panel to unit making sure the circuit breaker remains in position, all wires are properly located, and the static elimination chain remains free. Artromick NX15 Workstation © 2010 Artromick | Proprietary + Confidential -47-...
-
Page 53: Replace The Nx Power Pcb
Note: If the unit does not work after reinstalling the NX Power PCB, verify all connectors are properly installed. Caution: Do not force connections. 8. Reinstall the PCB cover and work surface. Artromick NX15 Workstation © 2010 Artromick | Proprietary + Confidential -48-... -
Page 54: Replace The Dc Power Plug
Repair Replace the DC Power Plug If it appears that a DC power cord needs replaced, please contact Artromick with the cart serial number and which device appears to have lost power. This will allow Artromick to determine which DC power cord replacement to provide. -
Page 55: Replace The Usb Hub
5. Reconnect the USB hub to the mouse, keyboard, and computer cables. Caution: Do not force connections. All cables are keyed and will only go in the appropriate socket the correct way. 6. Reinstall the work surface. Artromick NX15 Workstation © 2010 Artromick | Proprietary + Confidential -50-... -
Page 56: Replace The Nx Status Display
8. Reinstall the work surface. 9. Reinstall the plastic molding on top of the NX Column. 10. Reconnect the video and power cables to the monitor. Artromick NX15 Workstation © 2010 Artromick | Proprietary + Confidential -51-... -
Page 57: Replace The Charger
9. Reinstall the battery and base cover. 10. Depending on the status of the battery, plug in the cart and allow the battery to charge for three hours prior to use. Artromick NX15 Workstation © 2010 Artromick | Proprietary + Confidential -52-... -
Page 58: Replace The Plug Hanger
2. Remove the old power plug hanger and set it aside. 3. Position the new power plug hanger in its place. 4. Re-screw the power plug hanger in place. Power Plug Hanger Artromick NX15 Workstation © 2010 Artromick | Proprietary + Confidential -53-... -
Page 59: Replace The Nx Scanner Bracket Assembly
6. Use the 5/64” Allen wrench to tighten the two pressure screws that held the old assembly in place. Note: Be sure not to over tighten the pressure screws. Over tightening may cause damage to the channel. Artromick NX15 Workstation © 2010 Artromick | Proprietary + Confidential -54-... -
Page 60: Replace The Nx Mouse Holder
5. Using a #2 Phillips screwdriver, screw two screws on the bracket at the top of the slotted shelf to hold the new mouse tray in place. NX Mouse Holder Artromick NX15 Workstation © 2010 Artromick | Proprietary + Confidential -55-... -
Page 62: Warranty
Warranty Statement With respect to Products, Artromick provides a one-year “Return-To-Factory” warranty for the carts sold by Artromick. The warranty period begins on the date that the Equipment is delivered to the customer. This warranty covers all parts and materials except consumables (i.e. -
Page 64: Index
Power, Cord, 47 Display Support, 5 Documentation Conventions, 7 Drawer Cabinet, 18 Remove Work Surface, 38 Repair, 29 Electrical Safety, 4 Replaceable Parts, 33,34 Environmental, 4 Reset Button, 13 Help, 6 Artromick NX10 Workstation © 2009 Artromick | Proprietary + Confidential -59-... - Page 65 Storage, 10 Support, Technical, 6, 27 Voltage, 4 Swivel Pivot Mounts, 45 Warnings, 5 Technical Support, 6, 27 Warranty, 57 Tension Pivot Mounts, 45 Transport and Storage, 10 Troubleshooting, 27 Artromick NX15 Workstation © 2010 Artromick | Proprietary + Confidential -60-...
- Page 66 4800 Hilton Corporate Drive Columbus, Ohio 43232 800 848 6462 © Artromick, 2010 Part #6848 Rev. 00...
Need help?
Do you have a question about the NX15 and is the answer not in the manual?
Questions and answers