Table of Contents
Advertisement
Advertisement
Table of Contents

Summary of Contents for IVIEW 1760AIO
- Page 1 User Manual NOTE: For Spanish users, please go to 'Settings", then go to “Language & Input” to change from English to Spanish Language OSD. 17.3” All in One To assure the product to work in best status please read the user’s manual carefully before operation and keep it well for future use...
- Page 2 Video chat is made easy with the 2.0 MP front camera and built in microphone. The iVIEW 1760AIO features a built in 2600 mAh battery allowing you the freedom to take it with you On-the-Go! If you are looking for a high performance 17.3" Portable PC, iVIEW-1760AIO is the best All in One Portable PC you can't miss out.
-
Page 3: Table Of Contents
Table of Contents 1. Product Overview ................... 2 2. Keyboard & Mouse Setup................3 3. System Setup ....................4 4. Desktop Functions ..................5 4.1 Windows Start Menu ................5 4.2 Basic Touch Screen Commands ............5 4.3 Personalization ..................7 4.4 Action center .................. -
Page 4: Product Overview
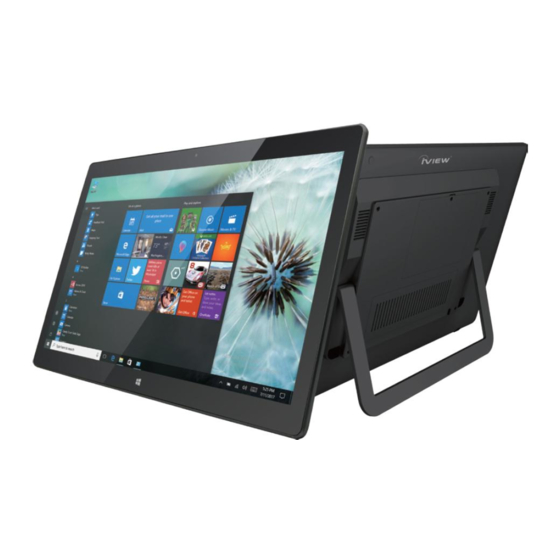
1. Product Overview Iview PC: 1. Main Camera 2. Charging Indicator Light 3. Home Button 4. Power Button: Press and hold to power on/off. Tap it briefly to enter and wake from sleep mode. 5. Volume- / Volume+: Lower / raise Volume. -
Page 5: Keyboard & Mouse Setup
2. Keyboard & Mouse Setup Before powering on your device, follow the instructions below to set up your wireless keyboard and mouse. First, open battery cover on the mouse and remove the wireless receiver. You can find it located next to the battery compartment, shown in the picture below: Insert the receiver in any of the device’s USB Ports (shown in Section 1). -
Page 6: System Setup
3. System Setup Windows will automatically help you set up your internet connection and system preferences. 3.1 Account Setup Once your network is set up, you’ll be asked to set up an account. You can add an existing Microsoft account, or you can create one. If you do not wish to create a Microsoft account at this time, you can select OFFLINE ACCOUNT near the bottom left-hand corner. -
Page 7: Desktop Functions
4. Desktop Functions 4.1 Windows Start Menu: You can access the Windows Start Menu by clicking on the Windows Icon in the bottom-left corner of the screen, or by pressing the key on your keyboard. Some apps and functions will only be available using a Microsoft Account. 4.2 Basic Touch Screen Commands Task View Action Center... - Page 8 Zoom Out Zoom In To zoom out on an image or web page, To zoom in on an image or web page, place two fingers on the screen and place two fingers on the screen and pinch pinch inwards. outwards. Scroll up Drag &...
-
Page 9: Personalization
4.3 Personalization Your device comes with an assortment of pre-installed applications. You can view them all in the start menu, under “All Apps”. You can also pin your favorite applications to the start menu or the taskbar for quick access. If you would like to pin apps to the start menu, right-click, or tap &... -
Page 10: Action Center
You can also unpin apps that you don’t use, by right-clicking and selecting “Unpin”. If you’re using the touch screen, tap and hold the pinned application for about one second, click unpin it from the Start Menu or Taskbar. You can also click for additional options. -
Page 11: Task View
4.5 Task View From the left side of the screen, place and slide your finger to the right to open Task View. This will display all applications currently running on your device. Click on an application to close it. 4.6 Split-Screen If you want to split-screen two applications at the same time, open the two apps you want to use, making sure one of them is full screen. -
Page 12: Additional Functions
5. Additional Functions 5.1 Sleep, restart and shut down ● Forced Reset / Shutdown If the tablet freezes, you can press and hold the Power button for 8~12 seconds. The tablet will shutdown automatically. 5.2 Recovery When your device is not performing well, you can perform a Windows Reset. (NOTE: This WILL erase all your data and revert back to factory settings) First, click on the start icon, or press the key on your keyboard. - Page 13 You’ll then be brought to the SETTINGS Window. At the bottom, select UPDATE AND SECURITY, followed by RECOVERY. Select the Get Started Button underneath RESET THIS PC. You will be prompted TWICE. First, select, REMOVE EVERYTHING. When Prompted again, select JUST REMOVE MY FILES. Make sure your device is plugged in, and select RESET.
-
Page 14: Bluetooth
Turn on Bluetooth by opening the action center and tapping on the Bluetooth Icon. To pair a device, tap and hold the Bluetooth icon until the option “Go to Settings” pops up. Select it. Your 1760AIO will automatically look for devices to pair. b) Sending Files: To send files, click on the Bluetooth icon on the lower right corner of the desktop. -
Page 15: Storage Expansion
6.1 Internal Hard Drive Your 1760AIO comes with a hard drive port in the back of the device (shown in Section 1). Before installing a hard drive, make sure your device is powered off and unscrew the cover, using a Phillips screwdriver. -
Page 16: Product Features
7. Product Features * Screen: 17.3" Touch Screen, 1920 x 1080 IPS High Resolution ® ® * Processor: Intel Celeron Processor N3350, Dual Core * OS: Windows 10 Home * Memory: 4GB * Storage: 32GB * Wireless Connection: WIFI 802.11 b/g/n * Built in Bluetooth 4.0 * Camera: 2.0MP * Support Skype Video Call... - Page 17 Basic Warranty Statement This product is warranted to the original purchaser ONLY, to be free from defects in materials and workmanship under normal use, for ninety (90) DAYS (parts and labor) and one (1) YEAR (parts only) from the date of original purchase. We agree under the warranty period to replace product if it is determined to be defective at 'No Charge"...
- Page 18 Please review your user Guide carefully before Using this product. Additional troubleshooting information can also be found on the web at: www.iviewus.com and click on “Support” or email us at support@iviewus.com...
Need help?
Do you have a question about the 1760AIO and is the answer not in the manual?
Questions and answers