
Related Manuals for Besantek BST-DL102

Summary of Contents for Besantek BST-DL102
- Page 1 BST-DL102 / BST-DL103 / BST-DL104 Multi-Channel Thermocouple Thermometer User Manual...
-
Page 2: Table Of Contents
CONTENTS Chapter 1. BST-DL102 / BST-DL103 / BST-DL104 80X Hardware................1 1.1 Introduction.................................. 1 1.2 Application..................................1 1.3 Multi-channel Thermocouple Thermometers Model....................1 1.4 Appearance...................................2 1.5 Single-channel LCD Screen (BST-DL102)........................3 1.6 Two-channel LCD Screen (BST-DL103)..........................4 1.7 Four-channel LCD Screen (BST-DL104)......................... 5 1.8 Buttons..................................6... -
Page 3: Chapter 1. Bst-Dl102 / Bst-Dl103 / Bst-Dl104 80X Hardware
Besides, it can support 8 types thermocouple sensors (such as K, J, E, T, N, S, R, B), measuring -200degC to 1800degC with different sensor type suitable for the exact applications. BST-DL102 / BST-DL103 / BST-DL104 with BESANTEK specialized BST Software is easy to operate and quite convenient, widely applied in industrial production fields, food processing industry, pharmaceutical industry and research testing fields as well as other temperature monitoring applications. -
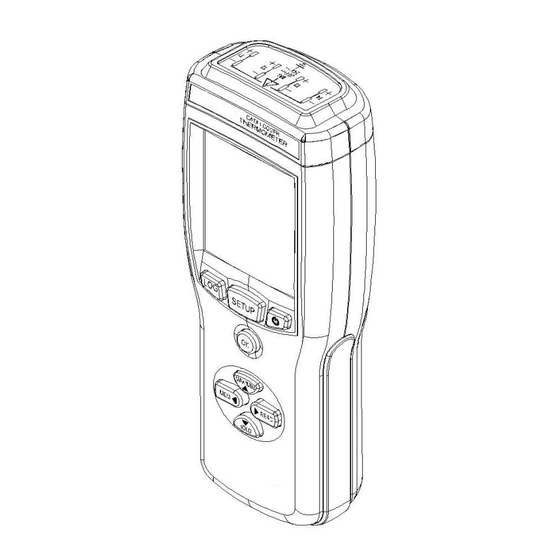
Page 4: Appearance
5- OK button under the setup mode, and Battery cover backlight button under normal working mode 6- Maximum and minimum checking buttons BST-DL102 cap(sensor port) 7- Manual recording data checking button BST-DL103 cap(sensor port) 8- The previous data checking button BST-DL104 cap(sensor port) -
Page 5: Single-Channel Lcd Screen (Bst-Dl102)
1.5 Single-channel LCD Screen (BST-DL102) Sensor type symbol display area. Count for auto-recording and manual-recording data Temperature data display area This symbol shows being the manual-recording checking status This symbol shows being the setup status Clock symbol This symbol shows being the manual recording... -
Page 6: Two-Channel Lcd Screen (Bst-Dl103)
1.6 Two-channel LCD (BST-DL103) This symbol shows being the setup mode Count for manual-recording or auto-recording data This symbol shows being the This symbol shows being the maximum/minimum data checking status manual-recording data checking status Sensor type symbol display area Symbol for clock Symbol for channel 1 and channel 2 Year/month-date/clock alternate display area... -
Page 7: Four-Channel Lcd Screen (Bst-Dl104)
1.7 Four-channel LCD Screen (BST-DL104) This symbol showing being the setup mode Count for auto-recording or manual-recording data This symbol shows being the maximum or This symbol shows being the manual-recoding minimum data checking status data checking status Sensor type symbol display area Symbol for clock T1,T2,T3,T4 for channel 1, channel 2, Year/month-date/time alternate display area... -
Page 8: Buttons
1.8 Buttons Buttons Introduction for buttons operation Click to turn on the instrument and press long for 3 seconds to turn it off. Automatic shutdown in 15 minutes. Click to enter into the logging mode, click again to exit the LOG(auto-recording) mode. Click to enter into the setup mode, click again to exit the current mode and save the settings. -
Page 9: Chapter 2. Bst Software
Chapter 2. BST Software (BST V1.2 English Version) 2.1 Install Driver & Software Windows 64bit please install 64bit-driver. Please Install BST Software in D:>\... -
Page 10: Setting The Logger's Properties To Start A New Measurement
2.2 Setting the Logger’s Properties to Start a New Measurement. Connect the data logger to a free USB port on the computer.1 Running BST Software on the PC. From the toolbar select Connect.2 Read the logger’s properties. Set the properties. Sync the properties &... -
Page 11: Properties Description
2.3 Properties Description Property Text Description Name English letters Name of the logger Numbers 10 Characters Must be the same as the one in the label of logger. Sampling Interval (s) Number from 1 to 240 Sampling frequency in LCD screen Log Interval (s) Number from 1 to 86400 Logging frequency. -
Page 12: Download The Records After A Measurement
2.4 Download the Records after a measurement. 11. Connect the data logger to a free USB port on the computer. 12. Running BST software on the PC. 13. From the toolbar select Connect. 14. From the toolbar select Download 15. Choose Auto Logs (LOG) or Manu Logs (MEM) to download Once the data is transferred from the logger to the PC, the data graph will be displayed. -
Page 13: Data Listing Window
Tips: Press and hold the left mouse button to drag a box in the graph, when the left mouse button is released, the graph will be redraw with the data in the selected rectangle area. Click right button, then the graph will be redrawing with all the data in the logs file. 2.5 Data Listing Window Click button on the toolbar, and then the data listing window is shown below. -
Page 14: Delete Records In The Logger
2.7 Delete records in the logger 16. From the toolbar select Delete 17. Choose Auto Logs (LOG) or Manu Logs (MEM) to delete Delete will clear the Logger’s LOG/MEM Record. It has no effect on record in the computer. 2.8 Check the Save File in File List The file list pane lists all the files in the directory Logfiles which is located in the installed directory of BST-Software. -
Page 15: Chapter 3. Attention
BST-DL102/BST-DL103/BST-DL104 are not waterproof. Do not connect loggers with computer when the logger is on water. BST-DL102/BST-DL103/BST-DL104 plastic shell is ABS, flame retardant, not resistant to acid and alkali. If repair is needed, only authorized technician could do the repair. -
Page 16: Chapter 4. Faq
Chapter 4. FAQ 4.1 LCD Screen Dim Reason: Insufficient battery or the environment temperature is too low or too high. Solution: In the case of insufficient battery, please replace the battery. If resulted from environment temperature, please immediately take the logger out of the environment. 4.2 Recording (LOG) are Automatically Stop Reason: When the battery level is low, there will not be sufficient power to support recording function of the logger.
Need help?
Do you have a question about the BST-DL102 and is the answer not in the manual?
Questions and answers