Advertisement
Table of Contents
- 1 Table of Contents
- 2 Warnings
- 3 Before Lighting Instructions
- 4 Safety Practices to Avoid Injury
- 5 Parts List
- 6 Assembly Instructions
- 7 Electricalwarning
- 8 Connecting / Disconnecting LP Gas Cylinder
- 9 Lighting Instructions
- 10 Care and Maintenance
- 11 LPG to NG Conversion
- 12 Troubleshooting
- Download this manual
Advertisement
Table of Contents

Summary of Contents for Mont Alpi Mai805 Island
- Page 1 Mai805 Island Instruction Manual and Installation Instructions...
-
Page 3: Table Of Contents
Contents Warnings Before Lighting Instructions Safety Practices to Avoid Injury Parts List Assembly Instructions Electrical Warning Connecting / disconnecting LP Gas Cylinder Lighting Instructions Care and Maintenance LPG to NG Conversion ... -
Page 4: Warnings
Read Carefully WARNING Leave the instructions with the consumer for the consumer to retain for future reference. FOR OUTDOOR USE ONLY. Do not store or use gasoline or other flammable vapors in the vicinity of this of any other appliance. -
Page 5: Before Lighting Instructions
Before Lighting Inspect the gas supply hose prior to turning on the gas. If there is evidence of a cut, any wear or abrasion it must be replaced prior to use. Only the pressure regulator and gas hose assembly supplied with this appliance should be used. -
Page 6: Safety Practices To Avoid Injury
Safety Practices to Avoid Injury When properly cared for, your grills will be safe and reliable for many years. However, the grill produces intense heat that can increase accident potential and must be handled with extreme care. When using this grill basic practices must be followed, including but not limited to the following: ... -
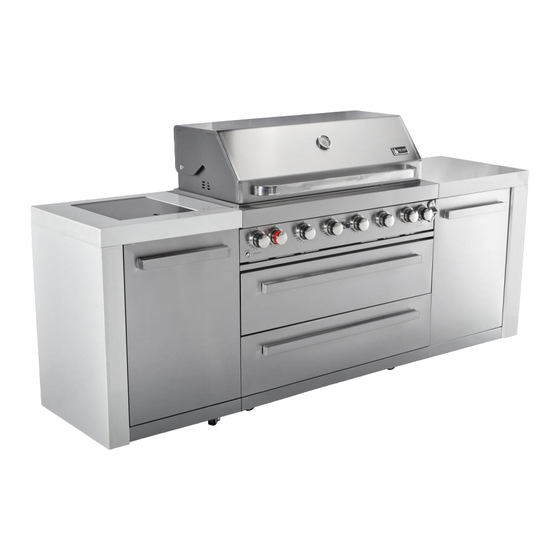
Page 7: Parts List
Parts List 1. Warming Rack 2. Cooking grid 3. Side burner grid 4. Flame Tamer 5. Side burner 6. Hood 7. Side Cabinet... -
Page 8: Assembly Instructions
Assembly Instructions Before assembly, make sure all parts are present. If any part is missing or damaged, do not attempt to assemble the appliance. Tools Required Philips screwdriver (not included) 1. Connecting the Side Burner Module... - Page 9 2. Connecting and Fixing the Modules...
- Page 10 3. For a Propane Cylinder Attach the regulator to the propane cylinder by turning the regulator handle clockwise as shown. If the outdoor appliance is not in use the gas must be turned “OFF” at the liquid propane cylinder. WARNING Check all gas supply fittings for leaks before each use.
- Page 11 4. Flame Tamer Assembly 6. Cooking Grid Assembly 5. Warming Rack Assembly...
- Page 12 7. Side Burner Grid Assembly 8. Ignition and Rotisserie 1 x AA Battery is required for ignition. Battery is not included...
-
Page 13: Electricalwarning
Read Carefully ELECTRICALWARNING To protect against electrical shocks, do not immerse the cord or plug in water or any other liquid. Unplug from the outlet when not in use and before cleaning. Allow to cool before putting on or taking off parts. ... -
Page 14: Connecting / Disconnecting Lp Gas Cylinder
Connecting the Liquid Propane Gas Cylinder To connect the liquid propane gas cylinder: 1. The cylinder valve should be in the OFF position. 2. Make sure the burner valve is in the OFF position. 3. Inspect the valve connections, port and regulator assembly. Remove debris and inspect the hose for damage. -
Page 15: Lighting Instructions
Operating Instructions Only the pressure regulator and hose assembly supplied with the grill should be used. Any replacement of pressure regulator and hose assembly must be specified by the grill manufacturer. Gas Consumption Burner Injector BTU/Each Injector BTU/Each (mm) (mm) Main Burner 0.98 12,000... - Page 16 To Light the Infrared Rear Burner 1. Read the instructions before lighting. 2. Open the hood during lighting. 3. Push down and turn the control knob counter clockwise to HIGH (+) and keep holding the knob for 10- 15 seconds. At the same time press the ELECTRONIC IGNITER button for 2-3 seconds. 4.
-
Page 17: Care And Maintenance
Care and Maintenance Stainless Steel There are many stainless steel cleaners available. Always use the mildest cleaning process first, scrubbing in the direction of the grain. DO NOT use steel wool as it will scratch the surface. To touch up noticeable scratches in the stainless steel, sand very lightly with dry 100 grit sand paper in the direction of the grain. -
Page 18: Lpg To Ng Conversion
Convert from LPG to NG Read Carefully WARNING 1. Conversions are to be done by and authorized person only. 2. Make sure all control knob and cylinder valves are in the OFF position. 3. The appliance must be isolated from the gas supply piping system by closing its individual manual shut-off valve during any pressure testing of the gas supply piping system at test pressures equal to or less than ½... - Page 19 Tools Required for Converting from LPG to NG Main Burner Conversion 2. Unscrew and remove the rear panel pictured. 1. Unscrew the main burner securing screws and remove the burner sitting alongside it.
- Page 20 3. With the burner removed, you will see the brass gas jet (LPG) which is screwed into the end of the valve. Using the 6mm but driver supplied, unscrew the end of the LPG jet while retaining the inner (NG) jet. 4.
- Page 21 Rear Burner Conversion 2. Remove the back burner cover 1. Remove the LPG jet from the elbow shaped brass injector assembly. 3. Reassemble the burner...
- Page 22 Side Burner Conversion 1. Unscrew the valve 2. Using the 6mm nut driver supplied, unscrew the end LPG jet while retaining the inner (NG) jet, then reassemble the burner. Connect the QDD to the Natural Gas Supply, then connect the grey hose to the QDD Connect the Grey Hose to the Grill 1.
-
Page 23: Troubleshooting
Troubleshooting Problem Possible Cause Prevention/Solution Burner will not •No gas flow. • Check to see if LP tank is empty. light. •Coupling nut and regulator not fully • Turn the coupling nut about one-half to three connected. quarters additional turn until solid stop. Tighten by hand only-do not use tools. - Page 24 Customer service Mont Alpi Phone: 949-207-9595 25541 Arctic Ocean Dr Email: John@Mont AlpiOnline.com Lake Forest, CA 92630 More from Mont Alpi COVMAi805 – 805 Island durable weather resistant cover. MAPZ-SS Table top gas pizza oven, stainless steel. Natural gas conversion friendly.
Need help?
Do you have a question about the Mai805 Island and is the answer not in the manual?
Questions and answers
We had someone assemble the gas grill but the igniter does not work to fire it up on Mont Alpi 805 Island grill model
The provided context does not contain specific troubleshooting steps for fixing the igniter on the Mont Alpi Mai805 Island grill. However, you can try the following general steps:
1. Ensure the grill is properly connected to a gas source and has been leak tested.
2. Check if the electronic igniter button is functioning by pressing it and listening for a clicking sound.
3. Inspect the igniter electrodes for dirt, grease, or damage, and clean if necessary.
4. Verify that the battery (if applicable) in the igniter module is functional and replace it if needed.
5. Ensure the wires connecting the igniter to the electrodes are securely attached.
6. If the igniter still does not work, manually light the burner using a long lighter and consult the user manual or customer service for further assistance.
If the issue persists, contacting Mont Alpi customer service may be necessary.
This answer is automatically generated
how do I get a replacement ignitor
Your installation manual leaves a lot to be desired. I **** looking for a diagram and instructions on how to connect the gas line piping provided with my island to the side burner. Please help
Is there a grease pan under the sear station?
refrigerator temperature