
Summary of Contents for Omron Adept MobileRobots Pioneer 3
- Page 1 Omron Adept Mobile Robots Development Platforms for Research and Education Pioneer 3 Operations Manual P3DX-SH , P3AT-SH with ARCOS P3X0001, P3T0001 Revision 6.5 ● April 7, 2017...
-
Page 2: About Omron Adept Mobilerobots
Developers and users are authorized by revocable license to develop and operate custom software for personal research and educational use only. Duplication, distribution, reverse-engineering or commercial application of Omron Adept MobileRobots, Omron Adept Technologies or Omron Corporation software and hardware without license or the express written consent is explicitly forbidden. - Page 3 Important Safety Instructions Read the installation and operations instructions before using the equipment. Avoid using power extension cords. To prevent fire or shock hazard, do not expose the equipment to rain or moisture. Refrain from opening the unit or any of its accessories. Keep wheels away from long hair or fur.
-
Page 5: Table Of Contents
Contents About Omron Adept MobileRobots ............................. ii Chapter 1 Introduction ................................ 1 Robot Packages ..................................1 Included Components (all robots) ............................1 Optional Components, Parts and Attachments (partial list)....................1 IO and Power Connections ..............................2 Software and Pioneer SDK ............................... 2 Additional Resources ................................ - Page 6 Integrated PC ..................................13 Computer Control Panel ..............................13 Operating the Onboard PC ..............................14 Onboard PC Networking ..............................14 Gyroscope ....................................15 Chapter 4 Quick Start ................................. 16 Preparative Hardware Assembly ............................16 Install Batteries .................................. 16 Client-Server Communications ............................16 ARIA Demo .....................................
- Page 7 SONAR Range Readings ..............................33 Stalls and emergencies ................................33 Accessory Commands and Packets ............................33 Packet Processing ................................34 CONFIGpac and CONFIG Command ........................... 34 Serial ...................................... 36 HOST-to-AUX Serial Transfers ............................36 Encoders ....................................36 Buzzer Sounds ..................................36 TCM2 Compass ..................................
- Page 8 Gyroscope Calibrations ..............................51 Drive Lubrication ..................................52 Batteries....................................52 Changing Batteries ................................52 Hot-Swapping the Batteries ............................... 52 Charging the Batteries ............................... 52 Automated Docking/Charging System ..........................53 Alternative Battery Chargers ............................. 53 Tightening the AT Drive Belt ..............................53 Getting Inside ..................................
-
Page 9: Chapter 1 Introduction
In addition to the companion resources listed above, we warrant your Pioneer 3 platform and our manufactured accessories against mechanical, electronic, and labor defects for one year. Third-party accessories are warranted by their manufacturers, typically for 90 days. -
Page 10: Io And Power Connections
Optional 2-axis, 2-button joystick for direct manual control of robot IO and Power Connections Your Pioneer 3 robot has a variety of expansion power and I/O ports for integration of a client PC, sensors, and other accessories. 3 RS-232 auxilliary serial ports (AUX serial) configurable from 9.6 to 115.2 kilobaud, accessible through robot microcontroller 1 “HOST”... -
Page 11: Additional Resources
The SONARNL libraries enable your SONAR-based Pioneer platforms to localize and autonomously navigate indoor spaces. Make your working maps for SONARNL with the free GUI Mapper 3-Basic application. Optional, typically accessory-bundled Pioneer SDK libraries include ARNL and MOGS. ARNL enables a much more robust, laser-based autonomous localization and navigation. -
Page 12: Support
Access to the e-mail newslist is limited to subscribers, so your address is safe from spam. However, pioneer-users the list currently is unmoderated, so please confine your comments and inquiries to issues concerning the operation and programming of Pioneer platforms. Support Have a problem? Can’t find the answer in this or any of the accompanying manuals? Or do you know a way that we might improve our robots? Share your thoughts and questions with us from the online form at the support website:... -
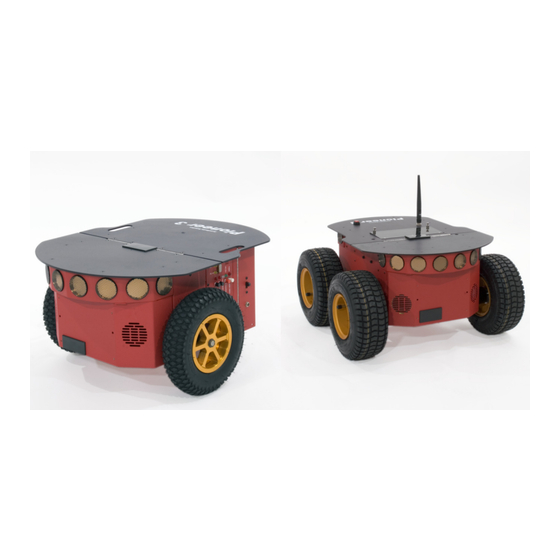
Page 13: Chapter 2 Specifications & Controls
Specifications & Controls Chapter 2 Figure 1. Pioneer 3-DX features Figure 2. Pioneer 3-DX’s physical dimensions and swing radius. HYSICAL HARACTERISTICS AND OMPONENTS Pioneer robots are composed of several main parts: Deck Motor Stop Button (optional on DX) User Control Panel... -
Page 14: Deck
The User Control Panel is where you have access to controls for the ARCOS-based onboard robot microcontroller. This panel is on the top deck of the Pioneer 3 AT, and is on the left sidepanel of the Pioneer 3 DX. -
Page 15: Serial Port
CCESSORY ANELS Your Pioneer 3’s sturdy, but lightweight aluminum body houses the batteries, drive motors, electronics and other common components, including the front and rear SONAR arrays. The body also has sufficient room, with power and signal connectors, to support a variety of robotics accessories inside, including an A/V wireless surveillance system, radio Ethernet, onboard computer, laser range finder and more. -
Page 16: Nose
SONAR Pioneer 3 supports up to four SONAR arrays, each with up to eight transducers that provide object detection and range information for collision avoidance, features recognition, localization, and navigation. The SONAR positions in all Pioneer 3 SONAR arrays are fixed: one on each side, and six facing outward at 20-degree intervals. -
Page 17: Motors, Wheels, And Position Encoders
OWER Pioneer 3 robots contain up to three hot-swappable 12V sealed lead-acid batteries, accessible through a hinged and latched rear door. We provide a suction cup tool to help grab and slide each battery out of its bay. Spring contacts inside the robot make contact with the battery terminal tabs when inserted. -
Page 18: Safety Arcos Watchdogs
All our recommended chargers are specifically designed for safe lead-acid battery recharging. Indicators on the module’s face show fast-charge mode (typically an orange LED) in which the discharged batteries are given the maximal current, and trickle mode (green LED indicator), which the batteries are given only enough current to remain at full charge. -
Page 19: Chapter 3 Accessories
Please also refer to the detailed documents that come with the accessory. OYSTICK AND OYDRIVE Although not all models come standard with an external joystick connector, your Pioneer 3 robot’s microcontroller has a joystick port and ARCOS contains a server for manual operation. -
Page 20: Automated Recharging Accessory
HOST SERIAL The power-contact mechanism and onboard power conditioning circuitry can be retrofitted to all Pioneer 3 and some Pioneer 2 and Performance PeopleBot robots. All require return to the factory. -
Page 21: Integrated Pc
NTEGRATED Mounted just behind the nose of the robot, the Pioneer 3 integrated PC is a common EBX form-factor board that comes with up to four serial ports, 10/100Base-T Ethernet, monitor, keyboard and mouse ports, USB ports and a hard-disk. -
Page 22: Operating The Onboard Pc
controls of the AT. The controls and ports use common connectors: standard monitor DSUB and PS/2 (older computers) or USB (newer computers) connectors on the mouse and keyboard. The Ethernet is a 10/100Base-T standard RJ-45 socket. slide switch controls power to the onboard PC. The LED lights when the computer has power. -
Page 23: Gyroscope
the computer OS to communicate with them. Unless you change internal settings on these devices, you can leave them as configured by MobileRobots. YROSCOPE The accessory gyroscope provides maximum 300 degrees-per-second rotational rate data to the AN6 analog port on your robot’s microcontroller. -
Page 24: Chapter 4 Quick Start
Install Batteries Out of the box, your Pioneer 3 robot comes with its batteries fully charged. The batteries are shipped separately.. Slide at least one and up to three batteries into the robot’s battery box through the back door. : If using a single battery, place it in the center. -
Page 25: Demo Startup Options
/usr/local/Aria/bin ./demo Demo Startup Options By default, the ARIA program attempts to connect with the Pioneer 3 robot controller through the serial port demo COM1 if on Windows or if on Linux. To change connection options, command-line arguments may be used to set /dev/ttyS0 options (see Table 1.) -
Page 26: A Successful Connection
Table 1. ARIA demo’s robot connection start-up options -remoteHost <Host Name IP> Connect with robot through a remote host over (abbreviated -rh) network instead serial port; requires special serial Ethernet hardware or IPTHRU software mediation. -robotPort <Serial Port> Connect with robot through specified serial port name;... -
Page 27: Disconnecting
Start serverDemo The ArNetworking client, , works to serverDemo mediate communications between your Pioneer 3 robot over the network and remote clients, such as the GUI MobileEyes. To examine its inner workings, look at (and others) sources serverDemo.cpp... -
Page 28: Quickstart Troubleshooting
The most common mistake is not having your robot’s “parameter” file located in the directory. For Aria/params Pioneer 3’s, the ARIA-parameter filenames are . These and all other ARIA parameter files p3dx-sh.p or p3at-sh.p either come with the latest version of. Note that the ARIA library itself contains internal parameter defaults in case the parameter file is missing. -
Page 29: Chapter 5 Software And Robot Control
Software and Robot Control Chapter 5 OBOT ONNECTION All Pioneer platforms use a two-tier client-server mobile robot-control architecture. In the model, firmware on the robot’s embedded controller works to manage all the low-level details of the mobile robot’s systems. These include operating the motors, firing the SONAR, collecting and reporting SONAR and wheel encoder data and so onall on command from and reporting to a separate client application, such as the ARIA demo. -
Page 30: Pid Controls
s h o r t m o v e , m a x v e l o c i t y m a x v e l o c i t y n o t r e a c h e d v e l o c i t y a c c e l d e c e l... -
Page 31: Position Integration
ACKET ROTOCOLS The Pioneer 3 communicates with a client using a client-server communication packet protocols, one for command packets from client to server and another for Server Information Packets (SIPs) from the server to client. Both protocols are byte streams consisting of five main elements: a two-byte header, a one-byte count of the number of subsequent packet bytes, the client command or SIP packet type, command data types and argument values or SIP data bytes, and, finally, a two-byte checksum. -
Page 32: Packet Checksum
Table 4. Client command packet protocol OMPONENT YTES ALUE ESCRIPTION header 0xFA, 0xFB Packet header; same for client and server byte count Number command/argument bytes plus Checksum’s two bytes, but not including Byte Count itself or the header bytes. Maximum of 249. -
Page 33: The Client-Server Connection
Nonetheless, the client-server interface provides a simple means for dealing with ignored command packets: Most of the client commands alter state variables in the server. By examining those values in respective SIPs, client software may detect ignored commands and re-issue them until achieving the correct state. LIENT ERVER ONNECTION... - Page 34 Table 5. ARCOS standard SIP contents ABEL ESCRIPTION 2 bytes Exactly in order 0xFA (250), 0xFB (251) HEADER byte Number data bytes (checksum), including BYTE COUNT header or byte-count bytes 0x3s Motors status; s = 2 when motors stopped or 3 when robot TYPE moving.
-
Page 35: Keeping The Beat-Pulse
Current rotational velocity in degrees X 10 per sec ROTVEL Not used on Pioneer. AULT LAGS Not used on Pioneer. byte Not used on Pioneer. EMPERATURE byte Not used on Pioneer. TATE HARGE Packet-integrity checksum CHECKSUM ‡ Client-side data-conversion factor. Consult the ARIA parameter file for your robot. ╪... -
Page 36: Command Listing
Command Listing Table 7. ARCOS client-side command set OMMAND ESCRIPTION VERSION Before Client Connection: none Start connection. Send in sequence. ARCOS echoes SYNC none synchronization commands back to client, and SYNC none robot-specific auto-synchronization after SYNC2. SYNC After Established Connection: none Reset server watchdog. - Page 37 degrees/sec (SETRV limit). Adjust heading relative to last setpoint; ± degrees DCHEAD (+ = ccw) Change rotation de(-) (+)acceleration, SETRA degrees/sec2 SONAR 1=enable, 0=disable SONAR; otherwise, bits 1-3 to specify an individual array number 1-4. See SONAR on page 32, below for more information. none Stop robot...
- Page 38 1=allow joystick drive from port while connected with JOYDRIVE a client; 0 (default) disallows. SONAR uint Change the sonar cycle time; in milliseconds. See CYCLE SONAR on page 32, below. Change the HOST serial port baud rate to 0=9600, HOSTBAUD 1=19200, 2=38400, 3=57600, or 4=115200.
-
Page 39: Motion Commands And Parameters
tens volts (100=10V); 0 to revert to real voltage none Force a power on-like reset of the microcontroller. RESET none Engage microcontroller maintenance (ARSHstub) mode. MAINTENANCE OTION OMMANDS AND ARAMETERS Table 8. Client motion-related commands OTATION HEAD (#12) Turn to absolute heading at SETRV max rotational velocity DHEAD (#13), Turn to heading relative to control point at SETRV max velocity... -
Page 40: Driftfactor, Revcount, And Ticksmm Parameters
rotation velocity command from the client or until the STOP button is reset. (See E_STOP and E_STALL later in this chapter.) DriftFactor, RevCount, and TicksMM Parameters Three client commands let you change, albeit momentarily for the current client-server connection, those values that affect translation, rotation and drift in your robot. -
Page 41: Sonar Range Readings
localization. For other applications, such as close-in obstacle avoidance, a shorter range but faster rate of update is better. Use the client command #48 to change the cycle timing on the fly to the command integer's argument SONAR_CYCLE value in milliseconds. Minimum and maximum values are two and 120 milliseconds, respectively. The default value is set in FLASH, normally to the legacy 40 milliseconds. -
Page 42: Packet Processing
serial baud rate to accommodate all data packets in the allotted cycle time, or some packets may never get sent. Packet Processing Identical with the standard SIP, all ARCOS server information packets get encapsulated with the header (0xFA, 0xFB; 250, 251), byte count, packet type byte and trailing checksum. It is up to the client to parse the packets, sorted by type for content. - Page 43 P2mpacs byte 1 means alternative SIP enable; not used by ARCOS. Stallval Maximum PWM before stall. If > PWMMAX, never. Stallcount Ms time after a stall for recovery. Motors lax during this time. Joyvel Joystick translation velocity setting, mm/sec Joyrvel Joystick rotation velocity setting in deg/sec Rotvelmax Current max rotation speed;...
-
Page 44: Serial
UZZER OUNDS Pioneer 3 robots have a piezo buzzer on the User Control Panel that aurally notifies you of system conditions, such as low batteries or stalls. For stealthy operation, issue the command #92 with an argument of zero to mute the... -
Page 45: Tcm2 Compass
microcontroller’s buzzer or argument of one to re-enable it. (See also the FLASH parameter in the next SOUNDTOG chapter to set its default state.) The SAY command #15 lets you play your own sounds through the buzzer. The argument consists of a length-specified string of duration and tone pair bytes. -
Page 46: Calibration
Enable auto calibration Stop calibration and send one TCM2 SIP, then revert to default mode 1. Soft reset (cycle power to hard reset) Table 14. TCM2 information packet Label Data Value/Description Header integer 0xFAFB Byte count byte 23/Number data bytes+checksum Packet type byte 0xC0... -
Page 47: Input Output (I/O)
See Appendix A for port locations and specifications. User I/O The User I/O connector on the Pioneer 3 microcontroller contains eight digital input (ID0-7) and eight digital output (OD0-7) ports, as well as an analog-to-digital (AN0) port. Additional analog ports are present in the joystick connector and “tilt/roll”... -
Page 48: Bumper And Ir I/O
Analog ports 0-7 input values at 10-bit 0-1023 resolution: 0-1023 = 0-5 VDC Battery 0-1023 Battery analog input (AN3 Pioneer 3) Checksum varies Computed checksum * Actual, not affected by since bumper bits may be used for other digital input besides bumpers. -
Page 49: Gripper
RIPPER Please consult the respective Gripper manual for details. ARCOS supports a (type=224; 0xE0) packet type and related command #37 to retrieve GRIPPERpac GRIPREQUEST setup and status information from the servers. Normally disabled, your client program may request one or a continuous stream (command argument greater than one) of Gripper packets. -
Page 50: Client-Side Gyro
ARCOS collects and averages 10-bit (0-1023) gyro rate and 8-bit (0-255) temperature data over a 25 millisecond time period—the bandwidth of the gyro. When not moving, the gyro rate is centered around 512 or so, depending on the gyro's temperature and other calibration factors which drift with use and should be corrected on the fly. Values below that center point indicate counterclockwise rotation rates;... -
Page 51: Chapter 6 Updating & Reconfiguring Arcos
Updating & Reconfiguring ARCOS Chapter 6 The ARCOS firmware and a set of operating parameters get stored in your Pioneer 3 microcontroller's FLASH memory. With special upload and configuration software tools, you change and update ARCOS, too. No hardware modification is required. -
Page 52: Arcoscf
, is part of a collection of utilities and files for comprehensive ARCOScf management of your Pioneer 3 robot’s onboard servers and FLASH-based operating parameters. The distribution archive for the software is simply named are the version major and minor numbers, such as 1_0), ARCOSV_v with a “. -
Page 53: Configuring Arcos Parameters
paramsfile On exit from ARCOScf, automatically save the current parameter values to the named .rop paramsfile To start up ARCOScf and make a connection with a serial port other than the default COM1 ttyS0 C:\Program Files\MobileRobots\ARCOS> ARCOScf –rp COM3 Similarly, these startup arguments tells ARCOScf to upload a fresh copy of the firmware to your robot’s microcontroller and then exits: % ./ARCOScf –u ARCOS1_0.mot –n –b ARCOS P... - Page 54 (.rop) disk later reference. q or quit Exits ARCOScf. ? or help Displays these commands and descriptions. Table 20. Sample ARCOS FLASH configuration parameters with values for Pioneer 3–DX EYWORD EFAULT ESCRIPTION type Pioneer Identifies the robot type. subtype P3DX-SH Identifies the robot model.
- Page 55 restoration of connection. soundtog byte 0 disables the buzzer SONARcycle byte SONAR cycle time in milliseconds SONAR1 12345678 Ping sequence for SONAR array #1. Up to 16 number characters 1-8; 0 to disable the array SONAR2 Ping sequence for array #2. See SONAR1 above SONAR3 Ping sequence for array #3.
-
Page 56: Pid Parameters
transveltop 1500 Maximum translation speed; mm/sec rotacctop Maximum rotation (de)acceleration; deg/sec transacctop 2000 Maximum translation (de)acceleration; mm/sec rotvelmax Max rotation speed; deg/sec. transvelmax Max translation speed; mm/sec. rotacc Rotation acceleration; deg/sec rotdecel Rotation deceleration; deg/sec rotkp Proportional PID for rotation rotkv Differential PID for rotation rotki... -
Page 57: Stallval And Stallcount
is a value in 1/8192 units that gets added or subtracted from the left-wheel encoder count at each DriftFactor motor cycle. In doing so, it compensates for tire difference and thereby straightens the robot’s translation forward and backward. Table 21. Some platform-dependent parameters VALUES P3DX P3AT... -
Page 58: Readme
IR ports 1-8. Set the value of each character position to the number of the bumper you want that IR port to effect; otherwise, '0' for no association/IR bumper. For example, the string "002411" means that IR #3, when triggered, will cause a bump event as if the front frontIRs bumper #2 had been hit. -
Page 59: Chapter 7 Calibration & Maintenance
Your Pioneer 3 robot platform is built to last a lifetime and requires little maintenance. NFLATION Maintain even tire inflation for proper navigation of your Pioneer 3-AT. We ship with each pneumatic tire inflated to 23 psi. If you change the inflation, remember to adjust the FLASH values. -
Page 60: Drive Lubrication
ATTERIES Lead-acid batteries like those in your Pioneer 3 robot last longest when kept fully charged. In fact, severe discharge is harmful to the battery, so be careful not to operate the robot if the battery voltage falls below 11 VDC. You may charge the batteries as often as needed or as long as needed, this will not damage the batteries or change their behavior. -
Page 61: Automated Docking/Charging System
RIVE Occasionally, particularly after heavy use, the Pioneer 3- or 2-AT drive belts that mechanically link the front and rear motors on each side will loosen and slip, resulting in a load popping noise. To tighten them, start with a 3mm hex key to loosen, but not remove, the three screws on the side of the robot near the front wheel. -
Page 62: Getting Inside
Opening the Deck All Pioneer 3 robots have a center hinge in the deck which let you easily open and access internal components without completely removing the top plate. Simply remove the indicated 3mm screws shown in the Figures nearby from the section of the deck that you want to access. - Page 63 Use authorized parts ONLY; warranty void otherwise. We will try to resolve the problem through communication. If the robot must be returned to the factory for repair, obtain a shipping and repair authorization code and shipping details from us first. We are not responsible for shipping damage or loss.
-
Page 64: Chapter 8
ORTS ONNECTORS This Appendix contains pin-out and electrical specifications for the external and internal ports and connectors on the SH2-based microcontroller for the Pioneer 3, PeopleBot and PowerBot, including motor-power interface and User Control boards. Figure 18. Mini-fit and micro-fit connector Figure 17. -
Page 65: Main Power Input
Figure 19. SH-2 Microcontroller Board Connector Locations Main Power Input The power connector is a 3-pin microfit socket that delivers 12 and 5 VDC to the microcontroller, including power ground, supplied by the Motor-Power board (see below). Table 22. Microcontroller Power Connector DESCRIPTION 12 VDC (battery) 5VDC... -
Page 66: User I/O, Gripper And Automated Recharger Connector
Table 23. HOST serial ports on microcontroller and on User Control panel SIGNAL DESCRIPTION SIGNAL DESCRIPTION Signal out Signal in Input detects attached device and switches TxD and RxD into the uC Common Output when microcontroller powered HRING Set low to signal low battery voltage Table 24. -
Page 67: An4, An5 Analog Inputs ("Tilt/Roll")
Table 25. User I/O – Gripper (20-pos latching IDC) IGNAL ESCRIPTION IGNAL ESCRIPTION DIGOUT DIGIN Gripper enable Paddles open limit DIGOUT DIGIN bit 1; Gripper direction Lift limit DIGOUT bit 2; DIGIN Outer breakbeam IR Lift enable DIGOUT DIGIN Lift direction Inner breakbeam IR DIGIN bit 4;... -
Page 68: Motors, Encoders And Irs
AGND signal Power ground ground Motors, Encoders and IRs A 26-position latching IDC connector on the microcontroller connects the Microcontroller to the Motor-Power Board (see Appendix B). Line descriptions also can be found in the following Motor-Power Interface section. Table 27. Motors, encoders, and IRs interface (26-pos latching IDC) IGNAL ESCRIPTION IGNAL... -
Page 69: Sonar
Table 29. Bumper ports (10-pos latching IDC) IGNAL ESCRIPTION IGNAL ESCRIPTION Bumper bit 0 Bumper bit 1 Bumper bit 2 Bumper bit 3 Bumper bit 4 Bumper bit 5 Bumper bit 6 Bumper bit 7 Common Common SONAR Four connectors—two latching 10-pos IDC and two 10-pos microfits—provide signal and power for the four SONAR arrays SONAR1 through SONAR4, respectively. - Page 70 Table 32. Heading correction gyro connector IGNAL ESCRIPTION IGNAL ESCRIPTION 5 VDC power RATE TEMP AGND Analog gnd Power ground...
-
Page 71: Chapter 9
ISTRIBUTION OARD The Motor-Power Board provides power conversion and distribution to other robot components. Figure 20. Pioneer 3 Motor-Power Board Microcontroller Connection Individual 26-pos IDC connectors and cables provide signal for the H8S- and SH2-based microcontrollers or for the legacy C166-based microcontrollers. A separate cable and connector provides for the SH2 microcontroller and SONAR power. - Page 72 (The 12-position latchlock connector to the left of the screw-down terminals was used in the past for some accessories.) Four-position microfit connectors also provide AUX power for standard accessories. AUX1 power was formerly called “Radio” power. AUX2 power is sometimes referred to or labeled as “Video” power as well. Table 34.
-
Page 73: Ir Signal And Power
IR Signal and Power Four connectors provide power and signal for fixed-range IR sensors. A separate connector provides signal path for an additional four IR sensors. Table 37. IR power and signal connectors (3-pos microfits) UNCTION ESCRIPTION Battery 12 VDC Switching signal Power/signal ground Table 38. -
Page 74: Chapter 10
Appendix C Chapter 10 PECIFICATIONS Pioneer 3-DX Pioneer 3-AT Physical Characteristics Length (cm) 44.5 50.1 Width (cm) 39.3 49.3 Height (cm) 23.7 27.7 Clearance (cm) Clearance bumpers (cm) Weight (kg) Payload (kg) Power Batteries 12VDC lead-acid (7 or 9 Ah) Charge (watt-hours) Run time (approx. - Page 75 Sensors Pioneer 3-DX Pioneer 3-AT SONAR Front Array (one each side, six 8 standard 8 optional forward @ 20° intervals) Rear SONAR Array (one each side, six rear 8 optional 8 optional @ 20° intervals) Bumpers Optional Optional Motors Four 12V DC gearmotors. Two motors on each...
-
Page 76: Chapter 11
SONAR BOARD -TOP FRONT SONAR BOARD - FRONT (PEOPLEBOT ONLY) For further information: USER CONTROL PANEL (1) Motor Power Board: See Pioneer 3 Manual Appendix B (ROBOT EXTERIOR SIDE PANEL) (2) Microcontroller board: See Pioneer 3 Manual Appendix A see (5) (3) http://robots.mobilerobots.com/wiki/Pioneer_3_Digital_Analog_IO... -
Page 77: Chapter 12 Warranty & Liabilities
Chapter 12 Your Pioneer 3 robot platform is fully warranted against defective parts or assembly for one year after it is shipped to you from the factory. Accessories are warranted for 90 days. Use only Omron Adept MobileRobots authorized parts or warranty void. -
Page 78: Index
Index Basic, 1 Body, 9 Computer, 10 acceleration, 31 Console, 8 Accessory Panels, 10 Nose, 10 ADSEL, 40 Optional, 1 ARCOS, 23, 47 User supplied, 2 ARCOScf, 49 Computer, 10 Configuring, 49 Computer Control Panel, 15 PID parameters, 52 CONFIG command, 35 revcount parameter, 52 CONFIG Packet, 35 TicksMM pararmeter, 53... - Page 79 Gripper, 42 Onboard Computer, 15 GRIPPERpac, 42 Networking, 16 OPEN, 25 GRIPREQUEST command, 42 Gyro, 43 Gyroscope (Gyro), 17 Calibration, 55 Packet, 23 Packets Checksum, 24 Configuration, 35 HasGyro, 43 Data types, 23 HEAD command, 31 ENCODERpac, 38 High-speed charger, 12 Errors, 24 HOST port, 14 Extended, 34...
- Page 80 Server Information Packets, 26 Support, 3 serverDemo (ArNetworking), 21 SYNC, 25 Servers ADSEL, 40 ENCODER, 38 SETA command, 31 TCM2 Compass, 38 SETO command, 33 TCM2 Compass SETRA command, 31 Calibration, 39 SETRV command, 31 Ticksmm, 52 SETV command, 31 TicksMM, 33, 53 SIP, 26 tires, 11...
Need help?
Do you have a question about the Pioneer 3 and is the answer not in the manual?
Questions and answers