Pacific Crest ADL Vantage Getting Started Manual
Hide thumbs
Also See for ADL Vantage:
- User manual (29 pages) ,
- User manual (33 pages) ,
- User manual (20 pages)
Advertisement
Table of Contents
ADL Vantage Getting Started Guide
Setup in the Office
1. Plug the ADL Vantage power supply cable into the transformer and then into the wall.
2. Attach the transformer's SAE connector into the programming cable's SAE connector.
3. Attach the programming cable's DE‐9 connector into a serial port on your PC. If your PC does not have a
serial port, you may use a serial‐to‐USB adaptor.
4. Attach the programming cable's LEMO plug (with the red dot facing up) into the bottom of the ADL
Vantage radio. This will turn the radio on.
5. Install ADLCONF (found on the ADL Vantage CD) on your PC.
6. Launch ADLCONF and refer to its user guide for instructions on connecting to the ADL Vantage
transceiver. The user guide is on the ADL Vantage CD and is also displayed when you click Help > User
Guide on ADLCONF's main menu. In most cases, you can simply click the Connect button on the right of
the ADLCONF main screen.
7. It is recommended after connecting to the radio for the first time that you click File > Export and save a
copy of the radio's original configuration to your PC. At any time, you can return the ADL Vantage to its
factory configuration by clicking File > Import and selecting this file. You will not lose any channel tables
or personalized configurations such as Owner Name or Call Sign by importing a configuration file.
510 DeGuigne Drive • Sunnyvale, CA 94085 • +1.408.481.8070 • +1.408.481.8984 (Fax)
www.PacificCrest.com
February 2010
P/N: M0082103
Advertisement
Table of Contents

Related Manuals for Pacific Crest ADL Vantage


Summary of Contents for Pacific Crest ADL Vantage
- Page 1 ADL Vantage Getting Started Guide Setup in the Office 1. Plug the ADL Vantage power supply cable into the transformer and then into the wall. 2. Attach the transformer’s SAE connector into the programming cable’s SAE connector. 3. Attach the programming cable’s DE‐9 connector into a serial port on your PC. If your PC does not have a serial port, you may use a serial‐to‐USB adaptor. 4. Attach the programming cable’s LEMO plug (with the red dot facing up) into the bottom of the ADL Vantage radio. This will turn the radio on. 5. Install ADLCONF (found on the ADL Vantage CD) on your PC. 6. Launch ADLCONF and refer to its user guide for instructions on connecting to the ADL Vantage transceiver. The user guide is on the ADL Vantage CD and is also displayed when you click Help > User Guide on ADLCONF’s main menu. In most cases, you can simply click the Connect button on the right of the ADLCONF main screen. 7. It is recommended after connecting to the radio for the first time that you click File > Export and save a copy of the radio’s original configuration to your PC. At any time, you can return the ADL Vantage to its factory configuration by clicking File > Import and selecting this file. You will not lose any channel tables or personalized configurations such as Owner Name or Call Sign by importing a configuration file. February 2010 510 DeGuigne Drive • Sunnyvale, CA 94085 • +1.408.481.8070 • +1.408.481.8984 (Fax) P/N: M0082103 www.PacificCrest.com...
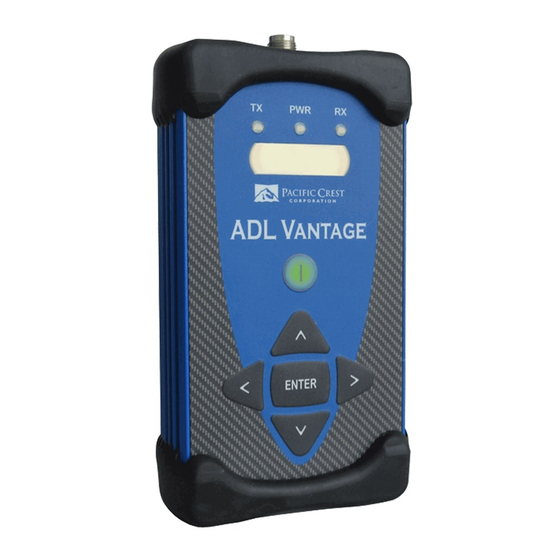
- Page 2 Setup in the Field 1. Attach the antenna to the ADL Vantage, either directly to the top of the radio or to an antenna cable. If you are using a remote antenna, screw the antenna onto the antenna adapter cable and attach the adaptor to your tripod. Attach the other end of the antenna cable to the top of the ADL Vantage and clip the ADL Vantage onto the slot in on of your tripod’s legs. 2. Hang the ADL Vantage from your tripod using the tripod clip on the back of the radio. 3. Connect the ADL Vantage to the source of the data you will transmit, for example, a GPS receiver, using the data/power cable. The ADL Vantage radio uses the same data connector – with the same pinouts ‐ found on the PDL HPB radio. This makes it compatible with existing HPB data cables. 4. Make sure the ADL Vantage is attached to its antenna. 5. Join the data/power cable’s SAE connector to the ADL Vantage battery’s SAE connector. This will turn the ADL Vantage on. If the radio had previously been powered on and then off, turn it on again by pressing the On/Off button in the center of the front panel. The ADL Vantage also uses the same battery and desktop power supply that shipped with the PDL LPB. 6. This will turn the ADL Vantage on. If the radio had previously been powered on and then off, turn it on again by pressing the On/Off button in the center of the front panel. The ADL Vantage’s enhanced user interface allows you to configure and troubleshoot your ADL Vantage in the field. The top row of the ADL Vantage LCD displays the name of the currently selected FW function. Press the right or left buttons on the front panel to display other functions available in the ADL Vantage. 7. The bottom row displays the various options for the selected function. The currently active setting is marked with an asterisk. To select another option for the displayed function, press the up or down button to display the desired parameter. Then press Enter to reconfigure the radio to use this new parameter. February 2010 510 DeGuigne Drive • Sunnyvale, CA 94085 • +1.408.481.8070 • +1.408.481.8984 (Fax) P/N: M0082103 www.PacificCrest.com...
Need help?
Do you have a question about the ADL Vantage and is the answer not in the manual?
Questions and answers