
Related Manuals for Lehner Liftechnik Delta

Summary of Contents for Lehner Liftechnik Delta
- Page 1 Installation Manual DELT P l a t f o r m s t a i r l i f t Web: www.lehner-lifttechnik.at Tel: +4372783514 Email: office@lehnerlifttechnik.at Mobile: +436641612980...
-
Page 2: Table Of Contents
DELTA Edition July 2013 Installation Manual Table of content OBSERVE THE FOLLOWING POINTS BEFORE INSTALLATION! ........2 INSTALLATION OF THE RAILS ..................3 LOAD AND FIXINGS OF RAILS AND PILLARS ..............5 INSTALLATION MATERIAL FOR FIXING OF THE RAIL ........... 6 OVERVIEW PLATFORM ..................... -
Page 3: Observe The Following Points Before Installation
DELTA Edition July 2013 Installation Manual Observe the following points before installation! Installation teams must have a general knowledge in: • working on electric controls • basic mechanical engineering and providing adequate fixation of the rails and pillars • reading and understanding circuit diagrams and wiring schematics The following points are necessary for the installation: •... -
Page 4: Installation Of The Rails
DELTA Edition July 2013 Installation Manual Installation of the rails The rails can be fixed directly to the wall or on pillars that are fixed to the staircase. Upper cam Bracket Pillar Charging station and mechanical limit assembly Step 1: If there are 2 rail sections, combine both rail sections. - Page 5 DELTA Edition July 2013 Installation Manual Step 3: First fix the upper bracket to the wall or to the upper pillar (pillars have the serial letters stamped on the base). The required dimensions for the first fixing point are given in the drawing –...
-
Page 6: Load And Fixings Of Rails And Pillars
DELTA Edition July 2013 Installation Manual Load and fixings of rails and pillars ∆ ∆ ∆ ∆ DELT platform lift page 5 of 24... -
Page 7: Installation Material For Fixing Of The Rail
DELTA Edition July 2013 Installation Manual Installation material for fixing of the rail For concrete walls: For concrete walls: For concrete walls: For brick walls: For brick walls: Adhesive 2 components glue for brick wall installation ∆ ∆ ∆ ∆... -
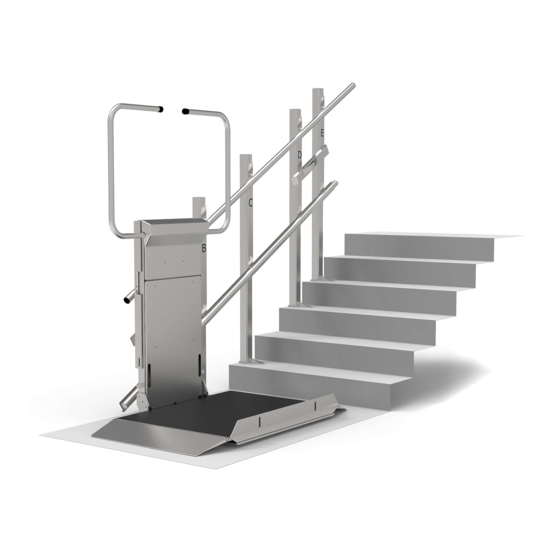
Page 8: Overview Platform
DELTA Edition July 2013 Installation Manual Overview platform ∆ ∆ ∆ ∆ DELT platform lift page 7 of 24... -
Page 9: Installation Of The Platform Onto The Rail
DELTA Edition July 2013 Installation Manual Installation of the platform onto the rail If you wish to reduce the weight of the complete unit, you can dismantle the platform floor from the carriage. Please see chapter “Changing the platform floor” for the detailed explanation. - Page 10 DELTA Edition July 2013 Installation Manual Step 7: Open the upper and lower frontal covers of the carriage. At delivery of the unit the upper carriage will be moveable (can rotate). This will facilitate the process of engaging the platform onto the rails.
-
Page 11: Installing Of The Charging Station/Limit Assembly
DELTA Edition July 2013 Installation Manual Installing of the charging station/limit assembly The position of the charging stations/limit assembly has to be adjusted so the limit switches on the lower carriages are pressed by the mechanical stop at the correct spot. -
Page 12: Adjusting Of The Control Cams
DELTA Edition July 2013 Installation Manual Adjusting of the control cams Adjust the control cams - the levers for unclamping the barrier must be in the middle of the control cams when the platform arrives in the stop position. Important: The charging lever must hit the charging ramps... -
Page 13: Last Checks Before Using The Stairlift
DELTA Edition July 2013 Installation Manual Last checks before using the stairlift Before going into operation, check again the correct measurements and fixings and make sure there can be no collision between the platform and the staircase or any other obstacle. -
Page 14: Standard Electrical Components Of The Sidewall
DELTA Edition July 2013 Installation Manual Standard electrical components of the sidewall Control board Platform motor Barrier arm horizontal switch Ramp switch Ramp switch Barrier arm safety switch Barrier arm safety switch Barrier arm open switch Platform closed switch Platform... -
Page 15: Electrical Components Of The Lower Carriage
DELTA Edition July 2013 Installation Manual Electrical components of the lower carriage Batteries Levers for unblocking of barrier arms Limit switch Limit switch Overspeed switch Ultimate Ultimate limit switch limit switch By-pass switch ∆ ∆ ∆ ∆ DELT platform lift... -
Page 16: Overview Of The Platform Mechanics
DELTA Edition July 2013 Installation Manual Overview of the platform mechanics Switch for lateral contact bar Lateral contact bar Barrier arm linkage Ramp activation Unblocking of barrier arms Actuator slider Switch for lateral contact bar Hook for barrier Central platform... -
Page 17: Adjustment Of The Platform Inclination
DELTA Edition July 2013 Installation Manual Adjustment of the platform inclination To adjust the platform horizontally, change the adjustment screws as shown in the picture. Check in loaded condition! Counter the adjusting screw with the counter nut after successful adjustment. -
Page 18: Adjustment Of The Loading Ramps
DELTA Edition July 2013 Installation Manual Adjustment of the loading ramps Adjust the ramps to achieve a 45 ° angle between the platform and ramp when the barrier is in horizontal position. When the barrier is open, the ramp has to fit to the bottom of the landing area. -
Page 19: Adjustment Of The Remote Controls
DELTA Edition July 2013 Installation Manual Adjustment of the remote controls How to teach the transmitter • The “teach-mode” can be initiated by pressing the button S1 (Prog.) on the main PCB (see picture below) board for minimum 1 second but no more than 6 seconds on the main board. -
Page 20: Dismantle The Platform Floor
DELTA Edition July 2013 Installation Manual Dismantle the platform floor • Dismantle the ball bearing connection between sliding mechanism and platform • Disconnect platform rod connection for sidewall • Dismantle safety under-pan of the platform • Disconnect spring inside platform floor. You might need to manually compress the spring in order to uninstall the connection. -
Page 21: Adjustment Of The Overload Switch
DELTA Edition July 2013 Installation Manual Adjustment of the overload switch If the unit is equipped with an overload device it is mounted at the lower right part of the sidewall. The platform with full load presses the spring washers and if the real load exceeds the rated load by around 25% then the switch is activates and departure from the landing stop position is blocked by the overload switch. -
Page 22: Troubleshooting
DELTA Edition July 2013 Installation Manual Troubleshooting The platform is open and in or near a landing station and does not react at all If unit is near to a landing station use the hand wheel and move platform away from landing station so the lock barrier arm levers and the charging lever are both not pressed. - Page 23 DELTA Edition July 2013 Installation Manual The platform is closed and does not react at all First use the hand wheel to wind it around 10cm upwards. If the unit is in the upper landing station wind it 10cm downwards with the hand wheel. Then try function again.
-
Page 24: Overview Of The Switchboard Led Functions
DELTA Edition July 2013 Installation Manual Overview of the switchboard LED functions ∆ ∆ ∆ ∆ DELT platform lift page 23 of 24... - Page 25 DELTA Edition July 2013 Installation Manual ∆ ∆ ∆ ∆ DELT platform lift page 24 of 24...