Table of Contents
Advertisement
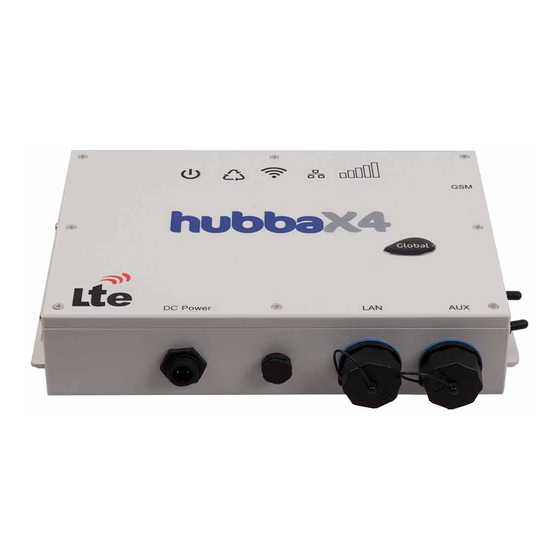
Basic set-up
External antenna
extension leads – up
to 20m
Mains PSU (3)
Ensure that the breather top (1) is always tightly screwed on.
Ensure that the power connector (3) is fully connected (either DC or mains) –To do this gently line up
the plug to the socket and rotate carefully until the spline engages. Now the socket will slide fully
into the plug at which point the locking ring on the plug can be rotated clockwise keeping the plug
firmly in position. Make sure that the locking ring is fully tightened.
If the LAN socket (2) or the AUX socket (5) are not in use then the waterproof cap should be securely
in place to protect the connectors.
The status indicator (4) is able to show a variety of conditions – refer to page 3 for full details.
Hubba-X4 Duo. Issue 2-7
Hubba-X4 Duo user guide
Issue 2-7 February 2018
Internal Wi-Fi antennas
Power switch.
Down = on
External GSM antenna
Status indicator (4)
AUX socket (5)
LAN socket (2)
Breather (1)
DC Power cable (3)
Roof mount
Page 1
Advertisement
Table of Contents

Summary of Contents for Buzz Connect Hubba-X4 Duo
-
Page 1: Basic Set Up
Hubba-X4 Duo user guide Issue 2-7 February 2018 Basic set-up External GSM antenna Internal Wi-Fi antennas External antenna Status indicator (4) extension leads – up to 20m Roof mount AUX socket (5) LAN socket (2) Breather (1) Mains PSU (3) DC Power cable (3) Power switch. -
Page 2: Table Of Contents
Front panel indicators Status indicator DC connection External GSM antenna How to change the SIM(s) Accessing the Hubba-X4 Duo via the web interface The Hubba-X4 Duo overview page Configuring APNs manually Using the wizard to configure the APN Configure SIM failover... -
Page 3: Front Panel Indicators
Constant red and blinking rapidly = data being transferred during a 2G data session Constant yellow and blinking rapidly = data being transferred during a 3G data session Constant green and blinking rapidly = data being transferred during a 4G data session Hubba-X4 Duo. Issue 2-7 Page 3... -
Page 4: Dc Connection
Care should be exercised with regard to polarity and to the quality of the supply, large voltage spikes may cause damage to the Hubba-X4 Duo. Do not attempt to power the unit using POE via the LAN (2) connection. -
Page 5: How To Change The Sim(S)
Firstly: disconnect power to the unit or switch the unit off using the power switch – failure to do this may cause irreparable damage to the SIMs and/or the Hubba-X4 Duo’s circuitry. Once the power has been disconnected undo the eight screws holding the lid on. Gently remove the lid – a little force may be required to break the watertight seal. - Page 6 Once the SIMs have been installed, replace the lid, remembering to set the ribbon cable to the right hand side of the router PCB. Do not over tighten the eight screws securing the lid or the waterproof seal may be compromised. Hubba-X4 Duo. Issue 2-7 Page 6...
-
Page 7: Accessing The Hubba-X4 Duo Via The Web Interface
Accessing the Hubba-X4 Duo via the web interface Make certain that a computer is connected to the Hubba-X4 Duo using either a cat5 cable connected to the LAN socket (2) or Wi-Fi using the hubbaX4 signal and the password buzzmarine. Make certain that the Hubba-X4 Duo has been switched on for at least two minutes before continuing. -
Page 8: The Hubba-X4 Duo Overview Page
Configuring APNs for the SIMs manually The Hubba-X4 Duo is capable of auto recognising a large number of APNs. However, if the router does not connect within a few minutes then the APN will have to be set manually. The best way of completing this is described below. - Page 9 ‘secure’. Note that the authentication method is set to ‘CHAP’ allowing the username and password to be set. Ticking this box will stop this SIM from roaming on to foreign networks (Roaming charges could be expensive) Hubba-X4 Duo. Issue 2-7 Page 9...
-
Page 10: Using The Wizard To Configure The Apn
Using the Wizard to set the APN – Please note this method is not recommended. Note that you must have a SIM installed in the SIM 1 slot to use this method Select ‘Setup Wizard’ from the System tab. Hubba-X4 Duo. Issue 2-7 Page 10... - Page 11 If you have two SIMs then you will need to select the correct SIM. Select Step 2 - mobile Click the down arrow to see the APN options – note that EE has been selected already but we will ignore that. The required APN is selected Hubba-X4 Duo. Issue 2-7 Page 11...
-
Page 12: Configure Sim Failover
Click ‘Save’ to confirm your selection. Configure SIM failover This will allow the Hubba- X4 Duo to swap connectivity between two SIMs based on a set of predetermined parameters Select ‘Mobile’ from the Network tab Hubba-X4 Duo. Issue 2-7 Page 12... - Page 13 Click the save button to confirm your settings SIM failover has now been set. It should be noted that the data connection will be lost for a minute or two when the SIMs swap over. Hubba-X4 Duo. Issue 2-7 Page 13...
-
Page 14: Configure Wan Failover
APN for the SIM or SIMs, do not use the wizard. See ‘Configuring APNs for the SIMs’ method 1 on page 8. Select ‘WAN’ from the Network tab Select the WIRED interface option as the main WAN Save the selection Hubba-X4 Duo. Issue 2-7 Page 14... - Page 15 Wired is now at the top – highest priority Move mobile connection up one Tick mobile for backup WAN Now save these details. Hubba-X4 Duo. Issue 2-7 Page 15...
-
Page 16: Configure Wi-Fi
Configure Wi-Fi Your Hubba-X4 Duo is configured with Wi-Fi called hubbaX4 which has the password buzzmarine. Should you wish to change these settings then please follow the diagrams below. Select ‘Wireless’ from the Network tab Click the ‘Edit’ button Hubba-X4 Duo. Issue 2-7... - Page 17 Encryption types – best left as the defaults WPA-PSK+ WPA2-PSK mixed mode and cypher as auto. WiFi password or key can be any combination of characters but must be at least 8 in length. Click ‘Save’ to confirm your settings Hubba-X4 Duo. Issue 2-7 Page 17...
-
Page 18: Setting Data Limits
(8GB for example) by setting data limits on the SIMs.. This may be used as a method of avoiding overage charges but the accuracy depends entirely upon the parameters entered by the user. Buzz Connect will not be responsible for any claim(s) regarding additional charges from mobile operators. Select ‘Mobile’ from the Network tab. -
Page 19: Using Wi-Fi As Wan (Use Harbour/Marina Wi-Fi)
This is a useful facility as it will allow the existing Wi-Fi antennas to connect to an external Wi-Fi source and rebroadcast it from your Hubba-X4 Duo. This will enhance any local Wi-Fi and also appear as your usual Wi-Fi (use same SSID and password as you would normally). - Page 20 – top first Now set up the incoming Wi-Fi Click to start the scan to see which Wi-Fi networks are available Scan is now complete Select the network you wish to use Hubba-X4 Duo. Issue 2-7 Page 20...
-
Page 21: Switch Off Wi-Fi As Wan
To revert to the GSM connection just change the order of the WAN setting as in page 17 but substituting GSM for Wi-Fi. Once changes have been made then it is essential that the router is powered down for 30 seconds. Failure to do this may result in erratic operation. Hubba-X4 Duo. Issue 2-7 Page 21... -
Page 22: Port Forwarding
For this example I will enable a web server on my internal LAN, located at 192.168.1.123, to be seen from the public IP on the SIM Select ‘Firewall’ from the Network tab. Click the ‘Port Forwarding’ tab Hubba-X4 Duo. Issue 2-7 Page 22... - Page 23 Add the port forward details Then click the ‘Add’ button The new port forwarding rule. Click ‘Save’ to store the new details Hubba-X4 Duo. Issue 2-7 Page 23...
-
Page 24: Dynamic Dns (Ddns)
DDNS providers will charge for this service once you have signed up. Type in the name of your new DDNS rule Click ‘add new’ to enable configuration. To configure the DDNS parameters click the ‘Edit’ button. Hubba-X4 Duo. Issue 2-7 Page 24... -
Page 25: Cat5 Connector Assembly
This is only applicable for units starting with serial number: 12T0770 Select the correct type of connector for your cat5 cable Ensure there isn’t any shroud on the connector This is good as it has no shroud Hubba-X4 Duo. Issue 2-7 Page 25... - Page 26 . If it isn’t then rotate the housing until it is Now assemble the connector by pushing the seals into the housing and then screwing the cap on. Seals correctly positioned before putting the cap on. Hubba-X4 Duo. Issue 2-7 Page 26...
- Page 27 Cap fully screwed on to the housing Connector is now ready to use. Your Hubba-X 4 Duo details SIM CTN: Router serial number: WiFi SSID: hubbaX4 Password for WiFi: buzzmarine Hubba-X4 Duo. Issue 2-7 Page 27...
Need help?
Do you have a question about the Hubba-X4 Duo and is the answer not in the manual?
Questions and answers