Table of Contents
Advertisement
Quick Links
Advertisement
Table of Contents

Related Manuals for Smart Electronic SMARTMETER T20

Summary of Contents for Smart Electronic SMARTMETER T20
- Page 1 DVB-T2- Meter User Manual Version: 07.09.2012 ENGLISH...
- Page 2 Preface Preface Dear Customer, Thank you for purchasing the digital DVB-T2 meter smartmeter T20. This user manual contains all the information required • to connect, • to operate, • to clean, and • to dispose of the device. Please read the user manual carefully before you start using the meter.
-
Page 3: Table Of Contents
Connecting the Power Plug (optional) ........15 Switching on the Meter ............16 4.3.1 Language................16 4.3.2 Time zone ................16 4.3.3 Area Configuration ..............16 Switching off the Meter ............17 Entering and Exiting the Menu ..........17 smartmeter T20... - Page 4 10.2.1 All ................... 24 10.2.2 Channel List Only ..............25 10.2.3 Radio Channel Only ............... 25 10.2.4 Nur verschlüsselte Sender ............. 25 10.3 Displaying the System Information ........26 11 Menu PC-Update ................26 11.1 USB Menu ................27 smartmeter T20...
- Page 5 Video ..................37 18.4 External Audio/Video Input (AV in) ......... 37 18.5 USB 2.0 Interface ..............38 18.6 Battery ..................38 18.7 Power Plug / Charger ............. 38 18.8 Dimensions and Weight ............38 18.9 Temperatures ................. 38 smartmeter T20...
- Page 6 Contents 19 Statement of Compliance ..............39 smartmeter T20...
-
Page 7: User Notes
User Notes User Notes 1.1 Using this Manual • This user manual applies to the DVB-T2-Meter smartmeter T20. • Please read the user manual thoroughly before you start using the de- vice. • Please follow all warnings and cautions in this user manual. -
Page 8: Product Description
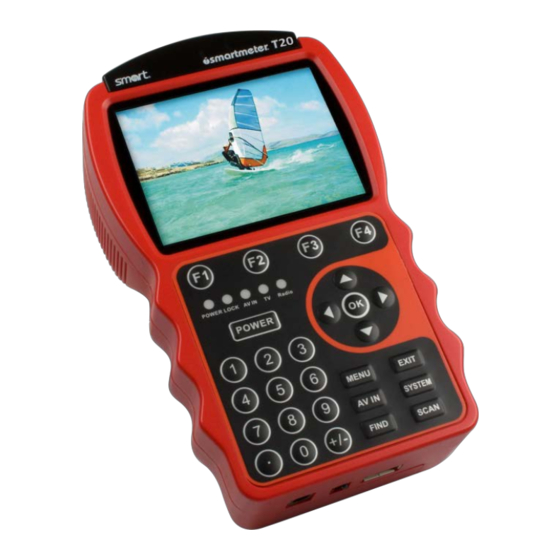
Product Description The smartmeter T20 is a compact digital meter used to check signals and locate errors on aerial systems to easily and quickly align outdoor DVB-T aerials and to identify the optimum location for DVB-T room aerials. -
Page 9: Meter
If the aerial uses a coaxial connector, use the supplied adapter F-connector to coaxial connector to connect the aerial. LCD display Displays the TV picture, the menu and the measured values. Function keys Functions vary across menus/submenus. Functions are indicated at the bottom of the display. smartmeter T20... - Page 10 Press to exit the current menu. AV IN Press to switch to (analogue) video input. SYSTEM Press to enter the Settings submenu (in TV mode only). FIND Press to enter the Packet Control submenu. SCAN Press to start automatic station search. smartmeter T20...
-
Page 11: Top View
2.2.4 Rear View No. Description Battery compartment The above figures show the smartmeter T20 without the black part cover- ing the top of the device. 2.3 Guarantee The digital meter smartmeter T20 of smart electronic GmbH comes with a guarantee in accordance with legal requirements as applicable at the time of the purchase. -
Page 12: Hazards From Improper Use
Have the power plug repaired by qualified personnel only. Taking the device from cold into warm temperatures can lead to condensation forming inside the device. Do not connect the device instantly. Leave it switched off for a few hours. smartmeter T20... -
Page 13: Safety Of People
When working on pitched roofs or close to roof edges, use a safety rope and secure yourself according to professional practice. 3.4 Lithium-Ion Polymer Battery The smartmeter T20 is provided with a lithium ion polymer battery. Please observe the following safety notes for the battery: Fire and explosion hazard Any kind of heat (from inside or outside) can trigger un- controllable chain reactions inside the battery. -
Page 14: Initial Start-Up
2. Connect the low-voltage plug of the power plug to the low-voltage socket on the bottom of the meter. The battery starts charging as soon as you connect the smartmeter T20 to the power plug. When the meter is switched off, charging is indicated by a yellow Power LED. -
Page 15: Connecting The Meter
Connecting a USB Data Storage Device (optional) Connect a USB data storage device (USB memory stick, USB hard drive) to the USB port on the bottom of the smartmeter T20. Using a USB data storage device is absolutely required for some of the func- tions of the smartmeter T20. -
Page 16: Switching On The Meter
2. Press the POWER key to switch on the meter. If the power supply is plugged in, the battery-switch will be useless, meaning that the smartmeter T20 can con- sistently be switched on regardless of the switch posi- tion. -
Page 17: Switching Off The Meter
Press the POWER key once again to switch off the meter after use. For long operational pauses, please also separate the smartmeter T20 electronics from the battery by setting the battery-switch on the underside of the device to an position. -
Page 18: Aligning The Aerial
Aligning the Aerial Aligning the Aerial Use the smartmeter T20 as follows to align the DVB-T aerial: 1. Press the MENU key. TP Search 2. Press the ◄/► and ▲/▼keys to select . Press OK to con- TP Search firm your selection. The display shows the window. -
Page 19: Deleting A Transponder From The Tp List
„Checking the TV Signal“, starting page 31. Menu TP IDE 7.1 Measurement Values The smartmeter T20 displays different nominal values and measuring val- ues for each channel. 1. Press MENU to enter the main menu. TP IDE 2. - Page 20 MER value, the better is the signal quality. The MER can be worsened by these issues: Noise (C/N) Low frequency hum (50/100 Hz) Inter modulation errors (distortioned amplifiers) I/Q modulation errors (phase/amplitude) Signal overlap (DECT phone) Standing waves (maladaptation or unfavorably mounted cables) smartmeter T20...
-
Page 21: Adding And Deleting Transponders
TP Search Transponders as in the submenu 7.3 Searching Channels TP IDE In the submenu you also can search for channels. This is de- scribed in the chapter „Checking the TV Signal“, starting page 25. smartmeter T20... -
Page 22: Menu Packet Control
Menu Packet Control Menu Packet Control The smartmeter T20 also allows you to read the signal strength (S) and signal quality (Q) of eight channels. Per default (after menu calling) this are eight successive channels according to the channel spacing. -
Page 23: Menu Spectrum
Menu Spectrum Menu Spectrum Use the smartmeter T20 as follows to display the spectrum of the aerial signal. 1. Press the MENU key. 2. Press the ◄/► and ▲/▼ keys to select the menu item Spectrum Spectrum Press OK to confirm your selection. The display shows the window. -
Page 24: Audio1 / Audio2
OK. 10.2.1 All 1. Select the menu item to reset the smartmeter T20 to factory set- tings. 2. Press OK to confirm your selection. The display shows a warning tell- ing you that the factory reset will delete all current data and settings. -
Page 25: Channel List Only
Do you really want to continue? as well as the question: Select using the keys ◄/►. If you select , the smartmeter T20 channel list is reset and you Factory Default will get back to the submenu Factory If you select... -
Page 26: Displaying The System Information
Menu PC-Update 10.3 Displaying the System Information When you call the smart electronic Support Hotline, our hotline staff will ask you about the software version of your smartmeter T20. Please check the details before you call. System Info Settings Select the menu item... -
Page 27: Usb Menu
Update the meter software as follows: 1. Extract the ZIP archive. 2. Save the *.bin file to your USB data storage device. 3. Connect the USB data storage device to your smartmeter T20. USB menu PC Update 4. Ensure that the in the submenu is open. -
Page 28: Media Player
- all tracks in the current directory are played in the displayed order. All Repeat - all tracks in the current directory are played and repeated in the displayed order. Random - all tracks in the current directory are played in random order and are then repeated. smartmeter T20... -
Page 29: Saving The Channel List To A Usb Data Storage Device
3. Select the edited channel list. 4. Press OK to open the file. The edited channel list is uploaded to the smartmeter T20. 11.1.5 Help Enter the USB Menu (see above). Press the F2 key to enter the Help item. -
Page 30: Create A New Folder On The Usb Data Storage Device
3. Press ◄/► to select YES. Press OK to confirm your selection. If you select NO, the meter returns to the USB Menu without deleting the file. 11.2.5 Formatting a USB Data Storage Device 1. Enter the USB Manager (see above). smartmeter T20... -
Page 31: Saving A Screenshot
A screenshot of the display is saved to the USB data storage device in a bmp file. 13 Checking the TV Signal Switch the smartmeter T20 to TV mode to check the TV signal. After switching the meter on (or after factory reset), the meter displays the main menu. -
Page 32: Tv Mode
Apart from the displayed channel values, the station details include audio, video and PCR PID (packet identifier). Press ◄/► to adjust the volume. PID = Packet Identifier: Tells the user which data packets are to be used. smartmeter T20... - Page 33 The external device must be connected to the meter via the Video In and Audio In ports on the top of the meter. Press the AV IN key again to return to aerial mode. smartmeter T20...
-
Page 34: Cleaning The Meter
3. Remove all other cables connected to the meter. 4. Put the meter, the cables and the user manual into the original packing. 5. Store the meter and the accessories in a dry and dust-free place. 6. Make sure that the meter is protected from frost. smartmeter T20... -
Page 35: Troubleshooting
USB data storage device back on. If the troubleshooting suggestions do not help to correct a malfunction, please contact your specialist dealer. You can find an FAQ-list with updated troubleshooting suggestions in the Support section on our website at www.smart-electronic.de. smartmeter T20... -
Page 36: Disposing Of The Meter
(2002/96/EC). This Directive was introduced to reduce the ever growing quantity of electronic waste from spent electrical and electronic devices. The aim is to avoid and reduce growing quantities of electronic waste and to promote eco-friendly disposal of such waste through extended manufacturer responsibilities. smartmeter T20... -
Page 37: Specifications
480p / 576p, 480i / 576i 18.4 External Audio/Video Input (AV in) Video Bandwidth 6 MHZ Video Impedance 75 Ω Video Voltage Level 2 Vpp Audio Freq. Range 20 Hz – 20 kHz Audio Impedance ∞ Audio Voltage Level 1.5 Vpp smartmeter T20... -
Page 38: Usb 2.0 Interface
12.6 V / 1.7 A 18.8 Dimensions and Weight Length x Width x Height 10.5 x 17.0 x 4.5 cm Weight 0.5 kg 18.9 Temperatures Operating temperature 0 °C to +40 °C Storage temperature -40 °C to +65 °C smartmeter T20... - Page 39 Statement of Compliance 19 Statement of Compliance Smart electronic GmbH, Industriestraße 29, 78112 St. Georgen, Germany, hereby states that this product complies with the following directives and standards: • Low Voltage Directive 2006/95/EC − EN 61010-1: 2001 • Electromagnetic Compatibility Directive 2004/108/EC −...
- Page 40 Doc-ID 11120801...
Need help?
Do you have a question about the SMARTMETER T20 and is the answer not in the manual?
Questions and answers