Advertisement
Quick Links
Advertisement

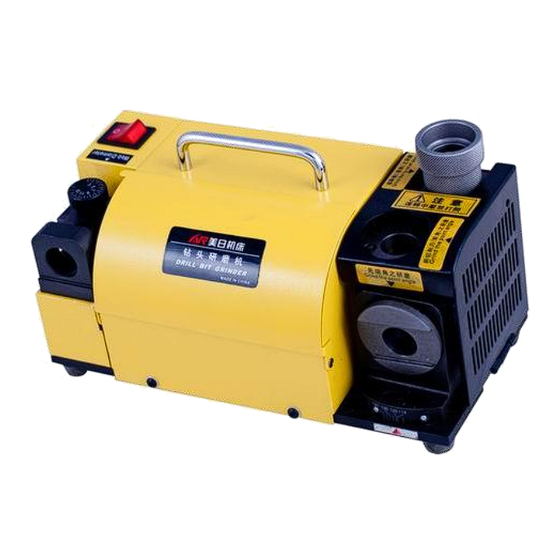
Summary of Contents for U.S. Solid MR-13D
- Page 1 DRILL BIT GRINDER MODEL: MR-13D OPERATING INSTRUCTION...
- Page 2 PLEASE REMEMBER 1. When using electric tools, machines or equipment, basic safety precautions should always be followed to reduce the risk of fire, electric shock, and personal injury. 2. Keep work area clean. Cluttered areas invite injuries 3. Consider work area conditions. Don’t use machines or power tools in damp, wet or poorly lit locations.
- Page 3 5. Do not use the tool if any switch does not turn off and on properly. MAIN APPLICATION AND CHARACTERISTICS 1. Patent 13D can sharpen the drill bit front cutting lip ,lip relief angle and point angle,you also can control the center spot at random instead of center drill,escape of chips easily.drill with a light heart.
- Page 5 OPERATIONS A. Setup the drill bit to the ER collet chuck *Please follow step 1,2 to set up the drill bit to the chuck (without tightening) 1. Determine diameter of your drill bit, and then select the proper collet and collet chuck. 2.
- Page 6 nut before grinding job started. If it is not parallel, adjust it again. Attention: If the cutting lip is downward, must increase the scale of web adjustment shelf. If it is upward, please decrease the scale of the web adjustment shelf. When the flute length of a drill becomes shorter, the web thickness of a drill would become thicker.
- Page 7 D. Grind the lip relief angle Put the chuck set into the lip relief angle grinding shelf. The slot of clamping nut must fit with the pin of the grinding shelf. Insert the drill gently into grinding shelf until reach the grinding wheel. Grind the drill by moving left and right until the grinding sound disappears.
- Page 8 E. Point grinding point splitting Put the chuck set into the point splitting shelf. The slot of clamping nut must fit with the pin(B) of the grinding shelf. Insert the drill gently into grinding shelf until reach the grinding wheel.Grind the drill by moving left and right until the grinding sound disappears.
-
Page 9: Clean And Maintenance
CLEAN AND MAINTENANCE Please clean the whole unit with an air blow gun, especially the holes before and after use REPLACING THE WHEEL A. Open the wheel cover 1. Make sure it is safe that the power cord is unplugged 2. - Page 10 1. Use the brush to clean the machine, then use dry cloth to clean the surface. 2. If you just use the the machine, please wait 3 minutes after the grinding temperature is fall. 3. Use the left hand to hold the wheel, then use the 4mm hex wrench to loose the screw counterclockwise by right hand.
Need help?
Do you have a question about the MR-13D and is the answer not in the manual?
Questions and answers