Table of Contents
Advertisement
Quick Links
Advertisement
Table of Contents

Summary of Contents for Efitment RB034
-
Page 1: User Manual
EFITMENT Magnetic Recumbent Bike w/ Pulse Monitor MODEL NO.: RB034 IMPORTANT! Read all instructions carefully before using this product. Save this manual for future reference. EXERCISE EQUIPMENT QUESTIONS: Contact customer service at service@zoovaa.com USER MANUAL... -
Page 2: Important Safety Instructions
IMPORTANT SAFETY INSTRUCTIONS At Efitment your safety is our top priority and to make sure both you and the unit remain in perfect working order, we encourage you to read all the instructions before assembling and using your new Efitment machine. -
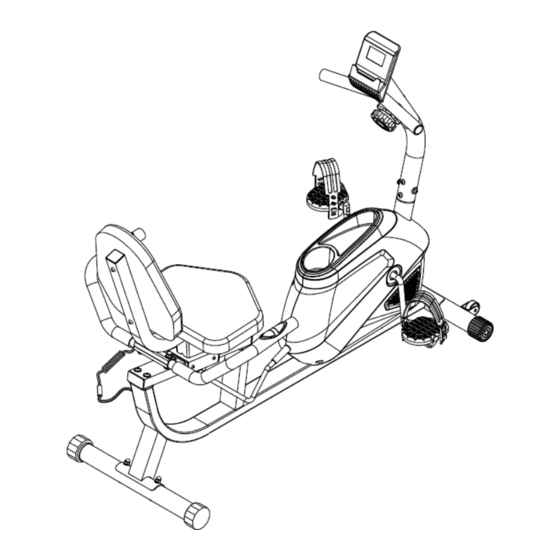
Page 3: Exploded Drawing
EXPLODED DRAWING... -
Page 4: Parts List
PARTS LIST Description Qty. Description Qty. Main Frame Bolt M5*10 Full Teeth Front Post Bearing Housing Ø56*15.5 Front Stabilizer Crank 140*220 1/2 Cushion Frame Flywheel Spacer 16*10.2*17 Handlebar Tension Spring 18*48 Seat Adjusting Tube Black Magnet 40*25*10 Magnetic Board Round Magnet 15*6 Idler Link Inertia Wheel 10*125*M10*1*17 Rear Stabilizer... - Page 5 Tension Wire 760mm Brake Handset 24*77*Hole 12 Transportation Wheel 41*8.5*20 Bearing Ø46*8 Brake Block 40*38*32 Two Groove Nut Ø46*12 Teeth on Left EV Pad 40*20*3 Locking Washer Ø46*2 Computer Hex Nut 32*32*4 Trunk Line 1 600mm Three Slot Nut Ø46*12 Needle Sensor Line 500mm with Seat Washer Ø40.5*3 Hand Pulse Sensor 700mm...
-
Page 6: Hardware Package
HARDWARE PACKAGE... -
Page 7: Assembly Instructions
ASSEMBLY INSTRUCTIONS Step1: Attach the Front Stabilizer (No.3) to the Main Frame (No.1) using 2 Carriage Bolts (No.19), 2 Arc Washers (No.26) and 2 Cap Nuts (No. 27). Tighten with Spanner (No.90). Attach the Rear Stabilizer (No.9) to the Main Frame (No.1) using 2 Carriage Bolts (No.19), 2 Arc Washers (No.26) and 2 Cap Nuts (No. - Page 8 Step 3: Insert the Brake Handle (No.49) into the hole of Eccentric Shaft (No.50), making sure the correct side is facing up, and then lock with 2 Screws (No.33). Tighten with Allen Wrench (No.91). Step 4: Attach the Handlebar (No.5) to the Cushion Frame (No.4) using 2 Carriage Bolts (No.25), 2 Flat Washers (No.23) and the 2 Cap Nuts (No.27).
- Page 9 Step 5: Attach the Cushion Frame (No.4) to the Main Frame (No.1) using 4 Bolts (No.22), 4 Spring Washers (No.24), and 4 Flat Washers (No. 23). Tighten with Allen Wrench (No.91). Then connect the Hand Pulse Sensor (No.80) with the Hand Pulse Wire (No.81). Step 6: Set the Tension Knob (No.72) at level 1 to ensure the wire is at its longest length.
- Page 10 Step 7: Connect 3 lines of Computer (No.77) with 2 Hand Pulse Wires (No.82) and Trunk Line (No.78) in turn. Then attach the Computer (No.77) to the Front Post (No.2) using 2 Bolts (No.37). Tighten with Spanner (No.90). Step 8: Connect the Pedals (No.60L/R) onto the Crank (No.39).
-
Page 11: Adjusting The Seat
ADJUSTING THE SEAT Fig. 1 Fig. 2 Pull the Brake Handle (No.49) up to loosen (Fig 1). Keep your feet on the floor as leverage, then move the Cushion Frame (No.4) to the desired position. Push the Brake Handle (No.49) down to tighten (Fig 2). -
Page 12: Adjusting The Resistance
ADJUSTING THE RESISTANCE Adjust the resistance of the bike using the Tension Knob (No.72). Increase the level of resistance by turning the tension knob to the RIGHT (clockwise), decrease the level of resistance by turning the tension knob to the LEFT (counter-clockwise). ADJUSTING THE HEIGHT AND BALANCE In order to achieve a smooth and comfortable ride, you must ensure that the bike is stable. -
Page 13: Computer Instructions
COMPUTER INSTRUCTIONS FUNCTION BUTTONS: MODE: Press to select functions. SET: Press to set values of time, distance, calories, or pulse when not in SCAN mode. RESET: Press to reset time, distance and calories to zero when not in SCAN mode. Press and hold for a few seconds to reset all values. - Page 14 NOTE: If the display is faint or shows no figures, replace the batteries. When you replace batteries, replace both at the same time. Do not mix battery types. Do not mix old and new batteries. Dispose old batteries according to your state and regional guidelines. SPECIFICATIONS: AUTO SCAN Every 4 seconds...
Need help?
Do you have a question about the RB034 and is the answer not in the manual?
Questions and answers