Table of Contents
Advertisement
Advertisement
Table of Contents

Subscribe to Our Youtube Channel
Summary of Contents for Fonteyn Spas Modern-2
- Page 1 Modern Sauna Installation & Owner’s Manual Revised April 20, 2009...
-
Page 2: Table Of Contents
TABLE OF CONTENTS Parts List ..................... 3 Dealer Information ..................3 Check your Boxes ..................4 Electrical Requirements ................4 Locating the Sauna ..................4 Basic Tools ....................4 Floor & Wall Assembly ................5 Wall and Ceiling Assembly ................6 Band Assembly ................... -
Page 3: Parts List
PARTS LIST QUANTITY PER SAUNA PART DESCRIPTION 6 X 4 6 X 6 6 X 8 Horizontal Panel (with rounded corners) Horizontal Panel (center) Horizontal Panel (center) Floor Joist 44-1/4” long Floor Joist 65-1/2” long Floor Joist 90” long Corner Panel Corner Panel Corner Panel Corner Panel... -
Page 4: Check Your Boxes
Read this entire manual through to the end before proceeding with the assembly. CHECK YOUR BOXES Be sure to immediately check your boxes against your shipping list and bill of lading. Examine for any damage and report it to the shipping company immediately. Notify us if there needs to be a repair or replacement of damaged or missing materials. -
Page 5: Floor & Wall Assembly
FLOOR AND WALL ASSEMBLY Locate the Horizontal Panels and Floor Joists. For the 6 x 4 sauna, you will need (2) HP1’s and (3) FJ1’s. For the 6 x 6 sauna, you will need (2) HP1’s, (1) HP2, and (3) FJ2’s. For the 6 x 8 sauna, you will need (2) HP1’s, (2) HP3’s, and (3) FJ3’s. -
Page 6: Wall And Ceiling Assembly
WALL AND CEILING ASSEMBLY Locate the Side Panels (SP) and screw them to the Corner Panels. For the 6 x 4 sauna, you will need SP1 and SP2. For the 6 x 6 sauna, you will need SP3 and SP4. For the 6 x 8 sauna, you will need (2) SP5’s and (2) SP6’s. -
Page 7: Band Assembly
BAND ASSEMBLY Prepare to install the stainless steel bands by temporarily placing nails to support them. On each wall panel, place two nails 2 ½” down from the top of the wall and 2” up from the bottom of the wall. Also be sure to remove the 2” nails that were temporarily installed during assembly of the wall sections. -
Page 8: Seat Installation
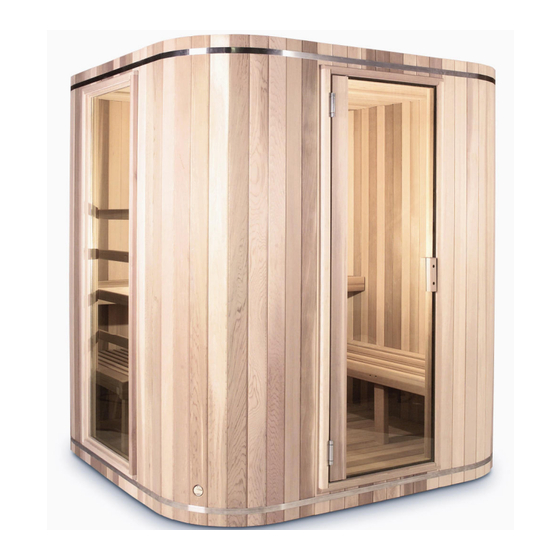
SEAT ASSEMBLY Start by laying the right Seat Assembly (SA1, SA3, or SA5) in place on the corner battens. Attach the Seat Assem- bly by fastening screws through the predrilled holes underneath the seat. Next, insert screws into the predrilled holes on the front of the seat and attach the front (closest to the door) Seat Support (SS1). - Page 9 The outside of your sauna should now look like the one pictured below. (Picture shows optional side window) FIGURE 8...
-
Page 10: Heater
HEATER Mount the heater as shown in the manufacturer's instructions. The heater should be positioned in the front left cor- The heater should be no lower than 6-1/2 inches ner of the sauna (mounted on panel CP4, see Figure 7). from the floor. -
Page 11: Light
LIGHT Have a licensed electrician mount and wire the light fixture (on a separate circuit) into the electrical box mounted in the sauna’s back wall. Do not install your light switch inside the sauna. No special type of light bulb is required, but the heat of the sauna will shorten the life of a normal bulb. -
Page 12: Taking A Sauna Bath
OPTIONAL SAUNA ROOF CAP If you ordered the optional roof cap for outdoor assembly, you are now ready to install it. First place a small block of wood in the center of the roof of the sauna. The block should ex- tend at least 3/4”... -
Page 13: Steps In Taking A Sauna Bath
TRADITIONAL STEPS IN TAKING A SAUNA BATH STEP #1 - Set your heater so that the sauna room achieves the desired temperature, usually between 150º F and 170º F. As a novice, you should begin at the lower end of this range and work your way up to the higher temperatures over several sauna baths. -
Page 14: Warranty
ALMOST HEAVE SAU AS LIMITED WARRA TY Almost Heaven Saunas extends this Limited Warranty solely to the original consumer purchaser of any Almost Heaven Sauna manufactured and installed in the USA after April 20, 2009. TWE TY-FIVE YEAR ROOM WARRA TY Almost Heaven Saunas warrants that the Almost Heaven Sauna shall be free from defects in material and workmanship under nor- mal conditions of use and service, for a period of twenty-five (25) years for residential applications after delivery to the original purchaser.
Need help?
Do you have a question about the Modern-2 and is the answer not in the manual?
Questions and answers