Advertisement
Quick Links
HQST PWM CONTROLLER
solar charge controller
( PWM 30A/PWM 40A )
User Manual
Dear users
Thank you for choosing our product. Before using the product, please
read this manual carefully.
Version : V1.01
The above information is subject to change without prior notice.
Product Features
1. Automatic system voltage identification
2. Charging program options for sealed, GEL and flooded lead-acid batteries and lithium batteries
are available.
3. An upgraded 3-stage PWM charging algorithm is adopted. Application of an equalizing charge
to the battery periodically or when over discharged can effectively prevent the battery from non-
equalization and sulfuration, thus extending the battery's service life (with the exception of GEL
and lithium batteries).
4. With temperature compensation employed, charging parameters can be automatically adjusted
(with the exception of lithium batteries).
5. A wide range of load working modes facilitate the product's application to different types of
street lights and monitoring devices.
6. The product provides overcharge, over-discharge, overload protection, as well as short-circuit
and reverse-connection protection.
7. By virtue of an advanced load starting method, large-capacitance loads can be started
smoothly.
8. A range of parameter settings and power-down saving functions are available, thus requiring no
repeated setting.
9. The product provides a dot matrix graphic LCD screen and a human-machine interface with 2
keys.
10. The user-friendly design of browser and dynamic interfaces ensures convenient and intuitive
operations.
11. (An optional communication function) provides a RJ12 data port (output of TTL232 level or
bluetooth signals), with the data adopting the standard Modbus protocol, and can be used
together with our upper computer monitoring software or mobile phone APP.
12. Boasting an industrial grade design, the product can function well in various tough conditions.
13. It features a backlit display, and the backlight will be turned on with a key pressed and turned
off over a period of time.
14. TVS lighting protection is adopted.
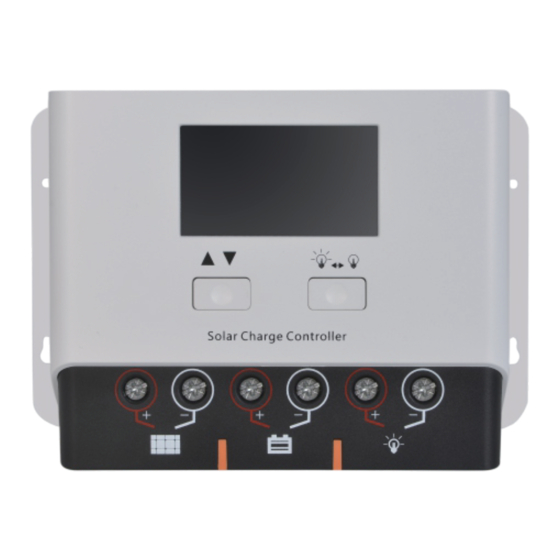
Panel Structure
Communication port
LCD screen with backlight
Keys
USB port
+
-
+
-
+
-
Solar panel
Batter y
Load
State Indicators
Indicated
LCD Icon
State
Meaning
Object
Day recognition
Steady on
Day time
Night
Steady on
Night time
recognition
Solar panel
Steady on
Solar panel indication
Steady on
Boost charging
Charging state
Steady on
Floating charging
Steady on
Equalizing charging
Quick
Battery overvoltage
flashing
Battery
Slow
Battery over discharge
flashing
4 dashes
100%
3 dashes
75%
Battery SOC
2 dashes
50%
1 dash
25%
0%
0 dash
Steady on
Load turned on
Load
Steady on
Load turned off
Quick
Overload or short-circuit protection
flashing
Five Load Working Modes
1.Pure light control (0): When sunlight disappears and the light intensity drops to
the starting point (light control off), the controller initiates a 10-minute delay
(settable) to confirm the starting signal, and then switches on the load for operation.
When sunlight emerges and the light intensity reaches the starting point, the
controller initiates a 1-minute (fixed) delay to confirm the shutting-down signal, and
then shuts down the output to stop the load's operation.
2. Light control + time control (1 to 14): The starting process is the same as pure
light control. After operating for a preset period of time (settable from 1 to 14 hours),
the load stops operation automatically.
3. Manual mode (15): In this mode, the user can switch the load on or off by the
keys,no matter whether it's day or night.
4. Debugging mode (16): When the solar panel voltage is higher than the "light
control off" voltage, switch off the load immediately; when the solar panel voltage is
lower than the "light control on" voltage, switch on the load immediately.
5. Normal on (17): The energized load keeps in output state.
LED
LED
Mode
Mode
Display
Display
0
Light control + time
Pure light control mode
control (9 hours)
1
Light control + time
Light control + time
control (1 hour)
control (10 hours)
2
Light control + time
Light control + time
control (2 hour)
control (11 hours)
Light control + time
Light control + time
3
control (3 hours)
control (12 hours)
Light control + time
Light control + time
4
control (4 hours)
control (13 hours)
Light control + time
Light control + time
5
control (5 hours)
control (14 hours)
Light control + time
6
Manual mode
control (6 hours)
Light control + time
7
Debugging mode(default)
control (7 hours)
8
Light control + time
Normal on mode
control (8 hours)
Load Working Mode Settings
In the load mode menu, long press
for 2s, and the number (e.g. 15) will begin to flash.
Press
to adjust the mode (from 0 to 17), and then long press again for 2s to complete
and save the setting.
Note: 1. After parameter adjustment, if
is not pressed and held long enough for
exiting, the system exits to the main menu after 12s, and the parameter that
was set is not saved.
2. When the system is saving data, the screen may shake slightly. This is normal
and the user may ignore it.
Safety Advice
1) When connected to a 24 V system, the solar panel terminal voltage may exceed the
limit for human safety. If operation is to be performed, be sure to use insulation tools
and keep your hands dry.
2) If the battery is reversely connected, the controller itself won't be damaged, but the
load end will have a negative voltage output, which may damage your load device.
Take care not to let this happen.
3) The battery contains a large amount of energy. Therefore, in no cases should the
battery be short circuited. It's recommended that a fuse be serially connected to the
battery.
4) Keep the battery away from fire sparks, as the battery may produce flammable gas.
5) Keep children away from the battery and controller.
6) Follow the safety advice provided by the battery manufacturer.
LCD Screen Illustration
Battery
indicator
Solar panel
Discharging
Night time
Day time
Load
indicator Charging current
SOC
current
indicator
indicator
indicator
indicator
indicator
indicator
Numerical value display area
Charging
Units
state
System
Battery
36V48V
voltage
type
Mode
Fault indication
Data
settings
communication
method
Browsing Menu on LCD Screen
1).Continuously press
,the screen will display the following in order: "main
menu"---"solar panel voltage"---" solar panel current"---"battery capacity"---"battery
voltage"---"discharging current"---"charging amp-hrs"---" discharging amp-hrs"---"
temperature inside controller"---" load mode"---" load mode settings"---"error code",
and then back to "main menu". If the keys are not operated for 12s, the system will
automatically return to display the "main menu".
Advertisement

Summary of Contents for HQST PWM 30A
- Page 1 1-minute (fixed) delay to confirm the shutting-down signal, and Day recognition Steady on Day time ( PWM 30A/PWM 40A ) and lithium batteries). Take care not to let this happen. then shuts down the output to stop the load's operation.
- Page 2 Charging and Discharging Overload Protection and Recovery Time Error Code List Parameter Details In the charging and discharging overload protection mechanism, the relation between Model PWM-30A/PWM-40A Remarks Code on LCD screen Corresponding error overload current and protection time is as follows: An overload current 1.25 times of No error Rated current 30A/40A...
Need help?
Do you have a question about the PWM 30A and is the answer not in the manual?
Questions and answers