
Summary of Contents for Powertrain LZ100
- Page 1 Exercise Bike – MODEL LZ100 INSTRUCTION MANUAL WARNING: Cycle should always be placed on a level surface for use Please read these instructions carefully and keep for future reference FOR DOMESTIC INDOOR USE ONLY...
-
Page 2: Important Warnings
Important Warnings WARNING: Injuries may happen to young children if the exercise cycle is operated in their vicinity without properly fitted guards. CAUTION: • Exercise cycle, its guards and safety devices must be regularly maintained and the integrity of guards and safety devices must be inspected prior to each use of this machine. - Page 3 FEATURES...
-
Page 4: Components -Parts
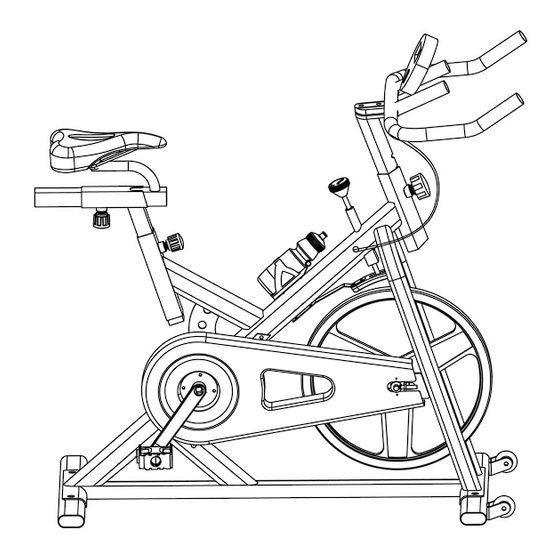
COMPONENTS -PARTS Please check if you have all parts as listed below. Note: Small components/parts may be pre-fitted to larger components to make it easier for end users to assemble the bike. Please check carefully all the parts before contacting us regarding any missing components. EXPLODED-VIEW ASSEMBLY... -
Page 5: Parts List
PARTS LIST DESCRIPTION SPECIFICATION Main Frame 30x60x500(included wheel) Front Stabilizer 30x60x500 1PCS Rear Stabilizer M8X16 4PCS Hexagon Screw Φ20*Φ8.2*1.5T 4PCS M8 Washer 2PCS Pedal Vertical Seat Post Knob Horizontal Seat Post Saddle Brake Knob Bottle 2PCS Crank(R+L) Handle Bar Bottle holder Handle Bar Post 2PCS Screw... -
Page 6: Assembly Instructions
ASSEMBLY INSTRUCTIONS Step 1 • Attach the rear stabilizer (3) to the main frame (1) using two sets of screws (5) and washers (6). • Attach the front stabilizer (2) to the main frame (1) using two sets of screws (5) and washers (6). - Page 7 Step 3 • Slide the Horizontal Seat Post(11) to the Post(9) and tighten Knob(22) • Attach the Saddle(12) to the Horizontal Seat Post(11). Step 4 • Attach the Handle Bar(16) & Computer Holder(25) to the Post Tube(18) use Screw(20) and Washer(21) •...
-
Page 8: Operating Instructions
Step 5 • Pedals (8) are marked “L” and “R”- (i.e. left and right). • Connect them to their appropriate crank arms. For example, the right crank arm is on the right hand side of the cycle as you sit on it. •... -
Page 9: Exercise Computer
Handlebar Adjustment To adjust the handlebar height, simply turn the adjustable knob loose, then adjust the bar to the required height and retighten the knob. Chain Adjustment • The chain on the bike has been pre-adjusted and should not require immediate attention. •... -
Page 10: Maintenance
resistance on the strap then lock it back around the buckle. Now mount the cycle and turn the pedals, the tension control knob should now be able to be used with a finer degree of adjustment.. MAINTENANCE • Before using the bike, always make sure all bolts/nuts are fully tightened •... - Page 11 Muscle Toning • To tone muscle while on your spin bike you will need to have the resistance set higher. This will put more strain on your leg muscles and may mean you cannot train for as long as you would like. •...
- Page 12 Warranty and Contact Details Kmate Pty Ltd provides a 12 month warranty for this product when used for domestic purposes. This product is not intended for commercial use and any such use will void all warranty. The benefits of this warranty are provided in addition to other rights and remedies you may have under a law in relation to the goods and services to which this warranty relates.
Need help?
Do you have a question about the LZ100 and is the answer not in the manual?
Questions and answers