Table of Contents
Advertisement
Quick Links
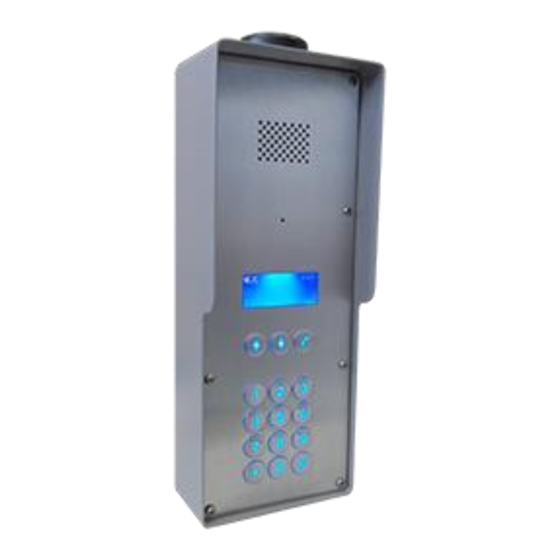
SOLO-KP LCD – QUICK START GUIDE
Please use web server on:
1. Read this Quick Start Guide first...
2. Install power supply wiring from PS source to location.
3. If antenna is not already mounted on the housing,
mount antenna on a location away from speaker.
4.
IMPORTANT: USE A MICRO SIM CARD (Micro-SIM)
WITH MEMORY FOR UP TO 250 CONTACTS!
Insert SIM card to be used for SOLO-KP LCD device in your
personal mobile phone to erase PIN code.
5. IMPORTANT: ERASE THE PIN CODE ON SIM CARD!
6. Insert SIM card in SOLO device – gold contacts down and cut off
corner RHS.
The unit must be switched OFF when you insert the SIM!
Insert SIM carefully as SIM holder is fragile if forced!
7. Connect outputs and power cable to SOLO-KP LCD device.
8. Connect SOLO-KP LCD device to source power supply voltage.
9. Wait until YELLOW LED start flashing in 5 second interval (0,5 sec
ON / 5 sec OFF) and BLUE LED (LED 1) starts flashing. This is set in
around 30 seconds.
10. SOLO-KP LCD unit is now ready to operate.
IMPORTANT: Before sending any SMS commands, the device
must be in normal operation mode!
WIRING
Wiring is minimal. Apart from Power supply to SOLO & door release
wires, there is no other required wiring.
*Do not use the Power out (12V AUX) for electric lock driving!
You can use it to power external sensors: Short-term current load
(up to 1 minute) - up to 500mA; Long-term current load - up to
100mA! Use separate power source for door electric lock!
For each entry SOLO-KP LCD incorporates a "Call group of
parameters". It supports up to 200 call groups (apartments).
SET A GROUP OF PARAMETERS FOR THE APARTMENTS –
Please set parameters with EasySet SW (it is on the CD in the box):
USING THE DEVICE FOR CALLING THE APARTMENTS:
Select name on LCD with arrows UP or DOWN and press CALL button:
Note: Short press on UP or DOWN for 1 step (one name up, down),
Longer press for 4 names at once up or down.
SETUP ACCESS CODES (PIN1 to PIN2000) – FOR DIRECT ACCESS:
NOTE: PIN1 to PIN1000 for Relay 1, PIN 1001 to PIN2000 for Relay 2.
Set 4 digit PIN access codes by sending SMS to SOLO-KP LCD:
;PIN1=1234;PIN2=2345;...;PIN2000=5588; (first digit ≥ 1)
Delete PIN access codes by sending:
;PIN1=;PIN2=;PIN3=;PIN4=;PIN5=; ... up to ;PIN2000=;
Check current PIN access codes: Request all PIN codes: ;PPIN;
Request a block of PIN codes: ;PPIN=1,5; (access codes 1 – 5)
www.easyset.eu
USING THE PIN ACCESS CODES FOR DIRECT ENTERING:
Type PIN access code on the keypad and press '#' to confirm:
Ex.: 1234# (1 long beep = PIN correct, 3 short beeps = PIN incorrect)
SET AUTHORISED CALLER ID (CLIP) USERS (In total up to 500):
All Call groups numbers are used as intercom and as Caller ID numbers
(400). You could use additional 100 Caller ID numbers.
;+CLP1=07798765432;CLP2=xxxxxxxxxx;...up to CLP100;
CHANGE SPEAKER LEVEL (default is 10 max is 20): ;+SPK=12;
CHANGE MICROPHONE LEVEL (default is 15 max is 40): ;+MIC=20;
SET OUTPUT SWITCHING CONFIGURATION:
Output 1 (3 second pulse default = ;OS1=3; ). Change to 5 second
pulse ;OS1=5;. Output 2: Change to 5 second pulse ;OS2=5;.
NOTE: If the confirmation SMS is needed, put "+" at the beginning of
the SMS command: Example - ;+SPK=12;MIC=20;
OPERATION & TESTING
Follow these steps to test the system...
1.SWITCH ON THE POWER: The device will beep once every 10 sec. as
it searches for the network. When it connects you will hear 3 quick
beeps. BLUE LED starts flashing (2 – 5 are recommended).
2.PROGRAM BY SMS: Send minimum setting ;+KPA1=07798765432;
(using your own phone number).
3. REPLY CONFIRMATION: You should receive an SMS back to
confirm the setting. If you don't, you either left off the '+' in the SMS
string, or the device is not ready, or the SIM has no credit.
4. PRESS BUTTON 1 on the keypad and press '#' to confirm: The
device initiates the call: you hear beeps to starts dialing and then a
ringtone (which can be muted: ;+MUT=1;).
5. OPEN THE DOOR: Press 11 on your telephone when the intercom
call is established and Output Relay 1 will switch (21 for Relay 2).
SWITCHING RELAY OUTPUTS
1. DURING AN INTERCOM CALL (DTMF): Press 11 for Output 1 'ON' &
10 for Output 1 'OFF' (if set to latching) and 21 for Output 2 'ON' &
20 for Output 2 'OFF' (latching only).
2. BY SMS: Send: ;ORC1=1; for Output 1 'ON' and
;ORC2=1; for Output 2 'ON'.
3. BY CALLER ID (dial in): Call the SOLO-KP LCD device from one of the
programmed telephone numbers. All Call groups numbers are at the
same time used as intercom numbers and as Caller ID numbers.
Example: All users under Call groups parameters can call SOLO device
and activate the output defined by the KPO1 parameter.
EASYSET PROGRAMMING SOFTWARE
Test the unit before trying to use programming software!
NOTE: Please install EasySet SW on your PC and with USB cable connect
normal operated SOLO-KP LCD device, logged on the mobile network.
1. Get the software EasySet & USB driver files from the CD or WEB.
2. Install the EasySet software (please be carefull to download the
correct PC program - x86 or x64): Double click on *.msi file.
3. Plug device into your PC with USB to Mini USB cable: With valid SIM card
and in normal operation mode – the SOLO device must be registered on the
GSM network, BLUE LED: 2 – 5 flashes.
4. Start EasySet SW: Double click on EasySet icon. The SOLO must be connected
to PC via USB. Select connection port: choose the COM port number (Device
manager Ports) and click Connect.
5. Program settings: Always
"Read configuration"
programming action by PC. Go through the tabs to change settings. From the
'Home' tab press "Send configuration" to program the
configuration to file" for future access via "Load configuration from file".
TROUBLESHOOTING
Please check the following before calling for support:
1. Will not connect: Change network, move antenna or check if connected
properly, try before installing: BLUE LED should flash 2 – 5 times.
2. Audio interference on the phone: Move antenna to new location,
improve signal, don't put antenna near speaker.
3. Will not call: Set User number/s to call (with EasySet) or check SIM card
is working in a phone first.
4. Gate release doesn't work: Check connections on gate control side.
TECHNICAL SUPPORT
See the complete Installation Manual for full information. This is a basic "Quick
Start Guide" only. Please contact your Supplier for further information, if you have
tried the above and cannot resolve the issue.
: 3 ways to switch the outputs:
first, before any
SOLO
. Then "Save
Advertisement
Table of Contents

Summary of Contents for EASYSET SOLO-KP
- Page 1 2. BY SMS: Send: ;ORC1=1; for Output 1 ‘ON’ and ;ORC2=1; for Output 2 ‘ON’. 3. BY CALLER ID (dial in): Call the SOLO-KP LCD device from one of the programmed telephone numbers. All Call groups numbers are at the same time used as intercom numbers and as Caller ID numbers.
- Page 2 Web Server: www.easyset.eu Our Android apps EasySet you can install free of charge from Google Play: https://play.google.com/store/apps/details?id=com.marscommerce.esweb https://play.google.com/store/apps/details?id=com.marscommerce.easycontrol Our IOS apps EISWARE you can install free of charge from Apple Store: https://itunes.apple.com/app/eisware-web/id1137960053?mt=8 https://itunes.apple.com/us/app/eisware-control/id1220908841?mt=8...
Need help?
Do you have a question about the SOLO-KP and is the answer not in the manual?
Questions and answers