
Subscribe to Our Youtube Channel
Related Manuals for Force1 Velocity Wave


Summary of Contents for Force1 Velocity Wave
- Page 1 USER MANUAL FOR MORE INFORMATION Visit us online at force1rc.com for product information, replacement parts, and tutorials.
-
Page 3: Table Of Contents
FORCE1 RC CONTENTS Important Statement & Safety Warnings ······················ 3 Important Safety Notice for RC Boat Battery ··············· 4 Li-Ion Battery Care Instructions ···································· 5 Charging Instructions for Boat Battery ························· 6 Box Contents & Boat Overview ···································· 7 Transmitter Overview & LCD Overview ························ 8 Transmitter Battery Installation ·····································... -
Page 4: Important Statement & Safety Warnings
VELOCITY RC BOAT User Manual IMPORTANT STATEMENT Thank you for buying a Force1 RC boat. Please read this manual carefully before operating the RC Boat. By reading this manual it is assumed you are accepting all content in this user manual when using this RC Boat. -
Page 5: Important Safety Notice For Rc Boat Battery
FORCE1 RC IMPORTANT SAFETY NOTICE FOR RC BOAT BATTERY * Keep Li-Ion batteries away from children and animals. * Never use or charge a Li-Ion battery that has ballooned or swelled. * Never use or charge a Li-Ion battery that has been punctured or damaged. -
Page 6: Li-Ion Battery Care Instructions
• After crashing the boat, always check the battery and connectors for damage. If any part is damaged get spare parts from Force1 RC.com. • Please use genuine factory spare parts replacements from Force1RC.com... -
Page 7: Charging Instructions For Boat Battery
FORCE1 RC CHARGING INSTRUCTIONS FOR BOAT BATTERY 1. Plug the white battery cable into the charging cable. 2. Choose one of the methods as pictured below to connect with USB plug. LI-ION BATTERY DISPOSAL & RECYCLING Lithium-Ion batteries must not be placed with household trash. -
Page 8: Box Contents & Boat Overview
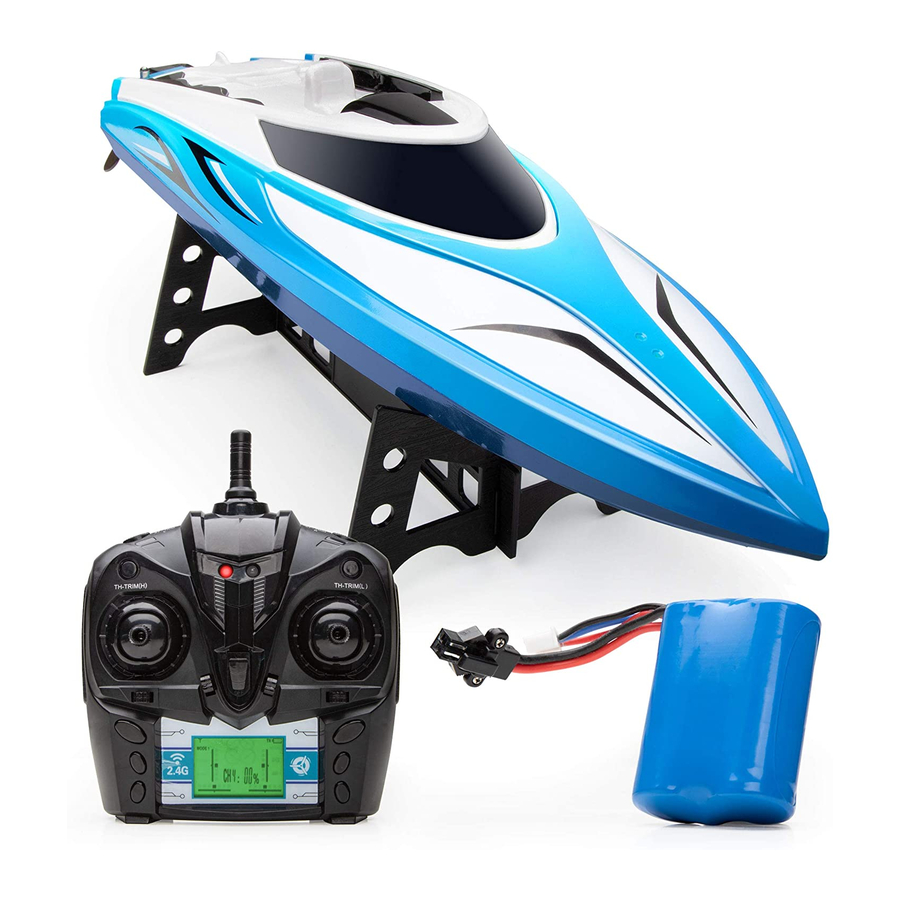
VELOCITY RC BOAT User Manual BOX CONTENTS RC BOAT TRANSMITTER 2 x 7.4v 1500mAh LiPo BATTERY PROPELLER USB CHARGER CABLE NOSE GUARD LUBRICATION OIL RC TOOL DISPLAY RACK WITH SCREWS BOAT OVERVIEW HATCH HATCH SWITCHES INNER HATCH STEERING ENGINE BAR BOAT STEERING RUDDER GUIDING RUDDER... -
Page 9: Transmitter Overview & Lcd Overview
FORCE1 RC TRANSMITTER OVERVIEW TURN LEFT TRIM TURN RIGHT TRIM BACKWARD TRIM FORWARD TRIM THROTTLE STICK DIRECTION STICK POWER SWITCH LCD OVERVIEW FORWARD/BACKWARD TRIM SIGNAL BATTERY CHARGE LEFT/RIGHT HAND MODE THROTTLE DIRECTION DISPLAY CH 1: FORWARD DISPLAY CH 2: BACKWARD DISPLAY... -
Page 10: Transmitter Battery Installation
VELOCITY RC BOAT User Manual TRANSMITTER BATTERY INSTALLATION Unscrew and open the battery cover on the back side of the transmitter and put 4 alkaline batteries (AA, not included) into the box in accordance with electrode instructions, as shown in Picture 1 & 2. PICTURE 1 PICTURE 2 CAUTION:... -
Page 11: Boat Battery Installation
FORCE1 RC BOAT BATTERY INSTALLATION 1. Turn the cabin switch either right or left to unlock. Remove the Cabin Cover (Picture 3). 2. Turn 4 switches to unlock the Inner Hatch. Remove the Inner Hatch (Picture 4). 3. Put the Boat Battery into the battery holder of the hull (Picture 5). -
Page 12: Maintenance
VELOCITY RC BOAT User Manual MAINTENANCE 1. After operation, please remove the battery. 2. The surface of the boat should avoid water exposure for long periods of time outside of operational use. After operation, dry the outside of the boat with a clean cloth. 3. -
Page 13: Spindle Tube Lubrication
FORCE1 RC SPINDLE TUBE WALL LUBRICATION 1. Unplug the motor wire (Picture 13). 2. Pull out the cooling rubber hose (Picture 14). 3. Unscrew the motor from the motor seat (Picture 15). PICTURE 13 PICTURE 14 PICTURE 15 4. Remove the motor from the seat module (Picture 16). -
Page 14: Pairing Boat With Transmitter
VELOCITY RC BOAT User Manual 10. Load the motor seat module (Picture 22). 11. Screw in the motor seat (Picture 23). 12. Reconnect the cooling rubber hoses (Picture 24). 13. Reconnect the motor wire (Picture 25). PICTURE 22 PICTURE 23 PICTURE 24 PICTURE 25 NOTE: Please route the battery wire to boat side to prevent the wire were cut off by the steering... -
Page 15: Left Hand Basic Operation Controls
FORCE1 RC LEFT HAND BASIC OPERATION CONTROLS MOVE FORWARD OR BACKWARD Push the THROTTLE STICK up and the boat moves forward, and pull the THROTTLE STICK down and the boat moves backward. TURN LEFT OR RIGHT Push the THROTTLE STICK up and: pull the... -
Page 16: Left Hand Trim Adjustments
VELOCITY RC BOAT User Manual LEFT HAND TRIM ADJUSTMENTS TRIM FORWARD OR BACKWARD When the boat is veering to the front or back, use the TRIM BUTTONS to correct the direction. When the boat is moving forward without touching the THROTTLE STICK, press the BACKWARD TRIM BUTTON until the boat stops moving forward. -
Page 17: Right Hand Basic Operation Controls
FORCE1 RC RIGHT HAND BASIC OPERATION CONTROLS NOTE: When Right Hand Mode is engaged the two rockers are switched, making the right stick the THROTTLE STICK and the left stick the DIRECTION STICK. MOVE FORWARD OR BACKWARD Push the THROTTLE STICK up and the boat moves forward, and pull the THROTTLE STICK down and the boat moves backward. -
Page 18: Right Hand Trim Adjustments
VELOCITY RC BOAT User Manual RIGHT HAND TRIM ADJUSTMENTS TRIM FORWARD OR BACKWARD When the boat is veering to the front or back, use the TRIM BUTTONS to correct the direction. When the boat is moving forward without touching the THROTTLE STICK, press the BACKWARD TRIM BUTTON until the boat stops moving forward. -
Page 19: Spare Parts
FORCE1 RC SPARE PARTS Recieving Plate Motor Battery Steering Engine 0001 0002 0003 0004 USB Charger Discharge Pipe Steering Engine Bar Propeller 0005 0006 0007 0008 Nose Guard Screw Spindle Tube 0009 0010 0011 Stern Rudder Position Tube Body Hatches... -
Page 20: Fcc Information & Warning
FCC INFORMATION This equipment has been tested and found to comply with the limits for a Class B digital device, pursuant to part 15 of the FCC Rules. These limits are designed to provide residential protection against harmful interference in a residential installation. This equipment generates, uses and can radiate radio frequency energy and, if not Installed and used in accordance with the instructions, may cause harmful interference to radio communications.
Need help?
Do you have a question about the Velocity Wave and is the answer not in the manual?
Questions and answers
There’s not show your strength or the battery
If the Force1 Velocity Wave drone does not show battery strength, try plugging the battery into another charger, if one is available, to check if the issue is with the charger.
This answer is automatically generated