
Summary of Contents for Liberator LR7
- Page 1 Liberator Rugged 7 with Chat Software User’s Guide v2.2.0 Liberator Pty Ltd 265 Gilbert Street, Adelaide SA 5000 Australia Tel: +61 (0)8 8211 7766 Fax: +61 (0)8 8211 7733 info@liberator.net.au www.liberator.net.au...
- Page 2 LR7 User’s Guide v2.2.0 Page 2...
- Page 3 Microsoft operating system. Saltillo grants permission for the use of Chat Editor on each computer used to exchange data with the NOVA chat (LR7) device. Attention! Consult accompanying documents. LR7 User’s Guide v2.2.0...
- Page 4 Small parts could present a choking or other hazard. Do not use the device if the screen is cracked or broken. Liberator Pty Ltd assumes no responsibility for any loss or claims by third parties which may arise through the use of this product.
-
Page 5: Table Of Contents
Welcome to Liberator Rugged 7 ......................10 What’s Included ........................... 11 LR7 Device Features ..........................12 Turning LR7 On & Off ........................... 13 Turning your Device On (from complete power down) ................13 Turning your Device Off (for storage) ......................13 Daily Use - Turn just the Screen On &... - Page 6 Hiding and Showing Button Images ......................45 Modifying Button Styles ........................46 Modifying a Button Style ..........................46 Modifying Button Colour Saturation ......................47 Modifying a Page Button Style ........................47 Modifying a Vocabulary Button Style ......................48 LR7 User’s Guide v2.2.0 Page 6...
- Page 7 Activating Buttons on Touch or Release ....................... 63 Setting a Time for Button Activation ......................63 Setting a Time to Prevent Selection of a Button Twice ................64 Setting up a Beep when a Button is Pressed ....................64 LR7 User’s Guide v2.2.0 Page 7...
- Page 8 Analysing Language Development ......................79 Using the Realize Language Website ......................79 Creating a Privacy Password ......................... 80 Turning Data Logging On or Off ........................80 Uploading Data for Analysis.......................... 81 Configuring Data Uploading.......................... 81 LR7 User’s Guide v2.2.0 Page 8...
- Page 9 No Speech and the message is not going to the Speech Display Bar when pressing buttons ..... 92 Can’t Find the Library Menu ......................... 92 Resetting LR7 ..............................92 Clearing and Restoring Customizations ....................93 Clearing Custom Vocabulary ......................... 93 Restoring the Default Settings ........................
-
Page 10: Welcome To Liberator Rugged 7
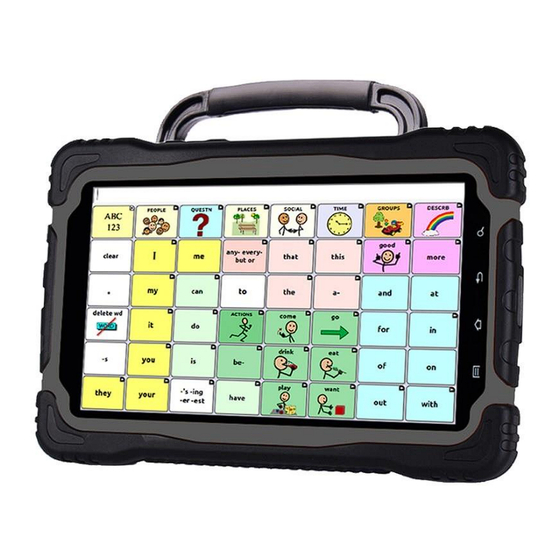
Welcome to Liberator Rugged 7 The Liberator Rugged 7 with Chat (LR7) combines the advantages of a fully rugged Android tablet and operating system with the well-known Chat software from Saltillo to create a powerful communication device. This manual offers step by step instructions for setting up and using your LR7 device. -
Page 11: What's Included
What’s Included The following were included in your LR7 package. Your LR7 device Battery Charger Stylus The stylus is a potential hazard for choking or poking the eye. Chat Editor Install USB Memory Stick Chat Editor is used for programming from a PC and for backing up custom files. -
Page 12: Lr7 Device Features
Home: Tap to go to the home screen. Menu: Tap to display menus that allow you to select a vocabulary file, enable or disable augmentative options, set how and when to speak messages, and configure a wide variety of additional options. LR7 User’s Guide v2.2.0 Page 12... -
Page 13: Turning Lr7 On & Off
Turning LR7 On & Off Turning your Device On (from complete power down) Press and hold the Power Switch. Turning your Device Off (for storage) Press and hold the Power Switch. Once you feel a vibration, let go. At the prompt, touch Power off on the screen. -
Page 14: Charging The Lr7
Charging the LR7 You received a battery charger in the box with your LR7. Plug the charger into a wall outlet (surge protector recommended). Open the rubber water /dust protection plug on the right side of the LR7 and plug the micro USB connector into the connector socket. -
Page 15: Checking Battery Status
Any time you choose this button, the application will speak the battery status of the device and the amplifier and display the information in the Speech Display Bar (SDB). For additional information on creating a button action, see Adding or Modifying a Button Action. LR7 User’s Guide v2.2.0 Page 15... -
Page 16: Controlling The Volume
Controlling the Volume Volume controls are located on the top edge of the LR7. Pressing the left side of the button adjusts the volume in one direction and pressing the right side does the opposite. Volume controls can also be added to buttons within the vocabulary pages. -
Page 17: Adjusting The Stand
1. Remove the stand, if in place 2. Remove a screw from each side 3. With some tension, extend the sides out around the casing. The stand and screws from handle could be a potential choking hazard. LR7 User’s Guide v2.2.0 Page 17... -
Page 18: Attaching A Strap
Attaching a Strap If you want to carry your LR7 with a shoulder strap, attach the two loops provided to the silver brackets on the back of your device. Do not clip the strap directly to the LR7 holders without using the loops, as this may damage the device. -
Page 19: Using The Touchscreen
Using the Touchscreen Your LR7 comes with a capacitive touchscreen. It responds best to a light touch from the pad of your finger. Cleaning your Device If you wish to clean the screen of your device, turn the device off, wipe with a soft, lint-free cloth slightly dampened with water or diluted window cleaning fluid. -
Page 20: Using The Android Home Screen (Non-Dedicated Devices)
To remove a shortcut: 1. Press and hold on the shortcut until Remove appears. 2. Drag the shortcut to Remove. Shortcuts: We have provided shortcuts to the Chat software and the camera for your ease. LR7 User’s Guide v2.2.0 Page 20... -
Page 21: Opening And Closing The Chat Application (Non-Dedicated Devices)
To fully close the Chat application, push and hold Back and confirm by choosing Yes. Using the Power switch to turn off the LR7 will also close all open applications on the Android device. LR7 User’s Guide v2.2.0 Page 21... -
Page 22: Using The Chat Application Screen
To clear all words, press and hold X. A small arrow in the upper corner of a button indicates that the button links to another page. For information on resizing or hiding an arrow, see Modifying a Button Arrow Link. LR7 User’s Guide v2.2.0 Page 22... -
Page 23: Using The Speech Display Bar (Sdb)
This option toggles the SDB context menu on or off. This option either hides or displays the X on the far right of the Enable Clear SDB. The X deletes a word when tapped or clears the entire SDB SDB (X) when held. LR7 User’s Guide v2.2.0 Page 23... -
Page 24: Changing Sdb Style Settings
To configure the SDB to appear at the bottom of the screen: 1. Choose Menu > Settings > Style. 2. Tap On Top to remove the checkmark. To return the SDB to the top of the screen, tap On Top to insert a checkmark. LR7 User’s Guide v2.2.0 Page 24... -
Page 25: Using The Chat Application Menus
View help and other information Pages View a list of pages Edit Page Edit the current page Edit Vocabulary Edit the current vocabulary More View additional options Hide Mode Turn Hide Mode on or off LR7 User’s Guide v2.2.0 Page 25... -
Page 26: Choosing A Vocabulary File
Choosing a Vocabulary File Choosing an appropriate vocabulary file is imperative to the success of the device user. Liberator suggests that a qualified speech-language pathologist, teaching staff, parents, and device user are all part of the decision process of choosing an appropriate vocabulary file. Consider the features of each vocabulary file (e.g. -
Page 27: Available Vocabulary Files
“Grammar” keys are used to provide morphological endings to verbs, nouns, and adjectives. A spelling/word prediction page is used to spell words that are not included as separate buttons on the pages. Being a LR7 User’s Guide v2.2.0 Page 27... - Page 28 “grammar” function provides morphological endings to verbs, nouns, and adjectives. Spelling with word prediction along with the category-based pages contained in all other versions of the vocabulary are also available. This vocabulary is configured to work with a keyguard. LR7 User’s Guide v2.2.0 Page 28...
-
Page 29: Multichat 15
The progressive system offers a variety of topics for everyday needs and conversation and provides AAC users immediate and more successful communication exchanges within a variety of settings. LR7 User’s Guide v2.2.0 Page 29... -
Page 30: Mycore
Each page is completely customizable to meet the specific vocabulary needs of each individual. LR7 User’s Guide v2.2.0 Page 30... -
Page 31: Chat Editor
Microsoft Voices again. 6. Choose Install. 7. Follow the on-screen instructions. 8. When the installation process is complete, remove the USB. The USB is not needed to run the Editor. LR7 User’s Guide v2.2.0 Page 31... -
Page 32: Configuring Chat Editor
6. Chat Editor will open. Note: You may need to set up multiple configurations if you support more than one client. For example: Tommy with only SymbolStix images and Sarah with both SymbolStix and PCS symbols. LR7 User’s Guide v2.2.0 Page 32... -
Page 33: Enabling Speech In Chat Editor
To explore files using Chat Editor, choose Library. My Resources stores all custom files. All default Saltillo-supplied files are stored in the folder specifying the symbol set and language used. LR7 User’s Guide v2.2.0 Page 33... -
Page 34: Device And Editor Differences
In Chat Editor, right-clicking on the vocabulary window will open context menus for editing. Orientation You can use the device in portrait or landscape orientation. To set Chat Editor’s screen orientation to match the device, choose Settings > View. LR7 User’s Guide v2.2.0 Page 34... -
Page 35: Using Chat Editor To Create Instructional Materials
4. In your document, insert the cursor and select Paste. The sequence will be pasted into the document. 5. Capture the next sequence. 6. When you finish capturing sequences, select Exit to close the Button Capture window. LR7 User’s Guide v2.2.0 Page 35... - Page 36 Capture Selections. Once you decide what you want to capture, turn Capture Selections back on. If you make a mistake, select Clear and start capturing the sequence again. Keep in mind that Clear removes all captured content from the Button Capture window. LR7 User’s Guide v2.2.0 Page 36...
-
Page 37: Creating A Customized Vocabulary File
4. Type a name for the file. 5. Choose Save. Creating a Copy using Chat Editor 1. Choose Library. 2. Choose the file to duplicate. 3. Choose Duplicate. 4. Type a name for the file. 5. Choose Save. LR7 User’s Guide v2.2.0 Page 37... -
Page 38: Turning Edit Mode On
Always copy the file with changes to the other platform. This will ensure that both the device and the Editor are current. LR7 User’s Guide v2.2.0 Page 38... -
Page 39: Change Button Label/Message
To do this: Choose Menu > Settings > Style > Fill. For information on adding images to buttons, see Adding or Modifying a Button Image. LR7 User’s Guide v2.2.0 Page 39... -
Page 40: Adding Or Modifying A Button Image
Choose Import to bring a new picture into the library (in Editor – choose files from your computer; on device – choose from saved images and photos). You can also use the Camera function to take your own image (on device). LR7 User’s Guide v2.2.0 Page 40... -
Page 41: Finding An Image From The Device Library
Choose the image you want and press Select. The image will be displayed in the Button Properties. Choose Save. If you don’t find the appropriate image, enter a new item in the text box, choose Search, and choose a different image. LR7 User’s Guide v2.2.0 Page 41... -
Page 42: Creating Your Own Image
Tap the checkmark to open a keyboard. On other devices, Save and Discard buttons will be displayed. Tap the Save button to open a keyboard. 6. Enter a name for the image and choose Save. LR7 User’s Guide v2.2.0 Page 42... -
Page 43: Using An Existing Image
3. Click Open device to view files. The computer will view the device as an external drive. 4. Copy the appropriate images from the computer to your device’s Pictures folder or from the device to the appropriate folder on the computer. 5. Unplug the USB cable. LR7 User’s Guide v2.2.0 Page 43... -
Page 44: Hiding Buttons
Note: Unchecking the Visible box makes a button invisible in standard mode and automatically disables the button action. Choose Save. To hide a single button using the Editor, right-click, choose the Style tab, and uncheck the Visible box. LR7 User’s Guide v2.2.0 Page 44... -
Page 45: Hiding Or Showing Multiple Buttons
Settings > Input > and uncheck Show Hidden Buttons. Hiding and Showing Button Images To hide or show all button images, turn button images off or on for the entire vocabulary file. Choose Menu > Settings > Style > Show Button Images. LR7 User’s Guide v2.2.0 Page 45... -
Page 46: Modifying Button Styles
Check Bold, Italic, or Underlined to modify label text. If you want to create a visual scene in which the location speaks but the button itself does not appear, choose Transparent. When you finish making changes, choose Save. LR7 User’s Guide v2.2.0 Page 46... -
Page 47: Modifying Button Colour Saturation
If you are using the Editor, select an option you want to modify, select the Edit button for that option, modify the setting, and select Done. Do the same for any other options you want to modify. When you finish making changes, choose OK. LR7 User’s Guide v2.2.0 Page 47... -
Page 48: Modifying A Vocabulary Button Style
Editor.) A list of button options appears. 3. Choose Button Style Override. The Button Properties screen opens to the Button tab. 4. Check the style options you want to change. 5. Choose Save. LR7 User’s Guide v2.2.0 Page 48... -
Page 49: Modifying A Button Arrow Link
2. Under “Modifiers”, choose Size. The Select a Size menu opens. 3. Choose Hide. If you are using the Editor, select Settings > Style > Button Style. The Button Style menu window opens. Under Button Modifiers, select No Show and select OK. LR7 User’s Guide v2.2.0 Page 49... -
Page 50: Adding Or Modifying A Button Action
9. Choose Save. (Click OK if you are using the Editor.) Note: To perform no action, remove all actions from the button. LR7 User’s Guide v2.2.0 Page 50... -
Page 51: Available Button Actions
Opens a specific Android™ application. (not functional with a Application closed/dedicated system) Plays audio files. These are recordings of someone speaking Play audio or sounds. Records audio files. These are recordings of someone Record Audio speaking or sounds. LR7 User’s Guide v2.2.0 Page 51... - Page 52 Visit Exception return to the previous page, use a Visit Exception action to leave it on the page for one additional hit. Volume Down Turns down the volume. Volume Up Turns up the volume. LR7 User’s Guide v2.2.0 Page 52...
-
Page 53: Using Navigate, Visit, And Jump To Page
For example, if you jump to the Describer page and then navigate to the Spelling keyboard from the Describer page, the system will not remember anything and will leave you on the keyboard page that you navigated to. LR7 User’s Guide v2.2.0 Page 53... -
Page 54: Copying Buttons
1. Choose Menu > Edit Mode. 2. Press and hold on an empty location. 3. Choose Add Button from Library. 4. Choose the page on which the button resides. 5. Choose the button to use. LR7 User’s Guide v2.2.0 Page 54... -
Page 55: Prioritizing Buttons
2. Press and hold the button that you want to resize. 3. Choose Change Button Size. 4. Set the number of cells you want the button to fill both vertically and horizontally. 5. Choose Save. LR7 User’s Guide v2.2.0 Page 55... -
Page 56: Creating A Page
Creating a Page from a Template 1. Choose Menu > Pages > Menu > New from template. 2. Choose the appropriate template and choose OK. 3. Give the page an appropriate name and choose Save. LR7 User’s Guide v2.2.0 Page 56... -
Page 57: Copying A Page From A Different Vocabulary File
Adding a Grid to Pages To add a wire-frame grid to pages, choose Menu > Settings > Style > Show Grid to insert a checkmark. To remove the grid, choose Show Grid to remove the checkmark. LR7 User’s Guide v2.2.0 Page 57... -
Page 58: Using Keyboards
Navigate action and choose Set. Or, if no Navigation action has been chosen, choose Navigate from the drop-down menu. 4. Choose the new keyboard from the page listing. 5. Choose OK. The button should navigate to the new keyboard. LR7 User’s Guide v2.2.0 Page 58... -
Page 59: Working With Gestures
7. Tap Add an action and choose an action from the drop-down menu. For example: Clear Display. 8. Choose Save twice. 9. Test the gesture by performing it on the page it was set up on. LR7 User’s Guide v2.2.0 Page 59... -
Page 60: Creating A Gesture For All Pages
6. Tap Add an action and choose an action from the drop-down menu. For example: Clear Display. 7. Choose Save twice. 8. Test the gesture by performing it from any page within the vocabulary file. LR7 User’s Guide v2.2.0 Page 60... -
Page 61: Working With Speech
Editor is not the same as the one on the device, and the two will not pronounce words in the same way. Pronunciation changes made on the Editor will not impact the device. LR7 User’s Guide v2.2.0 Page 61... -
Page 62: Configuring Speech Modes
Toggles all speech off and on If you prefer to generate messages quietly, uncheck all options and speak by tapping the Speech Display Bar or by choosing a button provided with a Speak action. LR7 User’s Guide v2.2.0 Page 62... -
Page 63: Setting Access Options
Setting Access Options Some people who use the LR7 may have trouble reliably selecting individual buttons or keys due to tremors or lack of fine movement control. To assist these individuals, we've included several different methods of "filtering" user input to make selections more reliable. -
Page 64: Setting A Time To Prevent Selection Of A Button Twice
The Input menu provides an option to toggle the visual indication on or off. 1. Choose Menu > Settings > Input. 2. Turn Draw Button Press on or off. Note: For additional options, see Adjusting Audible and Haptic Feedback. LR7 User’s Guide v2.2.0 Page 64... -
Page 65: Changing Device Orientation Settings
Changing Device Orientation Settings The LR7 allows the screen to rotate automatically when the device is tilted. This can be quite handy or a nuisance for some. The application allows you to change orientation settings and use orientation tilt with Speech Display Bar (SDB). -
Page 66: Using Orientation Tilt With The Sdb
Speech Display Bar for easier viewing by tilting the device. Tilting the device back will redraw the vocabulary page. For information on using and customizing the Speech Display Bar, see Using the Speech Display Bar. LR7 User’s Guide v2.2.0 Page 66... -
Page 67: Switch Scanning
Switch Scanning **Switch Scanning is only available on the LR7 using the screen as a single switch ** Options for customizing a scanning technique are in the Menu > Settings > Input > Scanning menu. Setting up Touchscreen Scanning Using the touchscreen to scan allows the user to tap anywhere on the screen to initiate a scan of the buttons. -
Page 68: Selecting The Scan Pattern
2. Tap the arrow to the right of the currently selected mode. A menu of mode options will be displayed. 3. Choose Linear, Row/Column, Block, or Flow. 4. Choose OK. For more information on setting up scanning on your Liberator Rugged or NOVA chat device, please see http://saltillo.com/support/category/scanning. LR7 User’s Guide v2.2.0... -
Page 69: Configuring Visual Effects For Scanning
Animate Effects When Animate Effects is turned on, the visual effects visibly move or grow when an area becomes active. You must turn on one or more visual effects for Animate Effects to work. LR7 User’s Guide v2.2.0 Page 69... -
Page 70: Using Word Finder
> Settings > Word Finder > Show Menu Item. If you choose to turn this feature on, a Word Finder menu item will appear at the bottom edge of the screen for quick access. LR7 User’s Guide v2.2.0 Page 70... -
Page 71: Setting The Display Time For Word Finder Results In The Sdb
When you want to find where a word is used, either tap the Word Finder button or choose the Word Finder menu item. Type the word in the coloured box. Tap Done. The paths to the word will be displayed. LR7 User’s Guide v2.2.0 Page 71... -
Page 72: Using Text Options
1. Press and hold on the entry. 2. Choose Edit and make appropriate changes. 3. Choose Save. To delete an abbreviation: 1. Press and hold on the entry. 2. Choose Delete. 3. Choose Yes to confirm. LR7 User’s Guide v2.2.0 Page 72... -
Page 73: Enabling Word Prediction
2. Choose American English or British English. Enabling Automatic Capitalization To enable automatic capitalization: 1. Choose Menu > Settings > Text. 2. Choose Automatic Capitalization to insert a checkmark. To disable automatic capitalization, choose Automatic Capitalization to remove the checkmark. LR7 User’s Guide v2.2.0 Page 73... -
Page 74: Restricting Access
5. Choose Power off. 6. Choose OK to shut down the system. 7. Power the device back on. Your LR7 will act as a dedicated device. To restore access to the operating system and apps: Important! If the Kiosk Mode option is greyed out or unavailable, you may have purchased a dedicated or “locked”... -
Page 75: Creating And Loading Profiles
6. Choose Select Profile. 7. Choose the appropriate profile. 8. Choose Save twice. If you create multiple profiles and load them using a button action, you can switch between profiles without navigating the menus. LR7 User’s Guide v2.2.0 Page 75... -
Page 76: Deleting A Profile
You can change languages and voices. 1. Choose Menu > Settings > Language. 2. Choose the appropriate language. 3. Changing the language provides alternative voices. 4. For details on changing the voice, see Selecting a Synthesizer and Voice. LR7 User’s Guide v2.2.0 Page 76... -
Page 77: Changing Display Settings
Adjusting Audible & Haptic Feedback The LR7 provides an option to have an audible and/or vibration sensation when a button is activated. The vibration sensation option setting is called Haptic Feedback. -
Page 78: Setting The Date And Time
8. Choose the General tab and add a label or/and symbol. 9. Choose the Style tab and set the appropriate style. Choose Save. When you choose the button, it should speak and show the date and time in the Speech Display Bar. LR7 User’s Guide v2.2.0 Page 78... -
Page 79: Analysing Language Development
• Quickly create reports that anyone can understand To learn more, go to the Realize Language website: https://realizelanguage.com/info/ To view or download the Realize Language Starter’s Guide, go to https://realizelanguage.com/info/support For Customer Support with the Realize Language website, email support@realizelanguage.com. LR7 User’s Guide v2.2.0 Page 79... -
Page 80: Creating A Privacy Password
From the Data Logging menu, select Data Logging. A green checkmark will appear to indicate that data logging is turned on. Note: To turn data logging off, select Data Logging to remove the green checkmark. LR7 User’s Guide v2.2.0 Page 80... -
Page 81: Uploading Data For Analysis
2. Enter your privacy password and choose OK. Another keyboard will open, prompting you to enter your Realize Language account email address and Realize Language account password. LR7 User’s Guide v2.2.0 Page 81... - Page 82 Auto Upload checkbox; and the Upload Now button with the date and time of the last data upload. 6. At this point you can select a person, set up automatic data uploads, or initiate uploads yourself. LR7 User’s Guide v2.2.0 Page 82...
-
Page 83: Selecting A Person
3. Choose Yes. The name you select will appear under “Person”, and a checkmark will replace the warning icon. Hint: At any time, you can choose Person to open the Person list and select a different person. LR7 User’s Guide v2.2.0 Page 83... -
Page 84: Setting Up Automatic Data Uploads
“Uploading” while the upload is in progress. When the upload is complete, “Upload Completed” will appear near the bottom of the screen. Note: You can use Upload Now even if Auto Upload is selected. LR7 User’s Guide v2.2.0 Page 84... -
Page 85: Saving Data To A File To Analyse Manually
Do you want to save personal communication?” 6. Select Yes. “File Saved” will appear near the bottom of the screen. 7. You can then view the file on your device or computer. LR7 User’s Guide v2.2.0 Page 85... -
Page 86: Clearing Usage Data
Note: A green dot will appear to the right of the person who is selected currently. You can choose that person, a different person, or All People. 3. When you select a person, the following confirmation prompt will appear: “Clear log for [person]?” 4. Choose Yes. LR7 User’s Guide v2.2.0 Page 86... -
Page 87: Changing Or Removing Your Privacy Password
1. Choose Change Privacy Password from the Data Logging menu. 2. Enter your old privacy password and choose Next. 3. Leave the New Password field blank and choose Next. 4. Leave the Confirm Password field blank and choose Next. 5. Choose Save. LR7 User’s Guide v2.2.0 Page 87... -
Page 88: Updating The Chat Application
Updating the Chat Application Please contact Liberator for support to update your Liberator Rugged device, as the process may differ depending on the software version you are currently running, and whether your device is dedicated or non- dedicated. You can check your device software version by selecting Menu >... -
Page 89: Backing Up And Restoring Vocabulary Files
1. Choose Menu > Library. 2. Choose Menu > Restore. 3. Choose Yes at the overwrite prompt. 4. Choose Yes at the restart prompt. 5. When the restore is complete, choose OK to restart the device. LR7 User’s Guide v2.2.0 Page 89... -
Page 90: Transferring Vocabulary Files
To transfer vocabulary files between the device and the Editor: 1. Start Chat Editor. 2. Attach a USB cable to the device (part of your LR7 charger) and to the computer that is running the Editor. The device screen will display “Transfer Mode”. -
Page 91: Copying Vocabulary Files From The Device To The Editor
When the transfer is complete, the name of the file should be listed in the Vocabs on Device section of the Transfer screen. Click Done. If you are finished transferring files, disconnect the USB cable from the device and the computer. LR7 User’s Guide v2.2.0 Page 91... -
Page 92: Troubleshooting
Can’t Find the Library Menu If the Library menu is not showing, exit Edit Mode. Resetting LR7 Try a soft reset by cycling power with the device’s power button. A hard reset is not recommended. LR7 User’s Guide v2.2.0 Page 92... -
Page 93: Clearing And Restoring Customizations
Removing Downloaded Apps and Files If you suspect that the device user may have downloaded new apps that should be deleted from the system, contact Liberator for details on removing these items. You can also follow these steps on a non-dedicated... -
Page 94: Care And Maintenance
Your device is waterproof when all socket covers are in place but still use caution when using it around water. As with most electronic devices, you should never use LR7 when you are actually in the water (for example, a pool or bath). -
Page 95: Index
Adding or modifying actions 50 Creating a privacy password 80 Changing label/message 39 Overview 79 Copying and pasting 54 Removing privacy password 87 Hiding 44 Saving data to a file 85 Hiding all button images 45 LR7 User’s Guide v2.2.0 Page 95... - Page 96 Moving to and from device 43 Creating 75 Importing Deleting 76 Images 43 Loading 75 Instructional materials Pronunciation Capturing button sequences 35 Adding words to dictionary 61 Keyboards Realize Language Options 58 Customer support 79 Kiosk Mode Overview 79 LR7 User’s Guide v2.2.0 Page 96...
- Page 97 Changing 76 Status bar 19 Volume Switch scanning 67 Controlling 16 Synthesizer Selecting a synthesizer 61 Warranty 94 Word Finder 70 Template Word prediction 73 Creating page from template 56 WordPower (vocabulary files) 27 LR7 User’s Guide v2.2.0 Page 97...
- Page 98 For enquiries, please contact us at: Liberator Pty Ltd 265 Gilbert Street, Adelaide SA 5000 Australia Tel: +61 (0)8 8211 7766 Fax: +61 (0)8 8211 7733 info@liberator.net.au www.liberator.net.au LR7 User’s Guide v2.2.0 Page 98...
Need help?
Do you have a question about the LR7 and is the answer not in the manual?
Questions and answers