Table of Contents
Advertisement
Advertisement
Table of Contents

Summary of Contents for PROLYNX PL-510
-
Page 2: Main Features
INTRODUCTION Thank you for purchasing our products. Combined the latest technology along with a sturdy mechanical frame, our radios provide cost-effective communications for the people who need to stay in touch with the working team such as retail stores, restaurants, campuses and schools, construction sites, manufacturing, shows and trade fairs, property and hotel management and more, they are the perfect communication solutions for all of today’s fast-paced... -
Page 3: Table Of Contents
CONTENTS 01 Chapter 1: SAFETY INFORMATION 01 Radio Care 02 Battery Care 04 Chapter 2: RADIO OVERVIEW 04 Package Includes 04 At a Glance 07 Chapter 3: GETTING STARTED 07 Install and Remove Battery Pack 07 Install and Remove Anetnna 08 Install and Remove Belt Clip 09 AC Adapter and Desktop Charger 09 Charging the Battery Pack... - Page 4 Squelch Level (SQL) Priority Channel (PRI CH) Scanning Mode (SCANMO) Automatic Power OFF (APO) LCD Backlighting Mode (LIGHT) VOX Sensitivty (VOX) PTT Unit Indentification (PTT ID) Keypad Tone (BEEP) Roger Beep Tone (ROGER) Battery Save (SAVE) Busy Channel Lock-out (BCLO) Squelch Tail Elimination (STE) Offset Frequency and Direction (SHIFTF, SHIFT) Channel Name Editing (CHNAME)
-
Page 5: Chapter 1: Safety Information
SAFETY INFORMATION Please read this information before using your radio. Failure to do so could result in personal injury, death, and/or damage to your radio, accessories and/or other property. Radio Care Advice ● Do not use options or accessories not specified. ●... - Page 6 will use one its charge cycles and may shorten its life. ● Charge the battery in accordance with the instructions enclosed with your charger. ● Do not charge the radio and/or battery pack if they are wet. The battery pack includes potentially hazardous components. Please: ●...
-
Page 7: Chapter 2: Radio Overview
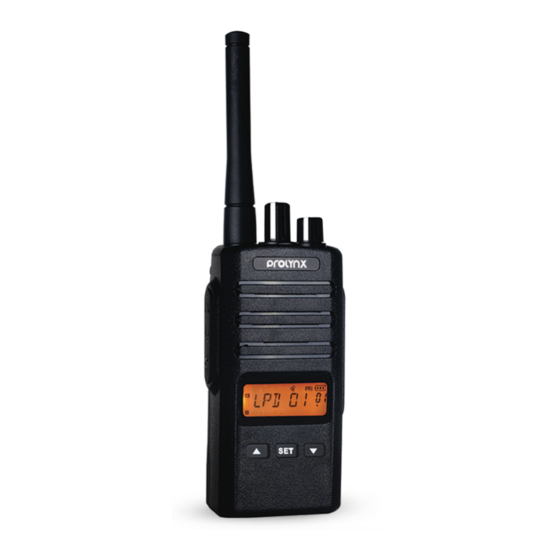
RADIO OVERVIEW Package Includes 1pcs radio unit 1pcs rubber antenna 1pcs rechargeable Lithium-ion battery pack 1pcs AC adapter & rapid desktop charger kit 1pcs belt clip 1pcs user’s manual At a Glance... - Page 8 1 – Antenna Provide at 2 – Channel Selector Knob 3 – LED Indicator Give radio battery status, TX & RX 4 – On/Off/Volume Knob 5 – Audio Accessory Jack (Motorola 2 Pin Connector) 6 – Microphone 7 – PTT (Push-To-Talk) Button 8 –...
- Page 9 9 – Side Button P2 Short press the button P2 is ‘Scan’ feature. Long press the button P2 is ‘FM Radio Receiver’ feature. (this feature maybe invalid in some districts). 10 – LCD display screen You will see the working channel frequency, name, number and various icons which stand for the selected functions.
-
Page 10: Chapter 3: Getting Started
GETTING STARTED Install and Remove Battery Pack Installing Battery Turn the radio OFF. With the top side up on the battery pack, fit the tabs at the bottom of the battery into the slots at the bottom of the radio’s body. Press the top part of the battery towards the radio until a click is heard. -
Page 11: Install And Remove Anetnna
Install and Remove Antenna Installing Antenna Screw the antenna into the connector at the top of the radio by holding the bottom of the antenna, and turning it clockwise until secure. Removing Antenna Rotate the antenna counter clockwise by holding the bottom of antenna. -
Page 12: Ac Adapter And Desktop Charger
Align the screw eyelets of the belt clip with those on rear of radio and fasten the belt clip with enclosed screws. Removing Belt Clip Loosen the screws to remove the belt clip. AC Adapter and Desktop Charger The radio is equipped with 1pcs AC adapter and 1pcs desktop charger. - Page 13 Place the desktop charger on a flat surface. Insert the connector of the AC adapter into the charger port on the back of the desktop charger. Plug the AC adaptor into a power outlet. The charger is ready for charging if the indicator LED lights red for one second and turns off.
-
Page 14: Chapter 4: Basic Operation
BASIC OPERATION Turn the Radio ON/OFF To turn on the radio, rotate on the On/Off/Volume Knob clockwise. The radio plays power up audio, displays current channel number or frequency on the screen. To turn off the radio, rotate the On/Off/Volume Knob counter-clockwise until you hear a ‘Click’... -
Page 15: Led Indicators
Make sure the PTT button is released and listen for voice activity. The LED indicator stays solid green when the radio is receiving a call. And the screen will show signal strength. To respond, hold the radio vertically 1 to 2 inches (2.5 to 5 cm) from mouth. -
Page 16: Save/Delete A Channel
ICON Description Means current channel sets CTCSS tone. Means the VOX is activated. Means positive offset frequency. Means negative offset frequency. Means the keypad tone is activated. Means the priority scanning is activated. Means battery power indicator. Means channel frequency or menu item. Means channel number or menu number. -
Page 17: Monitor
Press [SET] button to confirm and store the frequency into memory, and you will operate in the Channel mode. Turn off the radio, press and hold [SET] button and turn on the radio, the radio will switch back VFO mode. So you may now enter other frequencies, and store them into additional memory channels, by repeating the above process. -
Page 18: Default Setting Reset
software).To exit the FM radio mode, long press side button P2 a few seconds again. Note: This feature may be invalid in some countries for local radio laws. Default Setting Reset Press and hold [ ] button and turn on the radio. The display will show ‘RESET?’. -
Page 19: Detail Function Introduction
LIGHT LCD backlighting mode OFF/AUTO/ON VOX sensitivity OFF/LOW/MID/HIGH PTT ID PTT unit identification OFF/ON BEEP Keypad tone OFF/ON ROGER Roger beep tone OFF/ON SAVE Battery save OFF/ON BCLO Busy channel lock-out OFF/ON Squelch tail elimination OFF/ON SHIFTF Offset frequency 0.000~80.000 SHIFT Offset frequency direction OFF/+/-... -
Page 20: Tx Power Level (Power)
04 - TX Power Level (POWER) Allows the user to select TX power level in which the radio will operate on the current channel. Selecting ‘LOW’ can extend the radio’s battery life. LOW: the value is 1 Watt. Used when communication in close proximity, and to keep the radio from transmitting into other geographical groups operating on the same frequency. -
Page 21: Automatic Power Off (Apo)
programming software, you can activate priority scanning. Right now the icon ‘PRI’ will display on the screen. And the radio will start scanning from the priority channel first and then scans the other channels. The scanning sequence is: 09 – Automatic Power OFF (APO) There are OFF/10MIN/20MIN/30MIN/1H/2H/3H for selection. -
Page 22: Busy Channel Lock-Out (Bclo)
When it is activated, the radio decreases the amount of power used after no signal is present and no operations are being performed for 5 seconds. When a signal is received or an operation is performed, this feature turns off temporarily. 16 - Busy Channel Lock-out (BCLO) It prevents the radio’s transmitter from being activated if a signal strong enough to break through the ‘noise’... -
Page 23: Channel Display Mode (Dspmod)
21 – Channel Display Mode (DSPMOD) There are 3 display modes as channel frequency + number, channel number and channel name in total for option. FREQ: Frequency + Channel number display. Press and hold in [SET] button and turn on the radio to switch into VFO mode. CH: Channel number display. -
Page 24: Chapter 7: Troubleshooting
The programming software allows you to program the frequencies, CTCSS/DCS privacy codes as well as other features such as: TX power, bandwidth, VOX, battery save, TOT, working mode, roger beep, busy channel lock-out…etc. More features programmed via the programming software, please refer to our programming guide. -
Page 25: Chapter 8: Specifications
Confirm that the radios have the same Channel, Frequency, Interference Eliminator Code and bandwidth settings; Recharge, replace and/or reposition batteries; Obstructions and operating indoors, or in vehicles, may interfere, change location; Verify that the radio is not in Scan. Radios are too close, they must be at least seven feet Heavy static or apart;... - Page 26 Transmitter ≤5W(High) / 1W(Low) RF Power Frequency Stability <1.5ppm -36dBm<1GHz, Spurious & Harmonics -30dBm>1GHz FM Hum & Noise 65dB(Wide) / 55dB(Narrow) ≤5kHz(Wide) / ≤2.5kHz(Narrow) Modulation Deviation Adjacent Channel Power 70dBC(Wide) / 60dBC(Narrow) Audio Frequency Response +1 ~ -3dB Audio Distortion <3% Receiver Sensitivity (12 dB SINAD)
Need help?
Do you have a question about the PL-510 and is the answer not in the manual?
Questions and answers