
Summary of Contents for Aclarus AOWT-7
- Page 1 AOWT - 7 Model: ACLARUS OZONE WATER TREATMENT SYSTEM OPERATORS MANUAL Installation, Troubleshooting & Maintenance Guide Manual Version 1.3-0513.
- Page 2 Welcome to fresh, clean, safe water, provided by this 5-8 Gallon Per Minute (GPM) Aclarus Ozone Water System! The Aclarus System is designed for the treatment of common surface and ground water, and to meet the flow rate needs of our clients. This manual provides the following information to Aclarus service technicians, Do-it-Yourself clients, and Aclarus affiliates: ...
-
Page 3: Table Of Contents
Table of Contents Important Notifications..........................5 Maintenance Duties ..........................5 Legal Disclaimer ............................6 Safety Warnings ............................6 Certifications: ............................7 Chapter One: System Introduction ....................... 7 Package Component List ........................... 8 System Components ..........................9 System Overview – Schematics....................... 11 Control Panel Wiring ........................... - Page 4 Servicing and Replacing the Ozone Mixing Pump ................... 41 Replacing the Pump ..........................42 Servicing the Ozone Generator ....................... 43 Troubleshooting the Ozone Generator: ....................44 Servicing System Transformers ......................45 Chapter Six: Aclarus Warranty ........................46 Appendix: Component Specification Sheets ....................47...
-
Page 5: Important Notifications
Prime system with ozone before use and after extended periods of not running. Do perform required maintenance duties Aclarus is not responsible for damage to person or property due to misuse, improper maintenance, fluctuations in water quality. Maintenance Duties NOTE: Failure to comply with these instructions will damage your Aclarus System and VOID your warranty. -
Page 6: Legal Disclaimer
This manual outlines some of the basic principles of household water collection, treatment, and discharge and some of the features of the Aclarus Ozone Water System. It is not intended to be a definitive dissertation on the principles set out above. Any other reliance is expressly excluded. -
Page 7: Certifications
Certifications: All Aclarus AOWT-7 Ozone Water Treatment Systems are certified by the National Sanitation Foundation (NSF) protocol NSF-61: NSF/ANSI Standard 61 - Drinking Water System Components was published in 1988 to establish minimum requirements for the control of potential adverse human health effects from products that contact drinking water. -
Page 8: Chapter One: System Introduction
Chapter One: System Introduction This section presents an overview of the Aclarus System, including components, technical data, and a general wiring diagram. Record It is important to maintain owner information for future reference. Please record the following: System Owner/Operator :... -
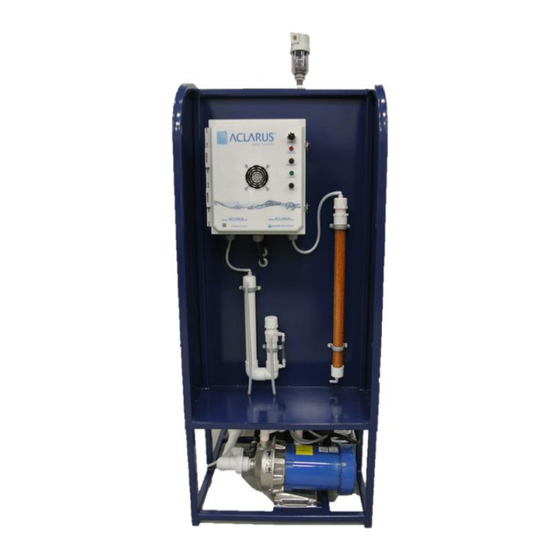
Page 9: System Components
System Components... - Page 10 NOTE: System, components and tank may not be exactly as shown...
- Page 11 AOWT – 7 Ozone Water System Specifications Overall System Specifications Brand Name: Aclarus Ozone Water System Product Name: AOWT -7 Flow Rate: 8-GPM (Max) Ozone Production Specifications Ozone Production: 2.5-5.0 gr/Hr. Gas Feed: Ambient Air – Reusable Silica Desiccant Dried.
- Page 12 30 To 80 Psig (Pressure Gauge Included) Drain Fitting: 1" FIPT Certification: Aclarus Aowt-7 Is An NSF-61 Certified System Power Specifications Power Requirements: 110 - 120 Vac, 60 Hz, 15 Amp - Standard Optional 220 – 240 Vac, 60 Hz, 15 Amp...
-
Page 13: System Overview - Schematics
System Overview – Schematics Control Panel Wiring NOTE: CONTACT ACLARUS BEFORE SERVICING ANY ELECTRONIC COMPONENTS Wiring Legend Diagram # Quantity per System Part Description 10 plate ozone generator High voltage coil Cooling fan ON/OFF switch 15 amp ceramic slow blow fuse... - Page 14 Make sure to connect the top (cap) end of the air dryer to the braided hose and leave the bottom fitting open to the air. Ensure the power switch on front of Aclarus head is in the OFF position. Check Serial Number plate for unit voltage and connect to appropriate...
- Page 15 Ensure that the outgoing valve of the unit is closed Wait for the Aclarus system and tank to fill entirely with pressure stabilized. If filter(s) are equipped with by-pass valves, make sure they are in the by- pass position.
- Page 16 If Aclarus system was equipped with only one filter or if both filters have run through their cycle, open the tap closest to the Aclarus system to flush out any small particulates of media that might have come through. Run for a few minutes.
-
Page 17: Chapter Two: System Installation And Start Up
Chapter Two: System Installation and Start Up Detailed installation instructions for installation are provided in this manual. Please also refer to the Site Specific Installation Sheet if provided with the Aclarus System for any additional information about any custom modifications specific to your model. - Page 18 Drain Outlet Inlet Image 2 Image 3 20” Activated Carbon prior to discharge shown Inlet and Outlet Shown Drain (Far right) for winterization etc… shown A – Fill Water Column here by unscrewing top and adding water B – Sight Line for Water Column – Ensure it is always at halfway up sight line C –...
- Page 19 Silica air dryer – Gas-Off Installed To ozone generator With Line to Drain/Window Example two – Off-Skid Post Filters – Sediment, then Activated Carbon Flow Switch Connection Plumbing Assembly Hose From Ozone to Mazzei Hose From Ozone to Mazzei Flow Switch Inlet Connection TO OZONE HEAD Outlet...
-
Page 20: Installation
Some Systems DO NOT have a water column and instead use a backflow preventer “check valve” in line. Installation Materials In addition to the system supplied by Aclarus, the following materials are, or may be, required for installation: Pressure regulator (if required) Teflon tape ... -
Page 21: Site And System Installation
2) Measure the selected area to ensure there is sufficient space for the system and components. Refer to Components Footprint Chart for space requirements. 3) Place Aclarus system in selected area. 4) Place filter(s) in selected area. Standard installation is beside the Aclarus system. -
Page 22: Plumbing The System
Plumbing the System 1) (Optional) Install a pressure regulator (not supplied) if system pressure exceeds 65 psi. A pressure regulator is required upstream of the Aclarus Ozone Water System if the supply pumps and pressure can exceed 65 psi. Set pressure regulator to maintain incoming pressure to the system below 65 psi. -
Page 23: Filling The System
Aclarus system to fill the system and tank. 2. Turn the power switch on the front of the Aclarus head to ON. Red light will show power on. 3. When the system is full, open part way and quickly close the ball valve controlling the outgoing water. -
Page 24: Filter Preparation - Optional Media Bed Filters
5. After the filter has finished cycling, open the outgoing valve on the bypass assembly. NOTE: If Aclarus system is equipped with more than one filter, repeat steps 1 to 4 for each filter. 6. Once all filters are finished backwashing run the tap closest to the Aclarus system for three to five minutes to flush any small particulates may have come through. -
Page 25: Testing The System
6. NOTE: System should start within a few seconds of water flowing from a tap and run up to 30seconds after the tap is stopped. This is for optimal treatment, contact Aclarus for more information if required. Dealer NOTES: Consult with the client regarding the system operations and completion of the installation. -
Page 26: Chapter Three: System Maintenance
Chapter Three: System Maintenance Failure to comply with these instructions may damage the Aclarus System and void your warranty. WARNING Check the silica in the air dryer weekly. Please refer to instruction sheet located on Page 22. Check operation indicator lights bi-weekly and ensure lights are on during operation. -
Page 27: Water Column Setup And Maintenance
Water Column Setup and Maintenance (NOTE: Your system may come with a check valve instead of a water column –(see image left) below if you are unsure or contact your Aclarus Rep.) The water column provides protection to the ozone generator and electrical components, and also gives a visual reference point for monitoring proper suction of the water and activation of the ozone system. -
Page 28: Maintaining The Manual Air Dryer
Maintaining the Manual Air Dryer Your Aclarus system comes with two silica air dryers to prevent downtime. The dryer contains silica gel which absorbs the moisture in the air, permitting maximum ozone production. For the system to function properly, the gel must be dried periodically, ensuring maximum moisture absorption. -
Page 29: Ozone Enclosure And System Light Check
Ozone Enclosure and System Light Check During normal operation, both the main power light and the ozone power light are on when the main switch is on and water is flowing downstream of system. 1- Main Power Switch ON/OFF 2- Main Power Light (RED) 3- Main Power Fuse (15 A) 4- Ozone Power Light (Green) 5- Ozone Power Fuse (0.5 A) -
Page 30: Ozone Enclosure Checks
Ozone Enclosure Checks Once you are familiar with the system, verify operation by checking the following. Main Power When system is plugged in and turned on the Main Power light will be lit. If light is not active, switch off the system using the ON/OFF switch. ... -
Page 31: Replacing Cartridge Filters
Plugged filter as the result of infrequent backwashing. Alternatively, backwashing too much breaks the media down faster. Not changing filter media properly or when required can lead to serious contamination. A broken distributor tube is a mechanical failure that required media to be replaced. -
Page 32: Winterization
IMPORTANT: Do not over-tighten the fittings. Re-pressurize the ozone system and perform filter flush prior to consuming produced water. Follow instruction with your specific cartridge filter. This will require a minimum of 30 to 45 minutes of flush time, depending on the cartridge. IMPORTANT: Ensure the proper filter flush process is performed IMPORTANT: prior to using the filters to purify the water. -
Page 33: Chapter Four: Troubleshooting
ON and water is flowing through the system. After completing these steps, go through this checklist: 1) Turn off and unplug (if applicable) Aclarus Ozone Water System, open Aclarus Ozone Enclosure and complete the following: a. Examine all breakers and fuses and reset or replace if needed. -
Page 34: Troubleshooting
Aclarus System start with water breaker. and check the 15 amp breaker located demand. on the Aclarus control panel. Reset or replace as needed. The source pump or flow See Maintenance Chapter switch is not activating. - Page 35 Problem Possible Cause Solution 1. Close all the taps that use system. Monitor the water meter on the system to see if water is being used. while all taps are closed. If so, then there is a leak either in the system, or in water lines that A leak in the household draw from the system.
- Page 36 Possible Cause Solution Problem If authorized by Aclarus, perform the following maintenance on the pump: 1. Check the valve in the Mazzei injector and replace if it has failed. Water column level does not drop after 2. Check the Mazzei inlet and flow...
- Page 37 Place system in bypass and disconnect ozone generator. power. For Other System Concerns or Possible Problems contact Aclarus or your Aclarus Representative. NOTE: For specific steps in replacing the valves or servicing the inlets, or any part of the system contact Aclarus or your installer.
-
Page 38: Chapter Five: Servicing The System
2. Shut off the incoming water flow by turning off the power to the main pump or by closing the system’s shut-off valve. 3. Relieve pressure on the system by opening a tap located after the Aclarus Ozone System. 4. Place container under unions in AWOT-4 and open unions at the front and back of system. - Page 39 5. Reconnect the quick connect to the Aclarus Ozone Enclosure. 6. Refill the Aclarus Ozone Water System (see Filling the Aclarus System page 18) 7. Turn on the Aclarus Ozone Water System and run water to verify that switch activates system.
-
Page 40: Servicing The Mazzei Ozone Injector
It also prevents the water from discharging into the air lines when the system is not operating. The AOWT-7 uses a #684 Mazzei. Several factors may cause the Mazzei to fail: Debris stuck in ball check valve, blocking it from setting properly into place. -
Page 41: Servicing And Replacing The Ozone Mixing Pump
14. Open main water supply. Open bypass assembly to pressurize system. 15. Inspect for leaks. If there are no leaks, turn Aclarus system on and run water to initiate system. If leaks are present, repeat steps or order replacement parts for the Mazzei. -
Page 42: Replacing The Pump
10. Plumb pump by tightening unions before and after pump. Then make sure drain plug in pump head is replaced. 11. Slowly refill the system and check for leaks. Once full turn Aclarus Ozone Water System on. 12. Place first filter in backwash and make sure system operates properly or open closest tap. -
Page 43: Servicing The Ozone Generator
If water column is installed, make sure it has water in it. Use ACLARUS transformers and generators. The Aclarus Ozone generators are fuse protected in the system. VISUAL CHECK: When system is running, verify that the lights indicating the... -
Page 44: Troubleshooting The Ozone Generator
Aclarus representative for service. Do not try to repair an ozone generator. This is a replacement component only. The ozone generator component comes with replacement instructions. NOTE: Only Aclarus components can be used with the Aclarus system. -
Page 45: Servicing System Transformers
The loss of proper energy input into the corona discharge generator can lead to coil and generator failure, potentially damaging both permanently. Replace only with Aclarus high quality transformers. Aclarus transformers come with replacement instructions. NOTE: If fuses blow again after replacement, call an Aclarus service technician to report the situation. -
Page 46: Chapter Six: Aclarus Warranty
Company's pricing reflects this allocation of risk and but for this allocation and limitation of liability, company would not have entered into this agreement. THANK YOU FOR CHOOSING ACLARUS Inc. 900 Major Bennett Dr. Peterborough ON, K9J 6X6... -
Page 47: Appendix: Component Specification Sheets
Appendix: Component Specification Sheets Pumps Specifications... - Page 50 Flow Switch Specifications...
- Page 52 Mazzei Specifications...
- Page 53 Gas-Off #1 Specifications...
Need help?
Do you have a question about the AOWT-7 and is the answer not in the manual?
Questions and answers