
Summary of Contents for Osmio Zero IP-II
-
Page 1: Reverse Osmosis System
Osmio Zero Installation Reverse Osmosis System User Manual WhatsApp +447852323666 Telephone: 0800 002 9533 Email: info@osmiowater.co.uk... -
Page 2: Table Of Contents
Contents 1 Safety Precautions 1.1 Power Safety Precautions 1.2 Setup Precautions 1.3 Usage Precautions 2 Product Description 2.1 Appearance Sketch Map 2.2 Display and Operation Interface 2.3 Product Specifications 3 Start Up 3.1 Introduction 3.2 Filling the Supply Pitcher 3.3 Power Connection 4 Use 4.1 Introduction 4.2 Flushing... -
Page 3: Safety Precautions
1 Safety Precautions 1.1 Power Safety Precautions • The system should be plugged into a normal UK 3 pin plug at your home or workplace and not be used in addition to AC 220-240V, 220V. • Should be used in a grounding socket with rated current above 10A. •... -
Page 4: Usage Precautions
1.3 Usage Precautions • On first use or if the unit has been idle for more than 2 days, run a complete cycle and discard the first batch of water produced. Fill your supply pitcher with water and then allow the machine to run until it fills the internal tanks. -
Page 5: Product Description
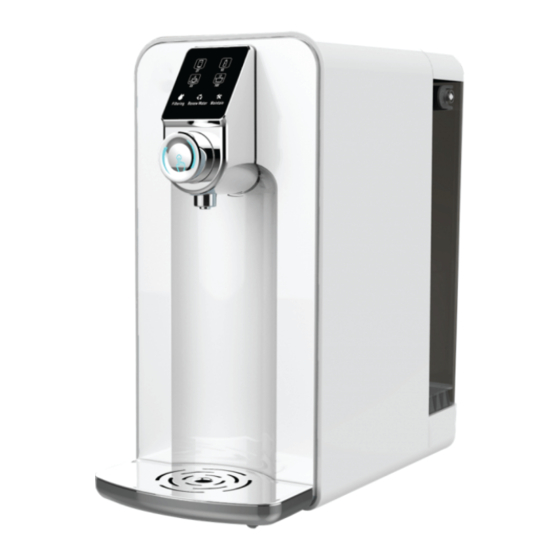
2 Product Description 2.1 Appearance FIGURE 1 1 Display Panel 2 Control Button (Rotate & Press) 3 Nozzle 4 Drip Tray Cover 5 Drip Tray 6 Power Plug 7 Supply Pitcher 8 Supply Pitcher Lid... -
Page 6: Display And Operation Interface
2.2 Display and Operation Interface FIGURE 2 A. Normal Water B. Warm Water ( 40℃-50℃) C. Hot Water ( 80℃-88℃) D. Boiled Water (90℃-98℃) E. Filtering Water F. Renew Water G. Filter Maintenance H. Rotate (Choose the Water Temp) I. Press to Get Water... -
Page 7: Product Specifications
2.3 Product Specifications Electrical Properties Rated Voltage : 220 - 240 V Rated Frequency : 50 Hz Rated Power: 2200W-2600W Heating System Rated Heating Power: 2180W-2580W Hot Water Capacity: 30 l/h (≥ 90°C) Filter Stages 1 - Quick-Change Sediment Filter 5μm: removes coarse particles, e.g. Sand, rust, chlorine, lime 2 - Quick-Change activated carbon filter: removes chlorine and organ- ic impurities... -
Page 8: Start Up
3 Start Up 3.1 Introduction • Please place the system in a cool, ventilated, solid horizontal surface, away from any heat source. The system comes ready installed with the filters so you can right away fill the Supply Pitcher. 3.2 Filling the Supply Pitcher •... -
Page 9: Introduction
4 Usage 4.1 Introduction • At first, produce and dispense 5 litres of water which you then dispose of by dispensing all the cold and hot water. This will flush out any loose filter media. It is normal to see black water when using new filters. •... -
Page 10: Sleeping State
4.5 Dispense Water • Place the water container on the tray (see Figure 1). Rotate the knob to select the desired water temperature (Figure 5), and then click on (or push on for 3 second) the middle part of the knob (see Figure 6) to dispense one cup (or bottle) of water. -
Page 11: Filters` Maintenance
5 Filter maintenance 5.1 Introduction • Use the company's certified filters. Disconnect the power. Do not disassemble or attempt to modify this product. 5.2 Filter replacement 5.2.1 Replacing the Pre Filter • The pre-filter (PP) screwed in inside the Supply Pitcher should be changed every 6 months. - Page 12 5.2.2 Replacement of the carbon filter, reverse osmosis filter and post filter - These filters need to be changed every 6 months or when the red maintenance light comes up. Turn the power off and replace the filters by following the steps below. STEP 1 Open the lid of the Supply Pitcher and wait 5 seconds STEP 2 Lift the Supply Pitcher up and...
- Page 13 STEP 4 Pull out the Post Filter slowly with your finger and insert a new one fully. STEP 5 Start with the new Carbon Filter so the label is on the left hand side twist the filter on anticlockwise. Repeat the same with the Membrane Filter.
-
Page 14: Failure State
5.2.3 Resetting the system after filter change 1) Disconnect the system from power supply 2) Lift up the rear tank cover 3) Press and hold the water dispensing button with one hand while connecting the unit to a power supply, keep holding the button until you hear 4 beeps 4) Disconnect the system again from the power supply 5) Close the rear tank cover 6) Open the rear tank cover again... -
Page 15: Common Usage Problem
6 Common usage problems If you have some problems during the usage, please check the problems by following the guide below. Likely Cause Suggested Solution Usage Problems Check the power plug is Power is disconnected. Cannot dispense loose or not in place. Not pressing on the right ambient temperature Press the button again. - Page 16 Likely Cause Suggested Solution Usage Problems Remove any water in the Water level in the Supply Abnormal sound during Supply Pitcher and refill Pitcher is too low. the filtering. to the 5 litre level and try again. Open and close the lid of Air blocked in the water source water tank several system.
-
Page 17: Quality Assurance
Please keep your sales invoice as proof of purchase. Osmio does not guarantee the repair or replacement of a product that has failed for any of the following reasons: • Faulty installation, repairs or alterations not in accordance with the installation guide. -
Page 18: After-Sale Service
8 After-sale service Our products have 1 year guarantee (for repair, replacement or compensation of faulty products). If the product you bought has any quality problem, please bring your invoice and to the dealer’s shop, exchange or refund service will be offered within 30 days, maintenance service will be offered within 3 years. -
Page 19: Declaration Of Conformity
For more detailed information about recycling of this product, please contact your local city office, your household waste disposal service or the shop where you purchased the product. The Osmio Zero Installation Reverse Osmosis System © Osmio Solutions Ltd. All Rights Reserved...
Need help?
Do you have a question about the Zero IP-II and is the answer not in the manual?
Questions and answers