Table of Contents
Advertisement
Quick Links
USB ANALOG TO DIGITAL CONVERTER
Operation Manual HY-VHS-CVT
Click on the "Hardware" tab and then "Device Manager."
In the Device Manager, click on the +Imaging Devices.
You should be able to see the USB Analog to Digital Converter listed there. It will list itself
as the "HYPE USB ANALOG TO DIGITAL CONVERTER."
If it has a yellow mark next to it, then this means that the driver is not installed correctly.
You will need to remove the driver and disconnect the converter from your computer.
Repeat instructions for installation until you see a green mark next to it.
SOFTWARE INSTALLATION
Insert the CD into your CD drive and from "My Computer," select the CD.
Click on "Installation Video-Studio 8" and select "Install."
You need to enter user name and serial number. The serial number can be found on
the driver CD bag.
Click "Finish" to complete setup. Start the Video Studio application, and begin convert-
ing your videos.
5.4 Effect Step
Before applying the Album Flip transition effect to your clips, make sure that your system
is updated with the latest display card driver.
5.5 Share step
To create an MPEG video file or DVD/VCD/SVCD-ready MPEG file:
Click the create Video File button and select one of the movie templates from the
pop-menu, or select Same as Project Settings to output an MPEG file according to the
project settings. Or, Click the Create Video File button and select Custom. Select MPEG
files from the Save as type box, then click the Options button to specify the properties
for the video file.
6 - DV-related Information
6.1. Please make sure the DV IEEE-1394 board (DV Board) and its drivers are properly
installed (please check with your DV IEEE-1394 board manual for details on installation).
Connect your DV camcorder to the DV Board using the IEEE-1394 cable provided with
your DV camcorder. Turn on the power of your DV camcorder by switching it to either
VTR or Camera mode.
6.2. If you observe many frames were dropped during DV capture, Please check if your
computer meets the program system requirements. Defragment your hard disk.
6.3. Some DV boards do not support PAL. Please consult your DV board manual for
more information.
6.4. If you experience any problems recording video back to the camcorder from your
hard computer, please make sure your computer ( and especially your hard drive)
meets the necessary minimum requirements.
6.5. To record or playback your final video through your DV camcorder, you should first
be in the Edit Step or the share Step. Select a DV AVI clip in the Library, then click Export
in the Options Panel and select DV Recording. Follow the instructions to record or play
the clip.
6.6. While you are capturing or recording DV files, please don't turn off the power of
your DV camcorder during the operation.
Thank you for purchasing the Hype™ USB Analog to Digital Converter. Please read
all instructions carefully before using and retain this manual for future use &
reference.
PACKAGE CONTENTS
• USB Analog to Digital Converter
• USB Cable
• Installation CD
KEY FEATURES
• Easy to use software
• USB 2.0 interface
• Captures audio and video through USB
• Brightness, contrast, hue and saturation control
SAFETY INSTRUCTIONS
Keep the unit away from heat sources, direct sunlight, humidity, water and any liquids.
Do not operate the unit of it has been exposed to water, moisture or any other liquids to
prevent against electric shock, explosion and/or injury to yourself and/or damage to
the unit.
Do not use the unit if it has been dropped or damaged in any way.
Repairs to electrical equipment should only be performed by a qualified electrician.
Improper repairs may place the user at serious risk.
Do not puncture or harm the exterior surface of the product in any way.
Keep the unit free from dust, lint, etc.
Do not use this unit for anything other than its intended use or purpose. Doing so may
damage the device.
This product is not a toy. Keep out of reach of children.
ULEAD VIDEO STUDIO
Please note, Hype does not manufacture ULead Video Studio. Below are installation
and use instructions for their software. If you are having problems using their software,
please contact them directly.
Website: http://ulead-videostudio.joydownload.co
This document provides basic information about Ulead Video Studio. Please click
below read more about each topic before you start using Ulead Video Studio.
1 - An overview of Ulead Video Studio
Ulead Video Studio is a consumer video editing software that lets users quickly and
easily produce their own home videos complete with attractive titles, video filters,
transitions, and sound. Unlike other software, Ulead Video Studio features an intuitive
step-based interface that helps users get started fight away. By following the steps, you
will be creating video masterpieces before you know it. Once you have completed
your video projects, you can share them on tape, e-mail, the Web or bum your own
high-quality VCDs, SVCDs and DVDs.
2 - System Requirements
Intel Pentium 800 MHz or higher
Microsoft Windows 2000, XP/Vista/7/8
256MB of RAM 512MB or above for editing
600MB of available hard drive space for program installation
4 GB+ hard drive space for video capture and editing
Windows-compatible display with at least 1024×768 resolutions
Windows compatible sound card
CDROM, CD-R/RW or DVD-R/RW
Real-time features perform best with at least:
Pentium 4, 2.0 GHz CPU 512 MB of RAM
7200 Rpm IDE hard drive
4
6.7. Microsoft defines two methods of storing DV video data in AVI files, called type-1
and type-2. Ulead Video Studio supports both. If you want to know more about these
two DV AVI file formats, please visit the website at:
http://www.microsoft.com/hwdev/desinit/dvavi, htm#type 1
6.8. All Adapec cards support something called a PAPI interface and will capture
type-2 DV AVIs. TI compatible IEEE-1394 cards can capture type-1 DV AVIs when using
the Direct-show capture driver (dvcam.sys).
6.9. When scrubbing DV clips on the timeline track, you can press Shift to repaint the
Preview window faster and smoother.
6.10. If your system supports DMA transfer, please enable it. To enable DMA in windows
98 SE or Windows Me:\
6.10.1. Open the Control Panel.
6.10.2. Double-click the System icon.
6.10.3. Click the Device Manager tab.
6.10.4. From "Disk Driver", select "GENERIC IDE DISK TYPE46" then click the Properties
button.
6.10.5. Click the Settings tab, and then select the DMA control.
6.10.6. Click OK to exit.
To enable DMA in Windows 2000 or Windows XP/Vista/7/8
6.10.7. Open the Control Panel.
6.10.8. Double-click the System icon.
6.10.9. Click the Hardware tab then click Device Manager.
6.10.10. From "IDE ATA/ATAPI controllers", fight-click "Primary/Secondary IDE channel"
and select Properties.
6.10.11. Click the Advanced Settings tab. Set Transfer Mode to the DMA if available
option.
6.11. To adjust the DV record settings, click the File menu and then Select Device
Control command to open the Device Control dialog box. Select "MS 1394 Device
Control" and click the Options button. There are four record settings that you can adjust
for your DV camcorder. As a role of thumb, keep the first 3 attributes on their default
values ; change the Delay record time to 3000 and try recording video. If there's too
much noise, reduce the value. If, however, you notice frames are been dropped while
recording, increase the value. Repeat this process by adding/subtracting about
200~500 on/off the value each time until you achieved desired results.
7
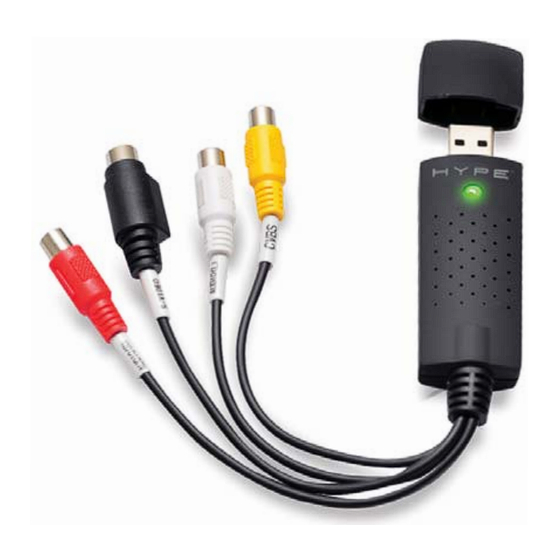
PROTECTIVE CAP
CVBS IN
UNIVERSAL
USB
S-VIDEO IN
LED
INDICATOR
AUDIO IN
LIGHT
SYSTEM REQUIREMENTS
USB: Compliant USB 2.0 port on computer
OS: Windows 2000, XP/Vista/7/8
CPU: Pentium III 800 +
HD: 600MB of available space for installation, 4GB+ HD space for video capture/editing
Memory: 256MB of RAM
Display: Windows-compatible display with at least 1024 x 768 pixel resolution
Sound Card: Compatible Windows sound card
HARDWARE INSTALLATION
NOTE: If you have anti-virus software enabled, please disable it during the installation of
the software.
Before you first connect the USB Analog to Digital Converter to your computer, please
insert the Software CD-ROM into your CD driver.
Select "Install Driver," and select "Next".
1
3- Installing Ulead Video Studio and drivers
To Ulead Video Studio and the necessary drivers, insert your Ulead Video Studio CD in
the CD-ROM drive and simply follow the on-screen installation instructions.
What are these drivers?
QuickTime 6.5 – The video format from Apple for creating and playing back movie files
such as MOV and QT file formats. You should install QuickTime 6.5 or above to be able
to use the Auto Music function(i.e., SmartSound QuickTracks) In Ulead VideoStadio. For
more information on Apple QuickTime, visit their web site at http://www.apple,
com/QuickTime.
SmartSound quicktracks – This is a plug – in from SmartSound. That is integrated into
Ulead Video Studio. It gives you a library of quality soundtracks that you can add as
background music to your movie projects.
RealPlayer 8.0 – this is a software player from RealNetworks for playing Real Video and
Real Audio files from the Internet. It is recommended that you install this driver unless you
have a later version. For more information, visit their website at :http://www.real.com or
products.
Intel indeo 5.0 –This is Adobe Acrobat Reader and is used for viewing the Ulead Video
Studio electronic manual .It is recommended that you stall it unless you have a later
version.
Microsoft Direct X-A driver from Microsoft that improves playback performance of
video files. You should install this driver. It will be installed automatically when you are
installing Ulead Video Studio .For more information, visit Microsoft's Website at: http//w-
ww.Microsoft.com/directx.
Microsoft Windows Media Format –A set of drivers form Microsoft that allows you to
create WMV and other streaming media files. They will be installed automatically when
you are installing UleadVideoStudio ,for more information ,visit Microsoft's website:
http://www.microsoft.com/windows/windows media .
5
Where to get the latest drivers:
For the latest Adaptec 8920 or 8945 IEEE 1394 boards, please visit the web site at:
http://www.adaptec.com/worldwide/support index.html
For the latest TI IEEE 1394 card drivers please visit:
http://www.ti.com
7 - Troubleshooting
If you experience difficulty getting started with Ulead Video Studio, use the online help
or check the manual for information.
When rendering a title text against a pure background color clip, the text may appear
blurry. This is due to certain types of compression. For better results, try using the Video 1,
RLE, or no compression options.
The Video Greeting Card does not support QuickTime files.
If you want to share and play your video on other machines, make sure you use a
common codec, such as Cinepak, Indeo or MPEG. If you use a hardware codec, such
as MJPEG, you may be unable to view the video unless the other machine has the
same card on board.
You may experience some problems when playing Quick Time files. Some examples
maybe, the playback may not be smooth or the Stop button in the Navigator bar can
not switch back to the Start button after playing. In such cases, please change to safe
mode in the QuickTime Video Settings. (You can do this by clicking the Control Panel:
QuickTime icon.)
Some camcorders (specially some Panasonic models) have a small problem that
prevents them from recording movies from your computer. If this is a problem, Video
Studio can be made to pause for a short time before transmitting the video to the
camcorder. NTSC)
8
Select the option "Install the software automatically" and click "Next." A window may
appear about the Converter not passing Window's logo testing. Select "Continue
Anyway."
A window titled "Found New Hardware Wizard" appears, click "Finish" to complete the
driver installation.
NOTE: If any further components are found, please repeat the above process until you
receive the message "Found New Hardware: Your Hardware is installed and
configured for use."
Before video capture, you need to ensure the drivers are installed correctly. Connect
the USB Analog to Digital Converter to your computer.
Right click on "My Computer" and select "Properties."
2
Note: If you have a previous version of Ulead Video Studio installed in your system ,it is
recommended that you uninstall it only after installing Ulead Video Studio ,During the
installation ,the Setup Wizard will auto –detect your capture device plug in and special-
ly supported codec's (such as MPEG-4,AC-3,3GP,DivX)from the previous Video-studio
version and integrate it onto Video Studio.
However, if you installed Ulead Video Studio then you uninstalled the older version,
program files and fonts that are used by both versions will also be deleted. To install
them back to Video Studio ,double –click ADD or Remove Programs in the Control
Panel, select Ulead Video Studio ,click Change/Remove ,then click Repair.
4 - Registering Your copy of Ulead Video Studio
Do not forget to register your copy of Ulead Video Studio , you can do this during the
installation of the program or by simply filling out the registration card and mailing it in. It
is important to register your copy as it allows your to receive technical support and
important product update information. You will also be getting the opportunity to win
praise as well as taking advantage of special promotions and discounts on other Ulead
Systems Software
5 - Program-related information
5.1 Capture board requirements
When acquiring video form an analog source ,make sure that the analog capture
card you are using supports RGB or YV capture.
5.2 TO check MPEG capture settings ,click the Options button in the Options Panel and
select Video and Audio Capture Property Settings. In the dialog box that opens ,click
the Capture tab. To view more MPEG settings ,click Advanced.
5.3 Edit step
In the Edit of the Options Panel, the Keep original size option that was in the Resample
option drop-down list has been removed. If you want image clips to retain their original
size, apply Pan &Zoom to the image clips . For each image clip ,select Pan &Zoom ,
then click Customize Pan & Zoom and set the Zoom ratio to 100
6
Find the msdevctl.ini file in the main program folder (in All Users. WINNT), open this file in
Notepad and modify the following line (where 1 second = 1000):
[MainSec]
RecordDelay=1000
Frame sizes supported by the Hitachi DVD Camcorder include:
352×480 (NTSC)
704×480 (NTSC)
352×576 (NTSC)
704×576 (NTSC)
Conflict between MicroMV and BT878-based capture card in Windows Me:
The conflict occurs when both Sony MicroMV and BT878 capture drivers are installed.
The capture function of the latter driver installed will fail.
MPEG cannot be supported when Adobe Premiere 6.5 and Ulead Video Studio are
installed in the same system:
When you have both Adobe Premiere 6.5 and Ulead Video Studio install in the same
system, Video Studio will not be able to perform MPEG related functions.
The solution would be:
a)Uninstall and then reinstall Video~Studio.
b)Copy all MPEG files in
C:\Program Files\common Files\ulead Systems\MPEG
To
C:\WINNT\system
"Please install the latest DirectX Media from www.Microsoft.com/direct x" message:
The message will be promoted depending on the system environment. There is no
certainty when this message will appear when prompted, please reboot.
9
3
7
10
Advertisement
Table of Contents

Need help?
Do you have a question about the HY-VHS-CV and is the answer not in the manual?
Questions and answers