Advertisement
Quick Links
I
n
t
r
o
d
u
c
t
i
o
n
t
o
a
p
p
e
a
r
a
n
c
e
a
n
d
k
I
n
t
r
o
d
u
c
t
i
o
n
t
o
a
p
p
e
a
r
a
n
c
e
a
n
d
k
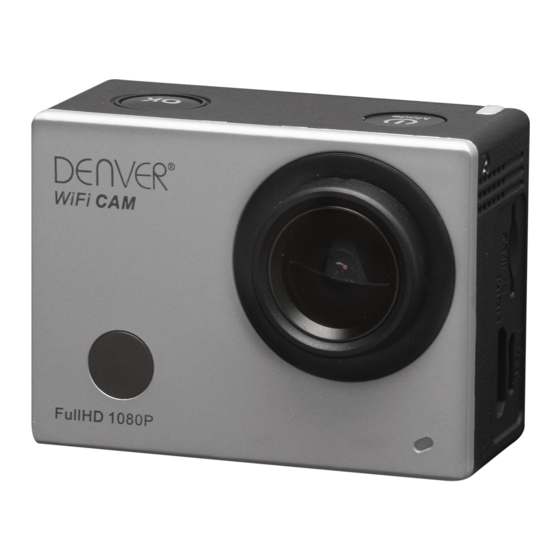
Lens
Infrared
remote
control lamp
Busy indicator
2.0'' HD LCD
Shutter/OK key
Power/Mode key
Wifi/Down key
S
S
t
t
a
a
r
r
t
t
u
u
s
s
i
i
n
n
g
g
_
_
_
_
_
_
_
_
_
_
_
_
_
_
1. Charge the built-in lithium battery
Connect the camera to the computer for charging, at this time, the charging indicator will
be in red, and it will be off after charging. Generally, it takes 2-4 hours to charge the battery.
2. Use the storage card
1. Push the TF card into the slot till it is in place as per the instruction in concavely engraved
words by the storage card slot.
2. To take out the TF card, press the tail of the storage card inwardly softly and it will be
popped out.
Note: There's no built-in memory unit in the camera, so make sure to insert a storage
ACT-5030W Quick Start Guide
e
y
s
e
y
s
Charging /Busy indicator
Display/Menu key
Microphone
HDMI port
USB cable
card into it prior to use (it is recommended that a TF card of better quality be used).
3. Power on/off
3.1 Power on: Press Power key for 3 seconds, the screen will be on and the camera will be
started.
3.2. Power off: Hold on Power key for 3 seconds when the camera is in the idle state to
turn it off.
3.3. Auto screen off: The screen will be turned off automatically when the time that the
camera is in the idle state for automatic screen off to save power. After that, the lamp
for screen off will be on.
3.4. Power off when the camera is lack of electricity. When electrical quantity of the
battery is very low, an icon of
you to charge it in time. When the icon turns red and flickers, the camera will be turned
off automatically.
4. Shift among functional modes
The camera has 3 modes, namely video recording mode, shooting mode and replay mode.
After power is on, press Power key to shift among them.
Video recording mode
Battery door
5. Indicator
Busy indicator (red): When the camera is busy such as recording videos, shooting photos
and turning off screen automatically, the work indicator will flicker.
Speaker
Charging indicator (blue): When it is on, the user is prompted that the camera is being
charged and it will be off after charging is completed.
6. Video recording mode
Micro SD Card
After power is on, the video camera will enter video recording mode directly and in preview
mode, press Shutter key to start video recording; Press it again to stop shooting. If the
memory card is full or electrical quantity is low, it will also stop shooting:
Micro USB port
1. Icon of mode, indicating video recording mode;
2. Indicate quality of video;
3. Indicate size of video, and FHD 1080P(30FPS)
/ HD 720P(60FPS) / HD 720P(30FPS) is optional;
4. Recording time, indicating recordable length of time;
5. Icon of battery, indicating current electrical quantity;
(
With maximum 29 minutes video recording and then stop.Must be started
manually on the camera again.
7. Shooting mode
After power is on, press Power key twice to enter shooting mode, and in preview state,
press Shutter key to take a photo:
1. Icon of mode, indicating the current is shooting mode;
2. Size of video, and 5M/8M/12M is optional;
3. Icon of quality of pictures;
4. Counter, indicating number of photos to be taken;
5. Icon of electrical quantity of battery.
8. Menu operation
There is a different menu in each working mode as shown in the following figures:
Menu for video recording
Menu for setting mode
Operation: Press Menu key, the menu for this mode will be displayed on the LCD. At this
time, press Power key to move the cursor leftward or rightward and select on the menu, and
press WIFI key to move the cursor upward or downward and select on the menu in a
circulating way. Press OK key to confirm and press Menu key to return or exit from menu
mode.
Application of remote controller
ENG 1
will be displayed on the LCD screen, prompting
Shooting mode
Menu for shooting mode
Menu for replay mode
Signal transmission port
Advertisement

Related Manuals for Denver ACT-5030W


Summary of Contents for Denver ACT-5030W
- Page 1 ACT-5030W Quick Start Guide card into it prior to use (it is recommended that a TF card of better quality be used). 3. Power on/off 3.1 Power on: Press Power key for 3 seconds, the screen will be on and the camera will be started.
- Page 2 APP (for Android and iOS System) I. How to Obtain the APP Installation Program 1. For the Android System, you can search “DENVER ACTION CAM 1” in the Play Store to Warning obtain corresponding installation programs, and then you can install them according to the indicated steps or through scanning the two-dimensional code •...
- Page 3 Additional information is available at the technical department of your city. Hereby, Inter Sales A/S, declares that this product (ACT-5030W) is in compliance with the essential requirements and other relevant provisions of Directive 1999/5/EC. A copy of the...