
Summary of Contents for Workzone PT 150601
- Page 1 User Manual Spend a little Live a lot 1500 W ROTARY HAMMER DRILL Original instructions ID: #05007...
- Page 2 QR codes take you where you want to go quickly and easily Whether you require product information, spare parts or accessories, de- tails on warranties or aftersales services, or if you want to watch a product demonstration video, our QR codes will take you there in no time at all. What is a QR code? A QR code (QR = Quick Response) is a type of matrix that can be read with a smartphone camera and that contains a link to a website or contact details,...
-
Page 3: Table Of Contents
Contents Overview ..................4 Use ....................5 Product contents/device parts ........... 6 General information ..............7 Reading and storing the user manual ........... 7 Explanation of symbols ..............7 Safety ................... 8 Proper use ...................8 Safety notes ..................9 Residual risk..................9 First use ..................15 Checking the rotary hammer drill and product contents ..15 Basic cleaning..................16... -
Page 6: Product Contents/Device Parts
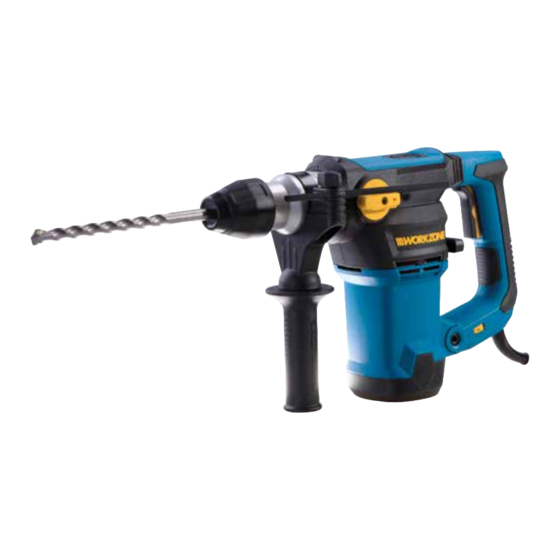
Product contents/device parts Rotary hammer ON/OFF SWITCH Rear handle Switch HAMMER ON/OFF Mains cord/mains plug Speed control Cover Depth stop Clamping mechanism for depth stop Front handle Chuck (SDS Plus) Selector switch CHISELING/DRILLING Masonry drill bits, 3× and chisels, 2× Storage case Dust collector Clamping chuck key... -
Page 7: General Information
General information General information Reading and storing the user manual This user manual accompanies this 1500 W rotary hammer drill. It contains important information on start-up and handling. For improved readability, the 1500 W rotary hammer drill will be referred to only as the “rotary hammer drill”... -
Page 8: Safety
Safety Declaration of conformity (see chapter “Declaration of conformity”): Products marked with this symbol meet all applicable Community regulations for the European Economic Area. Before using the rotary hammer drill, carefully read through the user manual. Wear protective goggles. Wear ear protection. Wear a dust mask. -
Page 9: Safety Notes
Safety Only use the rotary hammer drill as described in this user manual. Any other use is deemed improper and may result in damage to property or even personal injury. The rotary hammer drill is not a children’s toy. The manufacturer or vendor accepts no liability for damage caused by improper or incorrect use. - Page 10 Safety c) Keep children and other persons away from the power tool while you are using it. If you are distracted, you could lose control of the device. Electrical safety a) The connector plug for the power tool must fit in the socket. The plug must not be modified in any way.
- Page 11 Safety d) Remove all adjusting tools or spanners before you switch the power tool on. A tool or spanner in contact with a rotating part of the device may result in injury. e) Avoid an abnormal posture. Assume a stable position and keep your balance at all times.
- Page 12 Safety Special safety notes for rotary hammer drills and power screwdrivers a) Wear ear protection! Noise may cause hearing loss. b) Use the extra grip shipped with the rotary hammer drill. Loss of control over the rotary hammer drill may cause injury. c) Hold the rotary hammer drill by the insulated handles when perform- ing work where there is a risk of the tool being used or the screw com- ing into contact with hidden power lines or its own mains cord.
- Page 13 Safety − Do not operate the rotary hammer drill if it is visibly damaged or if the mains cord or mains plug is defective. − If the mains cord of the rotary hammer drill is damaged, the manu facturer, its customer service team or a person with simi- lar qualifications must replace it to avoid safety risks.
- Page 14 Safety WARNING! Danger for children and persons with impaired physical, sensory or mental capacities (e.g. partially disabled persons, older persons with reduced physical and mental capacities) or lack of experience and knowledge (e.g. older children). − This rotary hammer drill is not intended for use by persons (including children) with reduced physical, sensory or mental capabilities, or lack of experience and knowledge, unless they have been given supervision or instruction concerning use of...
-
Page 15: First Use
First use − Never attempt to clean the rotary hammer drill by immersing it in water and do not use a steam cleaner to clean it. Otherwise you could damage the rotary hammer drill. − Stop using the rotary hammer drill if its plastic parts exhibit cracks or breaks or are deformed. -
Page 16: Basic Cleaning
Operation of the rotary hammer drill 1. Take the rotary hammer drill out of the packaging. 2. Check whether the rotary hammer drill or the individual parts exhibit damage. If this is the case, do not use the rotary hammer drill. Contact the manufacturer at the service address specified on the warranty card. -
Page 17: Adjusting The Front Handle
Operation of the rotary hammer drill Adjusting the front handle 1. Loosen the front handle (see fig. A) by turning it counterclockwise and turning it around the drill axis to a convenient lateral working position. 2. Turn the front handle clockwise to fix it in place. Inserting and removing the masonry drill bits 1. -
Page 18: Mounting And Adjusting The Depth Stop
Operation of the rotary hammer drill Mounting and adjusting the depth stop The depth stop can be used to limit the drilling depth. 1. Loosen the wing screw for the clamping mechanism until the depth stop can be inserted in the clamping opening (see fig. A). Pull the depth stop up to the tip of the drill bit that is clamped in. -
Page 19: Switching Between Hammer Drilling And Drilling
Operation of the rotary hammer drill Switching between hammer drilling and drilling CAUTION! Risk of injury! When hammer drilling, chiseling and drilling, small rocks, airborne dust, borings and sparks may be produced. − Wear protective goggles and ear protection when hammer drilling, chiseling or drilling. -
Page 20: Switching Between Drilling And Chiseling
Operation of the rotary hammer drill Switching between drilling and chiseling WARNING! Risk of accident and injury! Flat chisels do not have guiding cutting edges so they cannot be used for drilling. The flat cutting edge also produces strong kickback forces when it is rotated. This may result in serious injury and damage. -
Page 21: Maintenance
Maintenance Maintenance WARNING! Risk of accident and injury! If the rotary hammer drill is started when the cover of the hammer mechanism is open, there is a very high risk of injury. − Pull the mains plug before you open the cover of the hammer mechanism housing. -
Page 22: Cleaning And Storage
Cleaning and storage 3. Check whether there is a enough grease in the hammer mechanism housing. The moving mechanical parts of the hammer mechanism should all be concealed by a layer of grease. The lubricating grease should be clean (without any dark discolouration) and firm. -
Page 23: Storage
Cleaning and storage Storage Always store the rotary hammer drill, the accessories and the tools in the enclosed storage case. Keep the storage case with the rotary hammer drill and its accessories in a dry area that is protected against dust. Ensure that children can not play with the rotary hammer drill. -
Page 24: Troubleshooting
Troubleshooting Troubleshooting Problem Cause(s) Solution It is not connected to the mains. Connect it to the mains. Insert the The rotary hammer The plug is not plug into the socket. drill cannot be inserted in the Have a defective mains plug/ started. -
Page 25: Technical Data
Technical data Technical data Model: PT 150601 Article number: 92533 Supply voltage: 230 V~/50 Hz Output: 1500 W Speed: 0 – 850 rpm continuous speed control clockwise rotation (can be switched off) Shifting gear: drilling, hammer drilling, chiseling Number of strokes: 0 –... -
Page 26: Noise/Vibration Information
Noise/vibration information Noise/vibration information WARNING! Health hazard! − Wear ear protection and suitable protective clothing when working with the device. Noise emission values Sound pressure level LpA: 95 dB(A) Measurement uncertainty KpA: 3 dB(A) Sound power level LWA: 106 dB(A) Measurement uncertainty KWA: 3 dB(A) Vibration levels... -
Page 27: Disposal
Disposal Disposal Disposing of the packaging Dispose of the packaging separated into single type materials. Dispose of cardboard and carton as waste paper and foils via the recyclable material collection service. Disposing of old devices (Applicable in the European Union and other European states with systems for the separate collection of reusable waste materials) Old appliances may not be disposed of in the household waste. -
Page 28: Ec Declaration Of Conformity
EC Declaration of conformity EC Declaration of conformity EC Declaration of Conformity MEROTEC GmbH D-47877 Willich, Hanns-Martin-Schleyer Str. 18a, Germany herewith declare that our product Rotary Hammer Drill Model PT150601 is in conformity with the following directives: MD 2006/42/EG RoHS 2011/65/EG EMC 2004/108/EG Applied harmonized standards: EN 60745-1:2009 + A11:2010,... -
Page 29: Warranty Card
WARRANTY CARD 1500 W ROTARY HAMMER DRILL Your details: Name Address E-mail Date of purchase* * We recommend you keep the receipt with this warranty card. Location of purchase Description of malfunction: If after contacting the manufacturer AFTER SALES SUPPORT you are requested to return the faulty 0845 872 2740 support@coreservice.co.uk... -
Page 30: Warranty Conditions
Warranty conditions Dear Customer, The ALDI warranty offers you extensive benefits: Warranty period: 3 years from date of purchase. Costs: Free repair/exchange. No transport costs. ADVICE: Please contact our service hotline by phone, e-mail or fax before sending in the device. This allows us to provide support in the event of possible operator errors. - Page 31 Spend a little Live a lot Great care has gone into the manufacture of this product and it should therefore provide you with years of good service when used properly. In the event of product failure within its intended use over the course of the first 3 years after date of purchase, we will remedy the problem as quickly as pos- sible once it has been brought to our attention.
Need help?
Do you have a question about the PT 150601 and is the answer not in the manual?
Questions and answers