Table of Contents
Advertisement
Quick Links
User's Guide
User's Guide
User's Guide
User's Guide
Please read this
Please r
Please r
Please r
ead this
ead this
ead this user's guide first before operating the unit and
user's guide first before operating the unit and
user's guide first before operating the unit and
user's guide first before operating the unit and
s s s s ave it for future reference.
ave it for future reference.
ave it for future reference.
ave it for future reference.
Congratulations on your purchase of this Bluetooth Speaker. To get the most from your
purchase, please take a few minutes to read these instructions.
1 1 1 1 . . . . Safety instruction
Safety instruction
Safety instruction
Safety instructions s s s
• This product should not be exposed to water by dripping or splashing and no objects filled
with liquids, such as vases, should be placed near to the product. Do not place the unit
on a wet surface.
• Do not expose the product to temperatures above 35°C and keep it out of direct sunlight.
• This product has no user-serviceable parts. Do not attempt to repair this product yourself.
Only qualified service personnel should perform servicing.
the rear of the speaker.
• Do not subject the product to harsh impacts. Do not drop the product as this may result in
damage.
Disconnect the product from the power source before cleaning. Never handle the USB
•
cable with wet hands as this could cause electric shock. Unplug the
be unused for long periods of time.
• This product is designed for indoor use only.
•
If the USB cable needs to be replaced, ensure that the replacement complies with the
manufacturer's recommendations and specifications.
The power rating is stated on
product when it will
2. Preparation for use
. Preparation for use
. Preparation for use
. Preparation for use
Unpack the speaker carefully. We recommend that you save the box and packing materials
in case you wish to store the speaker.
accessories are present:
1 x USB Power Cable
•
•
1 x 3.5mm Audio Cable
3 3 3 3 . P
. Power source
ower source
. P
. P
ower source
ower source
Unwind the USB power cable to its full length; connect one end to the DC input jack (10) on
the rear of the speaker. Connect the other end to a USB power adapter or PC USB port. The
charge indicator LED (9) will light up red to indicate charging.
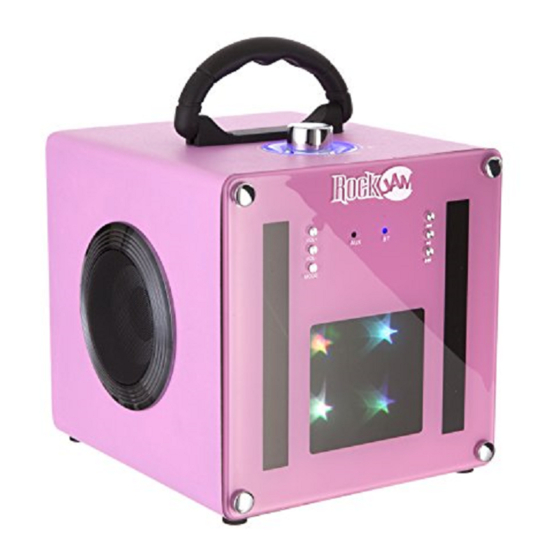
4. Location of controls and
4. Loca
tion of controls and indicators
indicators
4. Loca
4. Loca
tion of controls and
tion of controls and
indicators
indicators
1 – VOL+
VOL+
VOL+ Button
VOL+
Button
Button
Button
Press to increase the audio volume.
2 2 2 2 – – – – VOL
VOL
VOL- - - - Button
VOL
Button
Button
Button
Press to decrease the audio volume.
3 3 3 3 – – – – MODE Button
MODE Button
MODE Button
MODE Button
Press to select between Bluetooth and AUX
Input mode.
4 4 4 4 – – – –
PREVIOUS Track Button
PREVIOUS Track Button
PREVIOUS Track Button
PREVIOUS Track Button
Press to go back to the start of the track. Press
twice to select the previous track.
5 5 5 5 – – – – PLAY/PAUSE Button
PLAY/PAUSE Button
PLAY/PAUSE Button
PLAY/PAUSE Button
Press to alternately pause and play the music.
6 6 6 6 – – – – NEXT Track Button
NEXT Track Button
NEXT Track Button
NEXT Track Button
Press to go to the start of the next track.
Before setting up the unit, verify that the following
7 7 7 7 – – – – VOLUME
VOLUME
VOLUME Control
VOLUME
Control
Control
Control
Rotate the volume control as desired.
8 8 8 8 – – – – AUX Input
AUX Input
AUX Input
AUX Input
Connect the external audio device here
with the cable supplied.
9 9 9 9 – – – – CHARGE Indicator LED
CHARGE Indicator LED
CHARGE Indicator LED
CHARGE Indicator LED
Lights up red during charging. Goes off
when charged.
NOTE: The speaker can be left
NOTE: The speaker can be left
NOTE: The speaker can be left
NOTE: The speaker can be left
connected to the charger when off or
connected to
the charger when off or
connected to
connected to
the charger when off or
the charger when off or
in use; it will not overcharge
in use; it will not overcharge
in use; it will not overcharge
in use; it will not overcharge
10
10
10 – – – – 5V DC Charger Input
10
5V DC Charger Input
5V DC Charger Input
5V DC Charger Input
Connect the USB charge cable here and
charge from a USB charger or computer
USB port.
11
11
11
11 – – – – ON/OFF Switch
ON/OFF Switch
ON/OFF Switch
ON/OFF Switch
Use to switch the speaker On or Off.
NOTE: Speaker can be charged while
NOTE: Speaker can be charged while
NOTE: Speaker can be charged while
NOTE: Speaker can be charged while
off or in use.
off or in use.
off or in use.
off or in use.
Advertisement
Table of Contents

Related Manuals for RockJam BT-1106


Summary of Contents for RockJam BT-1106
- Page 1 2. Preparation for use . Preparation for use . Preparation for use . Preparation for use Unpack the speaker carefully. We recommend that you save the box and packing materials in case you wish to store the speaker. Before setting up the unit, verify that the following accessories are present: 1 x USB Power Cable •...
- Page 2 Using your mobile phone or other Bluetooth enabled device, search for Bluetooth devices iPod/iPhone/MP3 player and select ‘BT-1106’ from the list of devices found. The Bluetooth device should then connect - Adjust the volume on the audio device. songs or will not to the speaker and the status indicator will light continually in blue to show the successful function as expected.
Need help?
Do you have a question about the BT-1106 and is the answer not in the manual?
Questions and answers