
Related Manuals for BTG TCT-2301


Summary of Contents for BTG TCT-2301
- Page 1 User Manual TCT-2301 Smart optical low consistency transmitter Total Consistency Sample Enter Transmitter TCT-2300 M2007/3en ©BTG 2004...
- Page 2 The contents of this document are subject to revision without notice due to continued progress in methodology, design, and manufacturing. BTG shall have no liability for any error or damages of any kind resulting from the use of this document. ©BTG 2004.
-
Page 3: Table Of Contents
Electronics box design ........28 3.3.3 Connecting the measuring probe to the electronics box ... . 29 M2044/0en TCT-2302 Table of contents ©BTG 2004... - Page 4 Offset adjustment ......... . 57 4.4.4 Manual loading of probe signal settings......59 TCT-2302 Table of contents M2044/0en ©BTG 2004...
- Page 5 Inserting the probe ........101 M2044/0en TCT-2302 Table of contents ©BTG 2004...
- Page 6 TCT-2301 ........
-
Page 7: Product Introduction
0.01-3.5%. Based on BTG's patented Peak Method (see section 1.3) of optical anal- ysis, the TCT-2301 is virtually insensitive to variations in filler and fines content, making it particularly suitable for use with recycled and me- chanical pulp suspensions. -
Page 8: Technical Data
The TCT-2301 is served by the SPC-1000 hand-held terminal, which works not only with the TCT-2301, but also with all instruments in the BTG family of smart transmitters. The SPC-1000 can be connected at any point on the 4-20 mA output signal loop. - Page 9 Stainless steel to SS 2343, equiv. to ANSI 316, DIN X5 CrNiMo 18.22, B.S.316 S16/En 58J Connection Optical connection to electronics box. Weight Probe 3.3 kg (7.2 lb) Valve assembly approx. 3.8 kg (8.4 lb) M2007/3en TCT-2301 Product introduction ©BTG 2004...
- Page 10 LED curr./cons.level /internal temp. Electronic Enclosure Made of polycarbonate thermoplastic with a transpar- ent cover. Metal-plated internally to protect against interference. Protection rating IP65, NEMA 4x, UL, CSA Weight Electronics box 2.4 kg (5.3 lb) TCT-2301 Product introduction M2007/3en ©BTG 2004...
- Page 11 Directly with the DCS. See “Output signal - digital”. ® Allows HART universal commands. Option 3: RS-485 for connection to OPC-server. OPC program provided by BTG. Note: Only for DCS/OCS systems with OPC capabilities. Option 4: Prepared for fieldbus communication e.g. Profibus or Fieldbus Foundation. Signal transmission 10 m (33 ft) quartz glass optic fibers included, protected in a flexible conduit.
-
Page 12: Measuring Principle
8 Input signals 9 Output signals PEAK The TCT-2301 employs the patented peak method for measuring total consistency of pulp suspensions. This technology is based on the fact that suspensions contain both large and small particles. Large particles are typically fibers and small particles are fillers and fines. - Page 13 3. The total consistency is obtained by adding the further treated V and the values. Light transmission Volts 3 Output signal Clear water Peak value Direct current signals Alternating current signals Total Consistency Time M2007/3en TCT-2301 Product introduction ©BTG 2004...
-
Page 14: System Description
7 Pulp chest with sufficient mixing 8 Stock pump 9 BTG sampling valve type MPS-1000 The system consists of a probe (1) connected by an optical fiber to an electronics box (2) The probe contains only optical fibers. A ball valve arrangement that is welded to the pipe system make it possible to remove the probe without interrupting the process. -
Page 15: Dimensions
1.6 - Dimensions 1.6 Dimensions 5 TCT-2301 Dimensions 1 Electronics box 2 Probe with retraction system Min Ø100 4" Ø50 2” 18.5" 12" M2007/3en TCT-2301 Product introduction ©BTG 2004... -
Page 16: Type Sign Explanations
The TCT-2301 is approved according to CE directives. Always refer to the type 3. CSA-marking sign when ordering spare parts. The TCT-2301 electronics box is approved according to Australian C- TIC N1619 directives. 4. ETL-marking The TCT-2301 electronics box is approved by ETL 5. Warning sign The device is designed for industrial use. - Page 17 According to CE directive. Max. continuous output. 9. Installation category According to CE directive. Resistant to transients. 10.Frequency The unit operates both 50 and 60 Hz. 11.Manufacturing number BTG internal product identification number. 12.Factory identification M2007/3en TCT-2301 Product introduction ©BTG 2004...
-
Page 18: Ce-Declaration Of Conformity
1.8 - CE-declaration of conformity 1.8 CE-declaration of conformity CE-Declaration of Conformity According to EN 45014 BTG Pulp & Paper Sensors AB Manufacturer´s Name P.O. Box 602 S- 661 29 SÄFFLE, Sweden Manufacturer´s Address declares that the product: Total Consistency Transmitter... -
Page 19: Safety Recommendations
2. All units are tested as a complete system to conform with rele- vant CE directives and their standards. When using the unit in other combinations, BTG cannot guarantee the CE directive conformity. The unit in combination with customer installed external devices may conform with EMC and safety requirements when properly installed and using an adequate CE marked equipment. -
Page 20: Product Specific Safety Recommendations
Mounting parts, such as the weld-in studs, are dealt with in accordance with the pressure vessel standards of the respec- tive countries. For good personal and functional safety: Use only parts which have been manufactured or approved by BTG. 2.2.2 Selecting a transmitter model and assembly parts Pressurized parts must be suited to the current maximum pipe pressure in relation to temperature. -
Page 21: Installing The Electronics Box
Replace any damaged seals. If the probe’s pressurized parts have corroded, check that the material is correct for the application. Leakage may cause personal injury or damage to equipment due to corrosion or burning! M2007/3en TCT-2301 Safety recommendations ©BTG 2004... - Page 22 2.2 - Product specific safety recommendations TCT-2301 Safety recommendations M2007/3en ©BTG 2004...
-
Page 23: Installation Instructions
BTG sales engineer. When you are satisfied that your TCT-2301 has been correctly installed and are ready to power up the system for calibration, please turn to sec- tion 3.5: Checklist before start. -
Page 24: Visual Inspection
Product type sign The transmitter is manufactured to provide accurate and reliable mea- explanations see section 1.7 surements over a long period of time. Correct installation will ensure maximum operating life of the transmitter. TCT-2301 Installation instructions M2007/3en ©BTG 2004... -
Page 25: Installing The Transmitter
Fig 4 on page 8 shows a typical installation. Your BTG sales engineer and empty before opening can help you select the location that will give the best results in relation it for installation or to your control strategy. - Page 26 3. Install the probe so that it is protected from direct mechanical dam- age. 4. Protect the probe from heavy vibration such as cavitation or unbal- anced pumps. One method is to install a rubber bellows in the line. TCT-2301 Installation instructions M2007/3en ©BTG 2004...
- Page 27 A small angle downwards makes it possible for the pulp to evac- uate when the probe is retracted and also makes the insertion of the probe easier. See fig 10 below. Fig 10 Installation of the probe in a horizontal pipe. M2007/3en TCT-2301 Installation instructions ©BTG 2004...
-
Page 28: Probe Clearance Requirements
The sampling valve should be installed close to the transmitter. This helps to ensure that the laboratory sample is representative of the sample measured by the transmitter. Installing an appropriate BTG sampling valve, will ensure reliable re- sults. Install the sampling valve up or downstream of the transmitter but not closer than 0.5 m (1.5 ft) to the transmitter to avoid... -
Page 29: Installing The Ball Valve Assembly
6. Mount the ball valve arrangement. The slot for the crank handle must be located upwards since there is a scale on the probe that must be adjusted before the probe is mounted. Fig 13 Mounting positions of the probe. M2007/3en TCT-2301 Installation instructions ©BTG 2004... -
Page 30: Mounting The Probe In The Valve Assembly
45° line on the scale. Tighten the three screws properly. A suit- able allen key is included in the delivery. Angles other than 45° can be used in some installations. See section 4.2.3: Adjustment of measuring gap angle. Fig 15 Probe scale adjustment TCT-2301 Installation instructions M2007/3en ©BTG 2004... - Page 31 6. Secure the probe in inserted position with the two security screws Avoid getting O-ring lubricant on the measuring Secure the two security screws properly 7. When removing the probe, reverse the above procedures. M2007/3en TCT-2301 Installation instructions ©BTG 2004...
-
Page 32: Installing The Electronics Box
See fig 20. Fig 17 Dimensions of the electronics box Fig 18 Electronics box clearances Sample Enter 12" 2" Terminal Install the box in a position where it will be protected from mechanical damage. TCT-2301 Installation instructions M2007/3en ©BTG 2004... - Page 33 3.3 - Installing the electronics box BTG recommends that a roof or overhang is located above the electronics box to protect it against spray and pulp. If the box is located outdoors a roof will protect the unit from direct sunlight which can cause excessive operating temperatures.
-
Page 34: Electronics Box Design
3.3 - Installing the electronics box 3.3.2 Electronics box design Electronics boxes manufactured by BTG are designed to meet personal safety and interference requirements under the European CE directive and Canadian CSA requirements. The plastic enclosures are made of polycarbonate thermoplastic. -
Page 35: Connecting The Measuring Probe To The Electronics Box
The standard optical fiber is 10 m (33 ft). It is possible to use optical fiber up to 40 m (131 ft) long. Contact your BTG sales engineer for more in- formation regarding optional fiber lengths. Do not cut the optical fiber. -
Page 36: External Wiring Dimensions
3.3 - Installing the electronics box 3.3.4 External wiring dimensions BTG recommends properly dimensioned wire, shielded and twisted in pairs, for connection between the electronics box and external equip- ment. See also section 2.1: General safety recommendations. Power supply cable: Electronics box with built-in power supply unit: •... -
Page 37: Main Power Supply Connections
2 Nut 3 Sealing ring 4 Insert ring 5 Cable shield 6 Socket 7 Free wires Tighten nut fully for maximum contact for the shield. 6. Turn on the main power supply. M2007/3en TCT-2301 Installation instructions ©BTG 2004... - Page 38 A IN ALARM +24V GND RS485 TCT-2301 Field bus S = Shield connected to cable-gland * = Not used for TCT-2301 RANGE 1 RANGE 2 RANGE 3 RANGE 4 Notes on fig 26: • An external 2-pole switch close to the electronics box is required.
- Page 39 3.3 - Installing the electronics box Explanation for fig 26 TCT-2301 wiring diagrams. Terminal Function Neutral Phase 85-264 V AC, 47-440 Hz, power fuse 2AT Protective earth +24V DC (to optional PCD-1000) Ground, 0V DC (to optional PCD-1000) AOUT 1+...
-
Page 40: Transmitter Input And Output, Measuring Range Connections
BELL 202 modem standard. The transmitter complies to Hart -protocol standard requirements. ® A BTG handheld terminal is used to set and calibrate the transmitter. As this unit provides additional functions not covered by the Hart -protocol, a standard Hart competitive terminal offers ®... -
Page 41: Probe Cleaning System (Option)
The system can be delivered as a separate unit for rebuilding exist- ing units or together with a complete TCT-2301 transmitter. If the cleaning system is ordered with the TCT-2301 the probe will be mounted in the cleaning device at the BTG factory. The installation method is de- scribed for both cases. -
Page 42: Installing The Pcd-1000 Upgrade Kit
3.4 - Probe cleaning system (option) 3.4.2 Installing the PCD-1000 upgrade kit This section describes how to upgrade an existing TCT-2301 transmitter with the probe cleaning device PCD-1000/A (accessory). Make sure the pipe is empty and pressureless before starting the installation. - Page 43 (16). Do not forget the O-rings (19). 13. Put the accompanying rubber bushing (14) over the fiber cable and push it into the tip of the guiding rod. M2007/3en TCT-2301 Installation instructions ©BTG 2004...
- Page 44 17. Connect the air tube (9) to the nipple (21) on the rear cylinder flanged end. 18. Loosen the screws (24) and turn the protective sleeve until the screw hole on the guiding rod is visible through the slot (25). TCT-2301 Installation instructions M2007/3en ©BTG 2004...
- Page 45 24. Tighten the screws (23) and the nuts (5). 25. If the existing TCT-2301 is mounted with a threaded weld-in stud be- tween the ball valve assembly and pipe, the new flanged weld-in stud (22) must be used.
-
Page 46: Installing The Pcd-1000 Probe Cleaning Device
Installing the PCD-1000 probe cleaning device This section describes how to install the probe cleaning device PCD-1000/A that is delivered with a TCT-2301 probe. (Option) Make sure the pipe is empty and pressureless before starting the installation 1. Loosen the screws (3) that holds the protective sleeve (4) fixed. -
Page 47: Probe Cleaning Device Connections
1. Connect water to the membrane valve. The connection is 8.5mm (0.33 in) 2. Connect air to the solenoid valve by 6/4 (1/4 in) hose. 3. Connect the control signal and 24V DC supply from the TCT-2301 electronics box. See section 3.3.5: Main power supply connections. Fig 32 Cleaning device... -
Page 48: Checklist Before Start
3.5 - Checklist before start 3.5 Checklist before start When you are confident that your TCT-2301 has been correctly installed, and are ready to power up the system for calibration and/or testing, run through this brief check list before powering up. Using this list will help ensure trouble-free initialization of your system. -
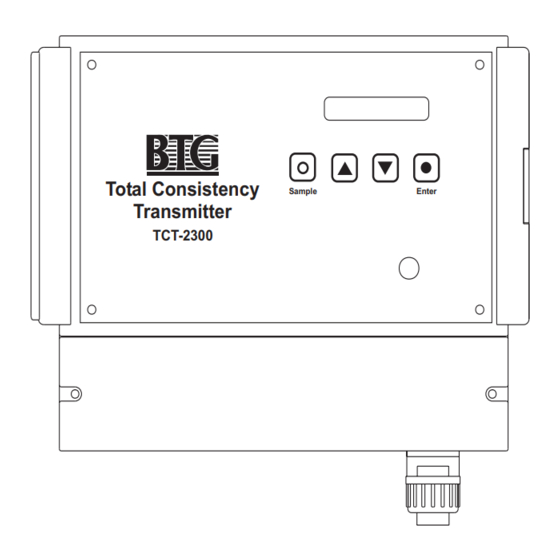
Page 49: Operating Instructions
4.1 - Starting the transmitter 4 Operating instructions Total Consistency Sample Enter Fig 33 TCT-2301 consistency transmitter Transmitter TCT-2300 with electronics box and hand Terminal terminal 4.1 Starting the transmitter All settings are made from the hand-terminal, SPC-1000, or from the electronics box. -
Page 50: Adjusting Tag / Serial No
Range 1 is always active if nothing is connected to the binary inputs. Edit Make sure changes are made in correct range, select using Range The active range is shown on the main menu, lower right ”Range: X” TCT-2301 Operating instructions M2007/3en ©BTG 2004... -
Page 51: Select Measuring Unit
20 mA 20 mA respectively. 1.00% 3.00% Misc. Print Tag: 25NT1237 Tag: 25NT1237 Range x Range 1 --------------- --------------- 53.3% 53.3% 100% 100% Note ! Trend Cons. 1.30% Cons. 1.30% TCT-2301 TCT-2301 SPC-1000 Communication Terminal M2007/3en TCT-2301 Operating instructions ©BTG 2004... -
Page 52: Clear Water Adjustment
ON/OFF EJECT MEMORY CARD Mode Menu int. Spec adjust 25NT1237 Devive TCT-2301 version 1.xx Boot version 1.xx version xx <Led int. adjust>: Led intensity adjust- ment / basic sensitivity settings. <Tag>: Transmitter ID <Tx. Spec>: Transmitter spec. SPC-1000 Communication Terminal Fig 35 shows the following menu. - Page 53 This must be The key ”Edit CW xx.x%” is used to manually send a water value to done only when the probe the transmitter if needed. is in clear water. M2007/3en TCT-2301 Operating instructions ©BTG 2004...
-
Page 54: Selecting The Correct "Mode
4.2 - Clear water adjustment 4.2.2 Selecting the correct ”mode” The TCT-2301 has preset calibration curves for different fiber types. Fi- ber types are divided into two main groups, low-strength pulp (short fi- ber) and high-strength pulp (long fiber). Confi- This setting is located under . -
Page 55: Adjustment Of Measuring Gap Angle
45°, 60°, 75°). Install the probe and observe the signal from the transmit- ter. Contact BTG for further technical information. Never go under a 15° or over a 75° angle to the measuring gap. This could spoil the cleaning effect of the measuring gap and/or create a plugging effect. - Page 56 Pulp Flow Pulp Flow Definition: At 0° the measuring gap points directly towards the flow. At 90° the measuring gap points towards the pipe wall. The transmitter is now ready for calibration against pulp samples. TCT-2301 Operating instructions M2007/3en ©BTG 2004...
-
Page 57: Calibration
Additional information can be found in ”Accurate Consistency — a hand-book in consistency measurement in pulp and paper processing”, available from BTG. To ensure acceptable precision in laboratory samples, we recommend use of BTG sampling valves. M2007/3en TCT-2301 Operating instructions ©BTG 2004... -
Page 58: Calibration Procedure
- SLS-1000 is a useful aid. 4.3.3 Calibration procedure Normal calibration is very simple, only one sample needs to be taken. 4-20mA MODEMPRINTER ON/OFF EJECT MEMORY CARD The functionality of the TCT-2301 means that a single point calibration Cali- Read Edit Confi- Cali- Calib- data... -
Page 59: Take Sample
Edit sample 2. Step to correct position for the sample using ON/OFF 3. Press to active the value (”ON”). 4. Press and enter the lab value. Send Return to the main menu and data M2007/3en TCT-2301 Operating instructions ©BTG 2004... -
Page 60: Calculate Calibration
0.00% 0.00% OFF signal cons. Edit 0.00% 0.00% OFF down through the menu and enter desired value. k0 = 0.1366 ON/OFF Calibr. k1 = 0.8613 curve SPC-1000 SPC-1000 Communication Terminal Communication Terminal TCT-2301 Operating instructions M2007/3en ©BTG 2004... -
Page 61: Calibration Table
SPC-1000 Communication Terminal The two calibration constants K0 and K1, and the special correlation fac- tor r2, provide a guide. Note that the displayed probe signal and the mea- suring span are the same. M2007/3en TCT-2301 Operating instructions ©BTG 2004... -
Page 62: Other Functions
If the time constant is too long, the high precision level of the transmitter is reduced. Contact BTG for further advice. Procedure: 1. Study the stability of the signal under MAIN MENU op-... -
Page 63: Setting Alarm Limits
<Load lab.>and enter value <Load lab.>and enter value 3. Push <Calc.> alt. enter the 3. Push <Calc.> alt. enter the x.xx% Send actual value at <Offset>. actual value at <Offset>. page SPC-1000 SPC-1000 Communication Terminal Communication Terminal M2007/3en TCT-2301 Operating instructions ©BTG 2004... - Page 64 2. Press in the submenu and enter the detected deviation. x.xx% Send 3. Transfer the value to the transmitter using . (Clear the page value by going back to the Offset function and entering 0.) TCT-2301 Operating instructions M2007/3en ©BTG 2004...
-
Page 65: Manual Loading Of Probe Signal Settings
80.00%0.00%OFF signal cons. 90.00%0.00%OFF k0 = 0.1366 ON/OFF Calibr. k1 = 0.8613 curve SPC-1000 SPC-1000 Communication Terminal Communication Terminal 3. Press Send Send to send calibration data to the transmitter. data change M2007/3en TCT-2301 Operating instructions ©BTG 2004... -
Page 66: Evaluation And Documentation Of Calibration
The 4 - 20 mA output signal is displayed as 0 - 100%. This means that Communication Terminal Communication Terminal the resolution is relatively low - approximately 1% (0.16 mA) - but the display is still a useful tool when setting parameters such as the time con- Damp stant TCT-2301 Operating instructions M2007/3en ©BTG 2004... -
Page 67: Documenting Calibrations With Printer
AC adapter and that the baud rate (2400) is correctly set. A sample printout is shown in fig 37 on page 62. M2007/3en TCT-2301 Operating instructions ©BTG 2004... - Page 68 4.5 - Evaluation and documentation of calibration BTG CONS. TRANSMITTTER TCT-2301 Fig 37 Sample of calibration documentation SPC software version 1.2en printout from printer Software version 1.04 Boot version 1.01 or PC version 7g Date Sign 1 Tx. model Tag 12NT1237 2 Software version Serial.
- Page 69 4.5 - Evaluation and documentation of calibration Fig 38 Calibration diagram for TCT [%] Probe signal [%] Consistency M2007/3en TCT-2301 Operating instructions ©BTG 2004...
-
Page 70: Documenting Calibration Using The "Back-Up Card
STORE DATA: SPC 1000 ----> BACKUP CARD READ DATA : BACKUP CARD --> SPC 1000 (1-125): 0 Copyright© 1995 All rights reserved STORE READ DATA DATA SPC-1000 Communication Terminal STORE 5. Press to store the terminal’s transmitter adjustment for DATA TCT-2301 Operating instructions M2007/3en ©BTG 2004... - Page 71 Tag number is shown in the identification list as per Item 5 section A: Storing the transmitter’s data on the back-up card (Store data). Press Verify 6. Switch off the hand-held terminal and replace the back-up card with the sensor card. M2007/3en TCT-2301 Operating instructions ©BTG 2004...
-
Page 72: Documenting Calibration Using A Pc
Documenting calibration using a PC If you use Windows 3.1 or later, you can use the ”SPC-1000 Documen- tation” software, available from BTG. If you have several BTG smart transmitters this is a practical way of storing all transmitter data within the same file. - Page 73 ”PRINTER”). Fig 41 PC serial connections 9-Pin 25-Pin 2. Double click on the BTG icon. 3. Double click on the SPC-1000 terminal icon. 4. Click on ”CommPort”, ”Settings” and select the connected comm- port. (normally selected automatically) 5. For more help click on the menu choice ”Help”.
-
Page 74: Electronics Box Display Menu
4.6 Electronics box display menu 4.6.1 General information The TCT-2301 electronics box is equipped with a display and four keys. The dimension of the display is one row with sixteen characters. This al- lows the operator to make some basic adjustments without using the handheld terminal SPC-1000. -
Page 75: Menu Structure
4.6 - Electronics box display menu 4.6.2 Menu structure After 15 seconds, the transmitter always returns to the result display regardless of where it was in the menu structure. Shows transmitter model TCT-2301 and TCT-2301 Start up display software version. Ver x.x Result display, shows consistency. -
Page 76: How To Change Settings And Collect Samples
The display indicates the position, take out the lab sample NO:9 at the same time. Enter to save the value, to discard. NO:9 1.35% OK? TCT-2301 Operating instructions M2007/3en ©BTG 2004... - Page 77 Offset adjustment OFFSET Press the sample in this position and collect a sample from the pipe for lab evaluation. SAMPLE 1.77% Press enter to save the value, press discard the value. M2007/3en TCT-2301 Operating instructions ©BTG 2004...
- Page 78 00 s Press to change value, verify with enter Calibration setting CALIBRATION Calibration constants for the transmitter. Press enter and then to step between calibration constants. TCT-2301 Operating instructions M2007/3en ©BTG 2004...
- Page 79 RESUME 00s Press enter to change the resume time. This time is to allow the probe enter back into the pipe before the TCT-2301 starts to measure again. Also set in seconds. Press to change value, verify with enter . (set to 0 if not used)
- Page 80 Selected language is indicated by the lower case letters. Language selection LANGUAGE English Press enter to change language. Scroll with the keys to the desired language. Svenska Verify with enter Español Italiano Deutsch Português Suomi Français TCT-2301 Operating instructions M2007/3en ©BTG 2004...
-
Page 81: Hand-Held Terminal Spc-1000
The telephone jack on the spiral cable can be parked in the hole in the rubber transport casing. You may need to upgrade your SPC-1000 to use it with the TCT-2301. Make sure that your hand-held terminal is... -
Page 82: Power Supply
In some cases, the molded plug may not fit your outlet. Re- voltage (110 or 220 VAC). place the plug with a suitable standard plug if this is the case. TCT-2301 Operating instructions M2007/3en ©BTG 2004... - Page 83 Rechargeable batteries or manganese batteries provide much shorter op- erating times. Display lighting does not come on in battery mode in order to maximize battery life and operating time. Display readability is how- ever sufficient in normal room lighting. M2007/3en TCT-2301 Operating instructions ©BTG 2004...
-
Page 84: Code Protection
Data can now be transferred to the transmitter. If you wish to Send check that the code has been entered, press data Send . The signal transfer will not take place without the input instruction for the code being displayed. TCT-2301 Operating instructions M2007/3en ©BTG 2004... - Page 85 ”Load code” will be displayed. code data code ON/OFF Enter your old personal code (or the general BTG code). ”New value” will then be displayed. Enter your new code. Press Enter. C. Deactivating the code you have entered Turn Press Send .
-
Page 86: Digital Communication According To The Hart Protocol
BELL 202 modem standard. The transmitter complies to Hart -protocol standard requirements. ® To set and calibrate the transmitter the BTG hand-held terminal is required. Since additional functions are not covered by the Hart ® protocol, a standard Hart competitive terminal can only be used ®... -
Page 87: Service Instructions
5 Service instructions 5.1 Maintenance planning and quality assurance In April 1993, BTG Källe Inventing AB attained ISO 9001 certification for development, design and production of process control equipment for the pulp and paper industry. Factory repairs are made in accordance with the appropriate requirements for new products. -
Page 88: Calibration Recommendations
Cleaning the measuring gap. • Inspection of wetted rubber details and metal parts for damage twice per year if exposed to aggressive chemicals. Long-term maintenance includes: • Replacement of seals, typically after 5 years of operation. TCT-2301 Service instructions M2007/3en ©BTG 2004... -
Page 89: Functional Description
8. Dual port memory for exchange of data between DSP and H8 pro- cessor. 9. Main processor handling calculations, communications etc. 10. Buttons and display positioned on the front of the electronics box. M2007/3en TCT-2301 Service instructions ©BTG 2004... -
Page 90: Service Electronics
5.2. Configured for software Change to hardware set- range setting ting. See section 5.2.9. 6. The SPC does not 6.1. Wrong program in the Switch off the SPC and work change to correct sensor card and program. TCT-2301 Service instructions M2007/3en ©BTG 2004... - Page 91 5.3.3. 7.3. LED circuits on card is Check testpoint ”TP3” with interrupted. ”LED intens” set to 100% according to section 5.2.3. If values are no good change the electronics card as in section 5.2.4. M2007/3en TCT-2301 Service instructions ©BTG 2004...
-
Page 92: Electronics Card Led Functions
– Slow flash (approx. 2 second interval). The program is running normal. – Fast flash (approx. 2 second interval). Indicates that the processor is running but doesn't have any software. Contact your BTG office. – No flash (lit or dark). Processor or program is not running. 6. ALARM. -
Page 93: Function And Testpoints Of Electronics Card
LED SET (not directly comparable - LED SET is IR intensity and LED ACT is LED current). 2.5Vref 2.495 2.505 A/D reference voltage. +AOUT- Analog output signal, depending on measured value and span. M2007/3en TCT-2301 Service instructions ©BTG 2004... - Page 94 5.2 - Service electronics Fig 48 Measurement points on the electronics card COM+ DO1 DO2 DI1 TCT-2301 Service instructions M2007/3en ©BTG 2004...
-
Page 95: Changing The Electronics Card
Ensure the optical connection is inserted in the correct position (see fig 23 on page 29). Install the connection pipe (3) before screwing down the card in the box. Check that optical unit, intermediate washer, box wall and connection M2007/3en TCT-2301 Service instructions ©BTG 2004... - Page 96 (important for grounding). See fig 23 on page connection part off the card while the optical connection pipe is When everything is mounted and power switched on, information will be fastened. shown on the display. TCT-2301 Service instructions M2007/3en ©BTG 2004...
-
Page 97: Change Of Power Supply
5. Loosen connectors (6 & 10) from the power supply card. 6. Unscrew the four tall nuts (9) with the socket wrench. 7. Lift the power supply unit (8) straight out. To mount the new power supply unit, reverse the above procedures. M2007/3en TCT-2301 Service instructions ©BTG 2004... -
Page 98: Changing The Front Panel
2. Connect the DMM set to mA (the smallest range for 20 mA) in series connection with the resistor on ”AOUT+”, connector ”P3 pin 3”. Misc. Factory 3. From the SPC main menu, push . Enter ”1632” setting TCT-2301 Service instructions M2007/3en ©BTG 2004... -
Page 99: Checking Communication To And From Spc-1000/A
SPC-1000. If there is a problem, check the current signal on analog out, measured in series between ”AOUT+” and ”AOUT–”. The current should be between 2 and 21 mA to get a working communication. M2007/3en TCT-2301 Service instructions ©BTG 2004... -
Page 100: Checking Range Inputs
If range is chosen from SPC (software) the Mode button has R. SW. There is an other button at the right, Range: x, for range selection. If Mode button is in state R.SW the range cannot be set from digital input. TCT-2301 Service instructions M2007/3en ©BTG 2004... -
Page 101: Checking The Alarm Output
7. Check that LED ”ALARM” lights up when the alarm is activated. 8. Push Alarm until it shows Alarm Push Send and then Send and check that LED ”ALARM” goes page change out and that the DMM measures “OL” (overload). M2007/3en TCT-2301 Service instructions ©BTG 2004... -
Page 102: Service Probe And Valve Arrangement
5. Loosen the locking device on the flexible insertion screw at the probe equipment on the ball flange. valve assembly functions correctly. 6. Pull out the probe TCT-2301 Service instructions M2007/3en ©BTG 2004... -
Page 103: Check Clear Water Value And Clean Of Probe
2% of each other continue with step 9. Otherwise continue with step 7. Alt2. If the new value is more than 5% higher than the old value, ad- just the LED intensity setting. Continue with step 7. M2007/3en TCT-2301 Service instructions ©BTG 2004... - Page 104 10. Install the probe in the valve arrangement again. Lock it properly us- ing the two screws. Check the clear water (CW) value on a regular base to ensure a high quality measurement. TCT-2301 Service instructions M2007/3en ©BTG 2004...
-
Page 105: Change The Probe With Fiber Connection
6. Make a new offset calibration based on a laboratory sample, see sec- tion 4.4.3 on page 57. If there is a large difference, do a new calibration with one or more lab values with different consistency values. M2007/3en TCT-2301 Service instructions ©BTG 2004... -
Page 106: Replacing Ball Valve Seals
Fig 50 Sealings in ball valve arrangement 1 O-ring 2 O-ring on probe 3 Packings (not available from BTG) If a new valve is mounted make sure the handle with it’s security plate is mounted. TCT-2301 Service instructions M2007/3en ©BTG 2004... -
Page 107: Inserting The Probe
5. Open the ball valve and insert the probe by cranking the handle. 6. Secure the probe in inserted position with the two security screws. ! Secure the two security screws properly M2007/3en TCT-2301 Service instructions ©BTG 2004... -
Page 108: Service Software
It can also be seen from the SPC-1000. Press the Confi- button and the gure version can be read: Device TCT-2301 version X.XX. 5.4.2 Troubleshooting functions There are a number of important functions in relation to trouble shooting on the transmitter. These functions can be found under MAIN MENU op-... - Page 109 ”Clr Alarm” When all active alarms have been shut off this will be regis- tered. Failure in the operative ”System Fail” This message will be sent if a system failure in the operative system occurs. M2007/3en TCT-2301 Service instructions ©BTG 2004...
-
Page 110: Software Fault Feedback Spc-1000
Errors in the message part, Probably faulty cables corresponding to check sum between instrument and below. SPC. Invalid chksum Wrong check sum on parcel Probably faulty cables (normally results in re-send- between instrument and ing). SPC. TCT-2301 Service instructions M2007/3en ©BTG 2004... - Page 111 Connect to the correct in- ed than that which the data strument and start by READ comes from. Identified by the DATA. serial number. If the instrument is the cor- rect one, continue to per- form READ DATA. M2007/3en TCT-2301 Service instructions ©BTG 2004...
-
Page 112: Evaluating Calibrations
Does the probe signal fluctuate widely? If so, the probable reason is that the transmitter is measuring in non-homogenous, badly mixed pulp. Check transmitter location. It may not be located cor- rectly; refer to the Installation Instructions for advice on reloca- tion. TCT-2301 Service instructions M2007/3en ©BTG 2004... - Page 113 Symptom 4: Poor precision outside normal working range. Calibration points are too few or too closely grouped Action: Enter more calibration points, making sure that they cover as much as possible of the measuring span. M2007/3en TCT-2301 Service instructions ©BTG 2004...
-
Page 114: Troubleshooting, General
Take out probe and clean measuring gap. the gap. Check CW calibra- tion. See section 5.3.2. 3.2. Fiber connection is Check if there is any dam- damaged. age on the fiber connection. Check CW calibration. See section 5.3.2. TCT-2301 Service instructions M2007/3en ©BTG 2004... -
Page 115: Maintenance Of The Cleaning System
5. Check that the thin O-rings on the outer flanged end are OK and that they are in the correct positions in their grooves. Use plenty of sili- cone grease to help keep them in position during mounting. M2007/3en TCT-2301 Service instructions ©BTG 2004... - Page 116 6. Re-install the air tube. 7. Fit the transmitter to the sluice valve, use three (3) hexagon-headed screws and tighten. 8. Open the sluice valve. Connect electricity and air. TCT-2301 Service instructions M2007/3en ©BTG 2004...
-
Page 117: Parts List
SS steel 2343 15001548 Screw MC6S 5x12 SS steel 2343 Washer ∅10,5x20x2 17002593 SS steel 2343 14460398 Washer Wolf ZX-100 19001379 Spring TF 20x10,2x0,8 SS steel 2331 Notched pin ∅3x16 ISO 2339 18002733 SS steel 2346-04 M2007/3en TCT1-2301 Parts list ©BTG 2004... - Page 118 6.1 - Probe TCT-2301 Parts list M2007/3en ©BTG 2004...
-
Page 119: Valve Arrangement
Security plate SS steel 2343-02 A0005066 Ball valve, complete AISI 316 Valpres A0005454 Weld-in stud, threaded type SS steel 2343 A0043901 Weld-in stud, flanged type SS steel 2343 A0005918 Warning label O-ring ∅37,47x5, 27014018 EPDM M2007/3en TCT1-2301 Parts list ©BTG 2004... -
Page 120: Tct-2301
6.3 - TCT-2301 6.3 TCT-2301 TCT-2301 Parts list M2007/3en ©BTG 2004... - Page 121 6.3 - TCT-2301 Rec. Item spare Part No. Spare Part Description parts A0019083 Electronics box, complete TCT-2301 A0037697 Enclosure RCP2500 A0006619 Front panel, complete 15020696 Screw RXK-H ST2,9x9,5 A0019091 Electronics card, complete TCT-2301 A0006635 Jack connection, complete A0006601 Display card, complete...
-
Page 122: Cleaning Device
Cylinder end A0086082 Guiding rod A0085209 Solenoid valve 35008358 Diaphragm valve A0043901 Weld-in stud, flanged type A0051763 Connection box, complete A0053124 Circuit card A0037705 Sealing kit Consist of item 1-8 and Silicone grease 48001887 TCT-2301 Parts list M2007/3en ©BTG 2004... -
Page 123: Accessories
84437508 Installation disk for backup data on 84437516 PC Cable, to SPC-1000 83340372 Smart Lab Sampler, complete 37016128 Blind flange For threaded stud A0054460 Blind flange complete For flanged stud 56015787 Allen key 5mm M2007/3en TCT1-2301 Parts list ©BTG 2004... - Page 124 Recommended spare parts marked * are typical for two years operation. Recommended spare parts marked (*) are less likely to fail but are recommended when a large number of transmitters are to be maintained. TCT-2301 Parts list M2007/3en ©BTG 2004...
Need help?
Do you have a question about the TCT-2301 and is the answer not in the manual?
Questions and answers