Table of Contents
Advertisement
Advertisement
Table of Contents

Related Manuals for Patroleyes SC-DV10

Summary of Contents for Patroleyes SC-DV10
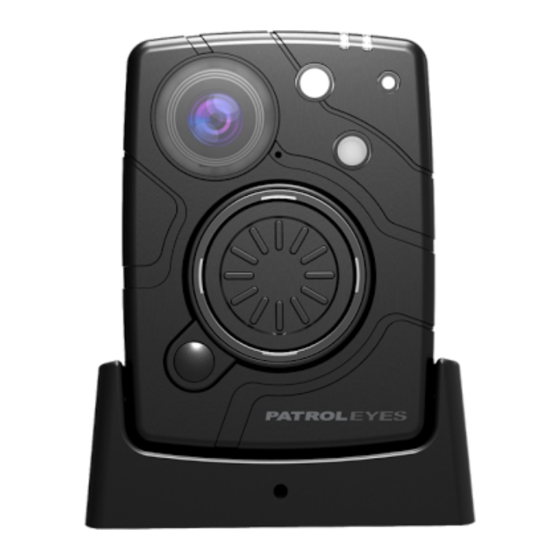
- Page 1 SC-DV10 SC-DV5_Main.jpg SC-DV5_Main.jpg SC-DV5_Main.jpg...
- Page 2 Overview Before Use • Fully charge the camera using the included USB cable and Camera: charging dock for 3-4 hours. The charging indicator will turn blue when charging. When the device is fully charged, the blue light will turn off. •...
-
Page 3: Getting Started
Getting Started Recording Basic Operation: Video Recording: 1) Press and hold the Power button (located in the middle of a. To record a video, press the Record button (located on the the camera) for about 2 seconds. You will hear front of the device). - Page 4 WiFi Phone App WiFi Phone App Install WiFi App d. Open the “linkineyes” app to begin viewing on your phone. Tap the red Recording icon (located in the center of your The WiFi Phone App displays recording time, battery indicator, screen near the bottom) to enter Preview Mode.
- Page 5 App Preview Mode - Video Mode App Preview Mode - Photo Mode The Preview Mode is the main screen while using the WiFi app. While in the Photo Preview Mode, the main screen shows the Here you can view the current camera feed and record video. current camera feed and allows for taking photos.
- Page 6 App Preview Mode - Video Resolution App Preview Mode - Photo Resolution Video Resolution Photo Resolution a. To change the video resolution, select the “Resolution” icon a. To change the photo resolution, select the “Resolution” icon (located on the top right of your screen) in video preview mode. (located on the top right of your screen) in photo preview mode.
- Page 7 App Settings Manager App File Manager To go to the Settings interface, press the settings icon a. To go to the File Manager interface, press the files icon (located on the bottom left corner of your screen). (located on the bottom left corner of your screen to the right of the Settings icon).
- Page 8 Hard drive storage for archiving video (1TB recommended) Software Download a. Download the Camera Management Software from our FAQs page: www.stuntcams.com/sc-dv10 b. Click “Cam Manager and Drivers” and download the .zip file. (once downloaded right click and extract all) d. To exit, press the back icon (located on the top left corner of c.
- Page 9 Management Software - Login Management Software - Camera Info Management Software Login Camera Info a. Open the “Cam Manager” software on your computer. Place a. After login, the Camera Management Software will open on your camera into the charging station, and plug the station into the Camera Info tab.
- Page 10 Management Software - Camera Settings Management Software - Camera Settings Resolution Video Segments a. Click the “Resolution” drop down. There are eight settings to a. Click the “Video Splitter” drop down. There are five settings choose from: to choose from: 1.
- Page 11 Management Software - Camera Info Management Software - Camera Settings d. Click “Open File Explorer” to view the camera’s files. The Camera Settings Management Software will close and the file manager will a. Click the “Parameter Settings” tab in the Camera open.
- Page 12 Management Software - Camera Settings Management Software - Camera Settings TV Out WiFi On a. Click the “TV out” drop down. There are two settings Click the “WiFi On” box to have WiFi automatically turn on to choose from: when the camera powers on. If the box is unchecked, WiFi must be turned on manually to connect to your smartphone.
- Page 13 Management Software - Camera Settings Management Software - Camera Settings Auto Power Off Date Format a. Click the “Auto Power Off” drop down. There are six settings a. Click the “Date Format” drop down. There are three settings to choose from: to choose from: 1.
- Page 14 • Carrying Case • Lens Protectors • 8 Camera Docking Station • PatrolEyes Protection Plus Program b. From here you can change device passwords. Select the user type for the password that you wish to change. Enter the For a complete list of accessories and pricing, visit: admin password, then enter the new password you wish to set For the latest news and firmware upgrades, please follow us at:...
Need help?
Do you have a question about the SC-DV10 and is the answer not in the manual?
Questions and answers