Table of Contents
Advertisement
Quick Links
Advertisement
Table of Contents

Related Manuals for ZUG Adora TS WP

Summary of Contents for ZUG Adora TS WP
-
Page 1: Operating Instructions
Operating instructions Adora TS WP Tumble dryer... -
Page 2: Safety Precautions
Safety precautions ▪ If the mains cable of this ap- Read the operating instructions be- fore using the appliance for the first pliance is damaged, it must time. be replaced by the manu- facturer or its Customer Ser- General safety precautions vices or a similarly qualified ▪... - Page 3 Safety precautions als were used for cleaning. sipated. ▪ Clean the fluff filters regu- ▪ Exhaust air must not be dis- larly. charged into a flue which is used for exhausting fumes ▪ Do not allow fluff to build up from appliances burning around the tumble dryer.
-
Page 4: Correct Use
Safety precautions dren. Danger of suffocation! Keep pack- have been contaminated by aging material away from children. hair care products be Correct use placed in a tumble dryer they should first be washed The appliance is only suitable for drying in hot water with extra deter- home textiles. -
Page 5: Serial Number
▸ Hold the button depressed until identification plate. These operating in- the following display appears: structions apply to: User settings FN XXXXX XXXXXX Adora TS WP Appliance designation Type WTATSWPZ 12005 Product family Variations depending on the model are noted in the text. -
Page 6: Table Of Contents
Contents Appliance description 7 Technical data 26 Appliance construction ........ 7 Drying tips 28 Indicator lights .......... 7 Saving energy.......... 28 Operating and display elements.... 8 Avoiding damage.......... 28 Programme overview 9 10 Disposal 29 Automatic programmes ......... 9 11 Notes 30 Standard programme........ 9 Additional programme ........ 9 12 Quick instructions 32 Fabric types .......... -
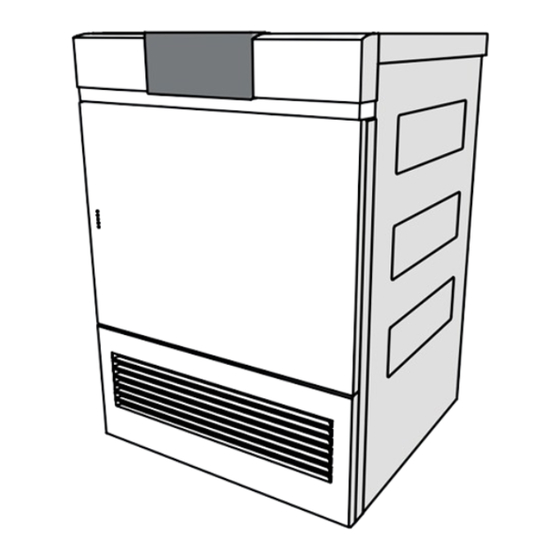
Page 7: Appliance Description Appliance Construction
Appliance description Appliance construction Door filter with door filter mat Front grille Pivoting operating panel Identification plate / serial number (FN) Cover for door filter Ventilation grille Front filter mat Appliance door Indicator lights Illuminated: relevant function active Off: relevant function not selectable Flashing: relevant function selectable... -
Page 8: Operating And Display Elements
1 Appliance description Operating and display elements Pause End of programme Display Automatic programmes Additional functions EcoManagement Additional functions Automatic programmes Additional programme Easy care Extra dry Timed drying ReversePlus Normal dry Delayed start Iron dry Damp Fabric types Standard programme... -
Page 9: Programme Overview
2 Programme overview Programme overview To avoid damaging the laundry, follow the fabric care symbols on garment labels: Tumble dry, medium heat Tumble dry, low heat Do not tumble dry Automatic programmes Automatic drying programmes have 3 phases: Drying The laundry is dried according to the settings. Cooling down / The laundry is cooled down to a temperature at which creasing is min- imized. -
Page 10: Fabric Types
2 Programme overview Fabric types ▸ Press the button repeatedly to select the fabric type. Airing: For refreshing or airing little-worn garments. 1–1.5 kg Woollens: Gentle drying for woollen textiles labelled as washable. 1 kg Silks: For drying silk fabrics. Follow the fabric care symbols as silk 1–1.5 kg tends to crease easily. -
Page 11: Additional Functions
2 Programme overview Additional functions Easy care: Gentle drying for mixed fabrics (e.g. shirts, pullovers and 1–2.5 kg T-shirts). The level of dryness is reduced. To prevent creasing, put only a few items of laundry in the washing drum and unload them as soon as the programme ends. -
Page 12: Operating The Appliance Preparations
3 Operating the appliance Operating the appliance Preparations ▸ Insert the mains plug into a suitable mains socket. ▸ Press the markings at the edge of the door (5 dots) and open the appli- ance door. ▸ Loosely load wet laundry items one by one into the appliance. ▸... -
Page 13: Selecting Additional Functions
3 Operating the appliance Duration remaining indicator When the programme starts, the programme Determining load 1h35 duration at maximum load is displayed. The let- ter «h» flashes for about 1 minute. During this time, the actual load is being determined and the expected duration remaining is being calcu- lated. -
Page 14: Timed Drying
3 Operating the appliance Timed drying ▸ Press button. The set duration appears in the display. ▸ Press the button repeatedly until the desired duration is displayed. Changing selection ▸ Press another programme button during programme selection. All selected settings are cleared. No changes can be made once a pro- gramme has started. -
Page 15: With Childproof Lock Activated
3 Operating the appliance With childproof lock activated How to turn the childproof lock on/off is described in «User settings». Selecting programme ▸ Close the appliance door. Childproof lock The following display appears: ▸ Hold the desired, flashing pro- gramme button depressed and at the same time press the «End of programme»... -
Page 16: End Of Programme
3 Operating the appliance 3.10 End of programme Display Depending on whether «EcoManagement» has been activated, information on the energy consumption is displayed when a programme ends. With «EcoManagement» The indicator light for the pro- End of programme gramme that has finished illu- Clean door filter minates. -
Page 17: Ecomanagement Statistics
4 User settings 3.11 EcoManagement statistics Energy consumption can be displayed before a programme starts or after a programme ends. Display total consumption ▸ Hold the button depressed for Total consumption 123 kWh 3 seconds. The adjacent display appears. Display average consumption ▸... -
Page 18: Childproof Lock
4 User settings EcoManagement When this function is activated, expected EcoManagement consumption values appear at the start of the programme and actual consump- EcoManagement tion values appear at the end of the pro- gramme. The stored consumption values can be deleted as well. EcoManagement Clear counter? Childproof lock... - Page 19 4 User settings ReversePlus When this function is activated, the ReversePlus washing dries evenly and is less likely to get tangled. ReversePlus Brightness The display can be adjusted to the pre- Brightness Very dark vailing lighting conditions. Brightness Medium bright Brightness Very bright Button tone...
-
Page 20: Care And Maintenance
5 Care and maintenance Care and maintenance To minimize the risk of fire hazard regularly clean the filters! A thick coating of fluff can trigger the «A9 Clean filter and mats» (see page 22) error mes- sage. Cleaning the door filter and door filter mat Cleaning the door filter (each time after tumble drying) ▸... -
Page 21: Cleaning The Front Filter Mat (Annually)
5 Care and maintenance Cleaning the front filter mat (annually) If the «A9 Clean filter and mats» error message still appears after the door filter and the door filter mat have been cleaned, the front filter mat must also be carefully cleaned. ▸... -
Page 22: Cleaning The Temperature Sensor
6 Trouble-shooting Cleaning the temperature sensor ▸ Open the appliance door and remove the front grille 1. ▸ Clean the temperature sensor 2 with a damp cloth. ▸ Put back the front grille 1. Cleaning the appliance ▸ Wipe the outside of the appliance from time to time with a damp cloth and wipe dry. Trouble-shooting You may be able to trouble-shoot the following errors yourself. - Page 23 6 Trouble-shooting Display Possible cause Solution A9 Clean filter ▪ Door filter, door filter ▸ Check and and mats mat or front filter mat clean (see page 20) parts. are blocked. ▸ Press the button. ▸ Restart the programme. Insert door filter / ▪...
-
Page 24: Other Possible Problems
6 Trouble-shooting Other possible problems Problem Possible cause Solution The programme ▪ Door filter and/or door ▸ Clean (see page 20) door filter and/or takes signific- filter mat are blocked. door filter mat. antly longer than ▪ Very wet washing. ▸... -
Page 25: Spare Parts
7 Spare parts Problem Possible cause Solution The progress of ▪ The laundry is being ▸ No action is necessary. The laundry can the programme cooled down. be unloaded at any time as long as it is remains frozen at ▪... -
Page 26: Technical Data
8 Technical data Technical data Dimensions Ambient conditions Height 85 cm Permissible room temperature when appliance is in opera- Width 59.5 cm tion: 5 °C to 35 °C Depth 61 cm Weight 65 kg Electrical connection Pumping height of pump 1.2 m See identification plate: Dry load capacity 7 kg ▸... -
Page 27: Consumption Values
8 Technical data Consumption values The stated values for the programme duration and energy apply for the maximum stated ca- pacity with a wash spun at around 1200 rpm (corresponds to a moisture level of around 60%). A higher spin speed or a smaller load reduce them by around 20–30%. Automatic programmes Programme Load... -
Page 28: Drying Tips Saving Energy
9 Drying tips Drying tips Saving energy ▪ Spin the washing in the washing machine at a high spin speed before tumble drying. Mechanical draining in the washing machine is much more efficient than water evaporation in the tumble dryer. ▪... - Page 29 10 Disposal Disposal 10.1 Packaging Never allow children to play with packaging material due to the danger of injury or suffocation. Store the packaging material in a safe location or dispose of it in an environmentally-friendly way. 10.2 Safety Render the appliance unusable to prevent accidents caused by improper use (e.g. through children playing): ▸...
- Page 30 Notes...
- Page 32 General queries, accessories and service will require the serial number (FN) and ap- agreement V-ZUG will be happy to help you with any pliance designation to register your appli- general administrative or technical queries, ance. You will them on the identification to accept your orders for accessories and plate of your appliance.
Need help?
Do you have a question about the Adora TS WP and is the answer not in the manual?
Questions and answers