Advertisement
Table of Contents
- 1 Product Description
- 2 Mounting and Installation
- 3 General Connections
- 4 Wiring Harness Connections
- 5 During Installation
- 6 Wiring and Connections
- 7 General Controls
- 8 Adjusting Volume
- 9 Tuner Operation
- 10 Bluetooth Audio
- 11 Connecting Usb Devices
- 12 Connecting an Iphone
- 13 Troubleshooting
- 14 Specifications
- 15 International Warranties
- Download this manual
OWNER'S MANUAL
Thank you for purchasing a JL Audio MediaMaster®
Source Unit for your sound system.
This product has been designed and manufactured to exacting
standards in order to deliver years of musical enjoyment. For maximum
performance, we highly recommend that you have your MM50 installed
by an authorized JL Audio dealer. Your authorized dealer has the
training, expertise and installation equipment to ensure optimum
performance from this product. Due to the complexity of modern
vehicle systems, we do not recommend self-installation unless you have
extensive experience in automotive and marine electrical systems.
Should you decide to install this product yourself, please take the time to
read this manual thoroughly to familiarize yourself with its installation
requirements and setup procedures.
If you have any questions regarding the instructions in this manual or
any aspect of the product's operation, please contact your authorized
JL Audio dealer for assistance. If you need further assistance, please contact
the JL Audio Technical Support Department at technical@jlaudio.com
or call (954) 443–1100 during business hours.
Advertisement
Table of Contents

Related Manuals for JL Audio MediaMaster 50


Summary of Contents for JL Audio MediaMaster 50
- Page 1 If you have any questions regarding the instructions in this manual or any aspect of the product’s operation, please contact your authorized JL Audio dealer for assistance. If you need further assistance, please contact the JL Audio Technical Support Department at technical@jlaudio.com...
- Page 2 Protect Your Hearing! FCC Compliance Statement We value you as a long-term customer. This equipment has been tested and For that reason, we urge you to practice found to comply with the limits of restraint in the operation of this product Part 15 of the FCC Rules.
-
Page 3: Product Description
Safety Considerations Installation Applications • Install this product in a dry, well- This product is designed for operation ventilated location that does not with 12 volt, negative-ground electrical interfere with your factory-installed systems. Using this product in systems systems. If a dry environment is not with positive ground and/or voltages available, a location that is not exposed other than 12 volts may result in... - Page 4 The MM50 includes the following features: • Configureable zone feature/control • Water-resistant chassis and display (IP66 options include: rated) is built to withstand the elements Level Control Mode options for on-the- • Intuitive interface with easy-to-read, fly volume adjustments of all zones, high-brightness, 2.8-inch full-color LCD together or individually.
-
Page 5: Mounting And Installation
MOUNTING AND INSTALLATION Use a jigsaw or rotary tool to cut an The diagram below shows a typical opening in the mounting surface. mounting procedure into a fiberglass If necessary, use a file or sandpaper panel. Always follow proper safety to adjust the opening for proper procedures. -
Page 6: General Connections
GENERAL CONNECTIONS USB – USB Storage Media or iPhone® 5 or beyond ANT – Motorola® Style Antenna AUX-IN – To PreAmp Aux Source ZONE1 ZONE2 To Ampli er SUBWOOFER NMEA LEN 1 – NMEA 2000® Network (Micro-C connector) REMOTE – MediaMaster® MMR-20-BE or MMR-10W Remote Controllers (Sold Separately) ZONE 1&2 SPEAKER OUTPUTS Z1 L + ( White) –... -
Page 7: Wiring And Connections
WIRING & CONNECTIONS Label Wire Color Connection Connect to a switched positive (+12V) source. This can be an ignition controlled, accessory circuit or a vessel battery equipped with a main disconnect switch. For added control functionality, we also recommend +12VDC installing a dedicated toggle switch (not included) at this wire lead’s +12V connection point. - Page 8 GENERAL CONTROL FUNCTIONS Below is a list of general commands, including many common operations. The functionality of each control will vary depending on the current source and menu selected. Use this button to turn ON or OFF and to access the source selection menu. Source/ •...
-
Page 9: General Controls
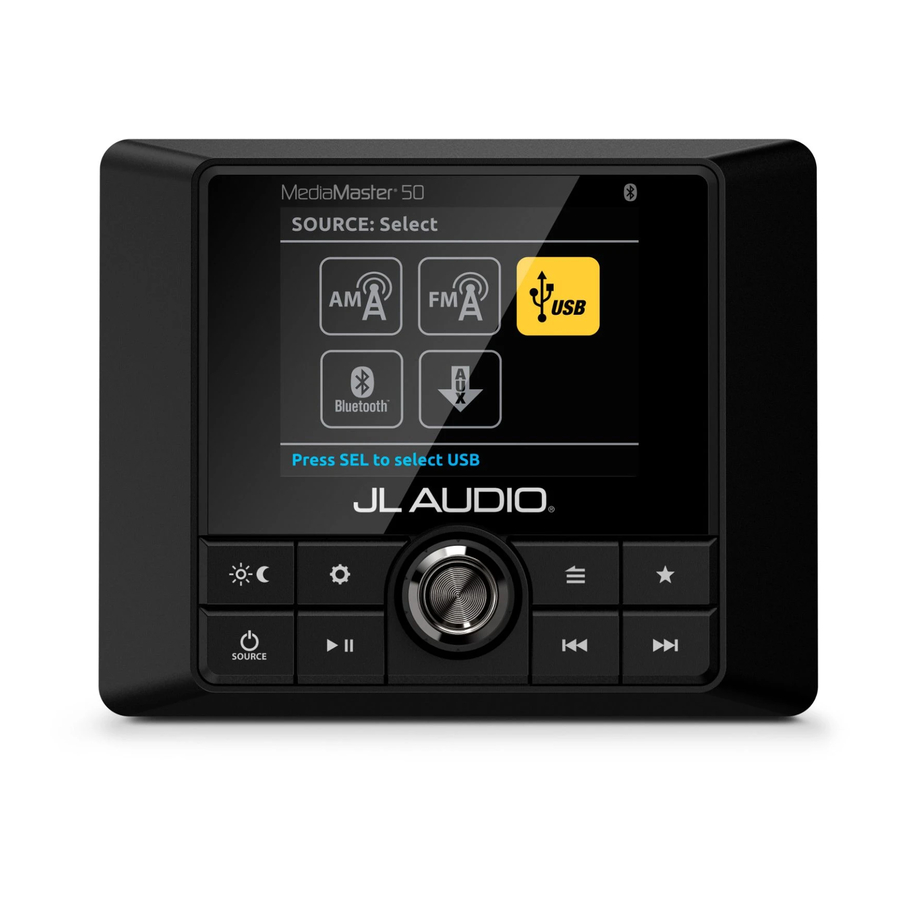
GENERAL CONTROLS Turning the Unit ON / OFF 1. Press to turn the unit ON. 2. Press and hold to turn the unit OFF. Selecting a Source 1. Press to access the SOURCE: Select menu. 2. Rotate the knob to highlight a desired source; press to select. Adjusting Volume knob is designed to be used as a main volume controller, allowing easy adjustment of the audio levels, for all zones simultaneously or for each zone... -
Page 10: Tuner Operation
Tuner Operation Tuning selections (AM/FM) can be made with the following controls: Press to: • Tune in the next frequency (AM/FM) Forward Press and hold to: • Seek to the next channel (FM) • Skip forward ten frequency steps (AM) Press to: •... -
Page 11: Bluetooth Audio
Bluetooth® Audio You may wirelessly stream audio from a Bluetooth® compatible device from up to 35 ft. away (11 m). Up to 8 devices can be paired to the MM50, but only one streaming device can connect at one time. Pairing a new device: on the MM50 to access the SOURCE: Select menu. -
Page 12: Connecting Usb Devices
Connecting USB Devices The USB port may be used to connect USB storage class devices (thumb drive, digital audio player, etc.). This USB connection also provides a 1A output for device charging. If this output is exceeded, an error message will display and the output will be disabled. -
Page 13: Connecting An Iphone
Connecting an iPhone® An iPhone® may be connected to the USB port using an appropriate Lightning to USB cable (not included). button and select USB from the SOURCE: Select Once connected, press the menu to access the connected device with the following controls: •... - Page 14 System Settings Main Menu This menu allows access the main 1. Press and hold to access the operational settings and features of System Settings: Main Menu. your MM50. Refer to the table below for 2. Turn the knob to highlight available settings and functionality.
- Page 15 Audio Zone Setup The MM50 includes two sets of line- The functionality of each zone is level RCA outputs for its main audio configurable via the Audio Zone Setup zones, plus a dedicated set of subwoofer menu, allowing you to customize the zone outputs, to send audio signals to listening experience for your vessel and aftermarket amplifiers/equipment.
- Page 16 Option Setting Function Simultaneous adjustment of all zones, with independent control of each zone’s relative offset level. The offset level of volume between each zone is easily adjustable, allowing you to create a Variable customized level controller, specific for your vessel’s layout and audio system design.
- Page 17 Optional Remote Controllers Optional NMEA 2000® Control Options Two contol options are available for your MediaMaster® (each sold separately) The MM50 is equipped with a using the REMOTE connection. Each NMEA 2000® connector (Micro-C) connnect directly using MediaMaster® to interface directly with NMEA controller cables and splitters (sold 2000®...
-
Page 18: Troubleshooting
NMEA®, NMEA 2000® and the NMEA 2000 logo are registered trademarks of the National Marine Electronics Association. The Bluetooth® word mark and logos are registered trademarks owned by Bluetooth SIG, Inc. iPhone® and Lightning are registered trademarks of Apple Inc. Use of all trademarks by JL Audio is under license. -
Page 19: Specifications
Specifications Electrical Specifications Operating Voltage 14.4V DC (10.4V – 15.8V) Current Draw / Fuse Value 15 A (max) / 100 mA (standby) / 15 A NMEA 2000® LEN 1 (Micro-C connector) Operating Temp Range -4 F to +158 F (-20 C to +70 C) Display Size / Type / Resolution 2.8-inch / TFT LCD backlighted / 320 x 240 Tuner... -
Page 20: International Warranties
Limited Warranty – Electronics (USA) JL Audio warrants this product to be free of defects in materials and workmanship for a period of two (2) years from the original date of purchase. This warranty is not transferable and applies only to the original purchaser from an authorized JL Audio dealer.
Need help?
Do you have a question about the MediaMaster 50 and is the answer not in the manual?
Questions and answers
JLA mm50 radio working except my subwoofer. Went into settings but still can’t adjust live volume, can only adjust dB on “SUB” but no sound from subwoofer
The JL Audio MediaMaster 50 subwoofer may not be producing sound despite adjusting the settings because the zone it is connected to might be set to "Off" or "Fixed" mode. In "Off" mode, the output level is disabled, and in "Fixed" mode, the output level is not affected by the volume knob. Ensure the connected zone is set to "Variable" mode and not disabled. Also, check that the zone output is not muted and that the subwoofer is properly connected.
This answer is automatically generated
Can you receive phone calls and speak throughout system
Find antennae connection