
Subscribe to Our Youtube Channel
Summary of Contents for Topcon DIGISTAR TMR4610
- Page 1 TMR4610 Operators Manual Ft. Atkinson, Wisconsin USA Panningen, The Netherlands www.digi-star.com D4208-EN Rev A September 27, 2017...
-
Page 2: Table Of Contents
Table of Contents Table of Contents 1.0 INTRODUCTION ......................4 2.0 TMR4610 SPECIAL FEATURES ..................5 3.0 ACCURACY STATEMENT ..................... 6 4.0 TECHNICAL SPECIFICATIONS ..................7 5.0 SAFETY DURING USE ....................8 6.0 FEED MANAGEMENT SOFTWARE ................9 7.0 INDICATOR OVERVIEW ....................10 8.0 OPERATION ........................ - Page 3 12.10 Change Time ......................34 12.11 Change Date ......................34 13.0 MANUAL PROGRAMMING OF RECIPES ..............35 13.1 Switch to Manual Programming ................35 13.2 Change Entry Method ..................... 35 13.3 Ingredient Re-name ....................36 13.4 Print Ingredients Names ..................36 13.5 Enter New Recipe ....................
-
Page 4: Introduction
Introduction 1.0 INTRODUCTION Thank you for your purchase of a Digi-Star TMR4610 scale indicator. Your TMR4610 is the culmination of more than 30 years of agricultural weighing engineering and expertise. With proper operation and preventative maintenance, the TMR4610 will last for many years. The Digi-Star TMR4610 is primarily designed for weighing agricultural animal feed products during the loading and unloading of mobile and stationary feed mixers. -
Page 5: Tmr4610 Special Features
TMR4610 Special Features 2.0 TMR4610 SPECIAL FEATURES Preset Weight The TMR4610 indicator provides simple to use and very useful Preset Weight feature. Using the numeric keypad, the operator can enter the desired weight of product that the operator wants to load or unload. Once loading or unloading begins the TMR4610 will count down to 0 (zero). -
Page 6: Accuracy Statement
Accuracy Statement 3.0 ACCURACY STATEMENT READ THIS SECTION BEFORE USING THE SCALE SYSTEM Digi-Star Scale Systems are designed and manufactured to provide the greatest accuracy possible. However, proper installation and use are required in order to obtain the highest level of accuracy. When using the scale system, the following must be considered to realize the best possible performance and accuracy. -
Page 7: Technical Specifications
Technical Specifications 4.0 TECHNICAL SPECIFICATIONS 10.25” long x 8.0” high x 4” wide (260mm x 190mm x 105mm) SIZE WEIGHT 4.5 lbs. (2.04 Kg) HELP MESSAGES Context sensitive help messages in 10 languages; Long messages are scrolled LOAD CELL 8 volts D.C. Nominal, Capable of driving ten 350 Ohms transducers, Short EXCITATION circuit proof AUTO TEMPERATURE... -
Page 8: Safety During Use
Safety During Use 5.0 SAFETY DURING USE Danger: Indicates an imminently hazardous situation that, if not avoided, could result in death or very serious injury. Warning: Indicates a potential hazardous situation that, if not avoided, may result in death or very serious injury. Caution: Indicates a potential hazardous situation that, if not avoided, may result in a minor injury. -
Page 9: Feed Management Software
Feed Management Software 6.0 FEED MANAGEMENT SOFTWARE TMR Tracker is a full-featured Windows based feed management system. TMR tracker also offers operators additional management tools including: Operator control, pen review, on line feed data exchange with nutritionists, ingredient tracking and numerous reports. TMR Tracker is an indispensable management tool for forward thinking operations. -
Page 10: Indicator Overview
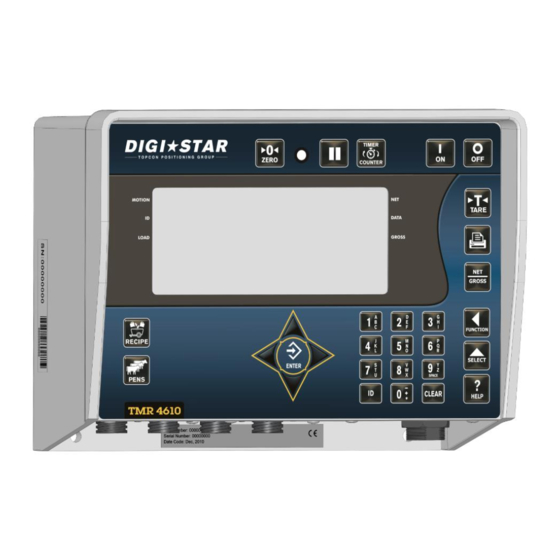
Indicator Overview 7.0 INDICATOR OVERVIEW - Press and hold for three seconds to zero balance. Pre-Alarm Light - Starts flashing and alarm sounds when weight is within preset limit. – Holds displayed weight when moving machine – Mixing timer runs down, alarm sounds / Rotation counter is added to count shaft rotations, alarm sounds. - Page 11 Indicator Overview – Clear the charactors on LCD (backspace) – Press in list mode to begin pen unloading. – Accepts change or proceeds to next item. Directional Arrows – Moves through list of information. Left arrow (-) and right arrow Keypad –...
-
Page 12: Operation
Operation 8.0 OPERATION 8.1 Turn on Scale 1. Press 11:58A 23NO 16 PRESS RECIPE TO LOAD 1. Enter User ID Number if required. 2. Press ENTER USER ID ON KEYPAD AND PRESS ID KEY TO USE SCALE 8.2 Zero Balance Indicator 1. -
Page 13: Tare And Net Gross
Operation 8.3 Tare and Net Gross Tare is a temporary zero (Net Weight), to display total weight (Gross Weight), Press 1. Weight displayed, Press sets zero weight. 1500 2. Display reads zero and flashing arrow on side of display points to NET. -
Page 14: Print Key
4. To show total of original weight of 1500 pounds plus added 400 1900 pounds, press flashing arrow on side of display points to GROSS. 8.4 Print Key 1. Press . Indicator sends data to printer or PC. Flashing arrow on side of display points to DATA. -
Page 15: Data Transfer
Data Transfer 9.0 DATA TRANSFER 9.1 USB Drive Mode To upload data: Insert USB Drive. 1. Press Note: When unused recipes are found on indicator, the indicator displays, Warning— unused recipes found in EZ —Press load new recipes from USB drive –Press exit. -
Page 16: Log In
9.3 LOG IN With the addition of the TMR4610 to the TMR batching family of indicators, a new feature was created. The Log In/Log Out feature could be used in the following scenarios. • Equipment failure – feedlines can be sent to a different indicator to be completed. -
Page 17: Log Out
9.4 LOG OUT METHOD #1 – Manual Mode 1. Repeatedly press the FUNCTION key until “LOG” is displayed. 2. Press and hold the FUNTION key. 3. The LOG screen will be displayed. PRESS 1 = LOG IN 4. Press the 2 key to perform a “log PRESS 2 = LOG OUT PRESS CLEAR TO EXIT out”... -
Page 18: Additional Settings
9.5 ADDITIONAL SETTINGS MEDIA STORAGE (MSTORE – D.A.N 6215) QSTART – Data is automatically SELECT uploaded/downloaded when media is installed. PRESS 1 = LOG IN MANUAL – Media does not need to stay PRESS 2 = LOG OUT installed into indicator. Transfer ENTER=DOWNLD CLEAR=EXIT is done manually by use of the USB >... - Page 19 MIMIC TYREL TCX-1300 (TC1300 – D.A.N 6221) This feature causes the indicator to weigh PARTFD and behave differently while batching. The ingredient or pen preset weight IF ON – RECORDS PRESET display includes all weight changes that WEIGHTS LIKE A TYREL TCX- have occurred since the last ingredient or 1300 INDICATOR pen weight was logged.
-
Page 20: Indicator Data Formats
Indicator Data Formats 10.0 INDICATOR DATA FORMATS Data sent to indicator sent in two formats: Complete Loads Mode: Each load built by PC software. It assigns pens to recipe and builds exact load for pens. Recipe and Pen List Mode: PC software sends recipe data and pen data in two different fields. -
Page 21: Resize Recipe Weight
Indicator Data Formats 10.2 Resize Recipe Weight Indicator gives option to resize pen load weight. 1. Enter new weight or keep original weight. 25000 2. Press ENTER NUMBER OF ANIMALS TO FEED ANIMAL 300 PRESET 20643 Note: Press to resize by number of head in pen. -
Page 22: Loading Recipe
Indicator Data Formats 10.3 Loading Recipe 1. First ingredient weight flashes in display. Load ingredient. 2. Weight approaches zero, alarm will flash FD – 1 CTR- 000 and sound. ING SOY ZN-0-REC MILK PRE-2760 G- 0 USE ADVANCE TO LOG 3. -
Page 23: Recipe And Pen List Mode
Indicator Data Formats 10.5 Recipe and Pen List Mode Starting a Recipe 1. Press 2. Display reads: RECIPE Example: R1- 25000 TOT- 50000 Line 1: RECIPE R1 R2- 20000 TOT- 18000 Line 2: R1 – 25000 TOT- 50000 R3- 20000 TOT- 10000 Line 3: R2 –... -
Page 24: Loading Recipe
Indicator Data Formats 10.6 Loading Recipe 1. First ingredient weight flashes in display. Begin loading ingredient. MIN1 2. Weight reached, alarm will flash and sound. 3. Manual Advance: Weight reached, Press Press again to start next ingredient. Auto Advance: When preset weight reached, indicator advances to next ingredient. -
Page 25: Advance Commands
Advance Commands 11.0 ADVANCE COMMANDS 11.1 Unload Partial Pens 1. Press DOWN arrow to advance to next pen without finishing current pen. Note: If pen tolerance is set and feeding stopped before preset weight reached, alarm sounds, Indicator displays: Pen underfed –... -
Page 26: Change Feeding Number
Advance Commands 11.3 Change Feeding Number 1. Press 2. Enter user number. 3. Press 4. Enter feeding number (1-9). 5. Press 11.4 Clear Scale Memory 1. To clear scale memory enter D.A.N. 8201, then press . Message will be displayed; On=Clear, Clear=Reuse, Net=exit Press to erase feeding memory. -
Page 27: Re-Use Recipe/Pen Data
Advance Commands 11.5 Re-Use Recipe/Pen Data 1. To re-use recipe/pen data enter D.A.N. 8201, then press CLEAR On=Clear, Clear=Reuse, Net=exit 2. Press to reuse recipe/pen data. Note: When re-using data stored in indicator, it takes recipe and pen information and removes completed weights loaded or unloaded and marks them undone. -
Page 28: Rotation Counter
Advance Commands 11.7 Rotation Counter The rotational counter is used much like the timer. It allows the indicator to count the number of revolutions of a mixer shaft and notifies the operator when a set count is reached. Note: First enter D.A.N. 4301, Press Choose TIMER or COUNTER, by pressing Then press 1. -
Page 29: Maintenance Message
Advance Commands 11.9 Maintenance Message Message can be used to alert the user of maintenance needed to be done on the equipment. Rotation Counter Sensor Kit--(p/n: 408088) needed for this feature. For proper maintenance schedule, refer to equipment operator’s manual(s). 1. -
Page 30: Add A Pen To Pen List
Advance Commands 11.10 Add a Pen to Pen List (List Mode Only) 1. Enter pen name or number CALF 2. Press 3. Press 1. Press UP or DOWN arrows to find desired recipe. RECIPE 2. Press 1. Enter amount to unload to pen. 6000 2. -
Page 31: Commonly Used Direct Access Numbers (D.a.n.)
12.0 COMMONLY USED DIRECT ACCESS NUMBERS (D.A.N.) 12.1 Pre-Alarm Select weight or percentage method, enter value to activate early warning indicator reaching preset. 1. Enter 4001 and press 4001 2. Press again to change between 3:02P 30JAN 17 WEIGHT and PERCENT. PRESS RECIPE TO LOAD 3. -
Page 32: Ingredient Tolerance
Commonly Used Direct Access Numbers (D.A.N.) 12.4 Ingredient Tolerance Sets weight “window” to accept loaded weight before auto advance. 1. Enter 6003 and press . Press 6003 again to choose desired percentage off, or any entered using 3:02P 30JAN 17 the keypad. -
Page 33: Scale Id Or Truck Id
Commonly Used Direct Access Numbers (D.A.N.) 12.7 Scale ID or Truck ID Each indicator has scale ID. 1. Enter 1003 and press 1003 2. Press and hold for three seconds 3:02P 30JAN 17 to erase old ID, enter the new ID. PRESS RECIPE TO LOAD 3. -
Page 34: Change Time
Commonly Used Direct Access Numbers (D.A.N.) 12.10 Change Time 1. Enter 1202 and press 1202 2. Press LEFT arrow to move cursor 3:02P 30JAN 17 3. Press UP arrow to set time. PRESS RECIPE TO LOAD 4. Press 12.11 Change Date 1. -
Page 35: Manual Programming Of Recipes
13.0 MANUAL PROGRAMMING OF RECIPES Three different Entry Methods for entering ingredients: Amount per Animal (this is the default setting) Allows entry of ingredient amounts required for feeding one animal. Indicator calculates preset amounts required for each ingredient. Percent (%) Per Load Enter ingredient amounts in (%). -
Page 36: Ingredient Re-Name
Manual Programming of Recipes 13.3 Ingredient Re-name Ingredient names are listed in a standard table and can be changed using the following steps: 1. Repeatedly press until rename displays. 2. Press quickly and hold for three RENAME seconds. 3. Then first ingredient is shown. Use UP or DOWN arrows to select ingredients to edit. -
Page 37: Enter New Recipe
Manual Programming of Recipes 13.5 Enter New Recipe 1. Press and hold until indicator beeps and displays program then REC - _ _ displays either first recipe programmed or rec_. 2. This indicates recipe number can be entered using keypad. Example;... - Page 38 Manual Programming of Recipes 8. Press RIGHT arrow to change pens. 9. Press UP & DOWN arrows to scroll PEN 7 available pens. 10. Press to select pen on screen. 11. Enter amount for pen. 12. Press to store amount. 13.
-
Page 39: Edit Recipe
Manual Programming of Recipes 13.6 Edit Recipe 1. Press and hold until indicator beeps and displays program. PROGRAM 2. Press UP or DOWN arrows until recipe number is displayed. 3. Press to edit this recipe. 4. First ingredient name displayed followed by amount. -
Page 40: Erase A Recipe
Manual Programming of Recipes 11. Press RIGHT arrow to display pens. Press LEFT arrow to display CORN ingredients 12. Press UP or DOWN arrow to scroll available ingredients or pens. 13. Press to select ingredient or pen. 14. Enter amount required. 15. -
Page 41: Review A Recipe
Manual Programming of Recipes 13.8 Review a Recipe 1. Press . Press UP and DOWN arrows to select recipe number. REC - 01 2. Press LEFT or RIGHT arrow and scale indicator will automatically step through ingredients, then return to recipe number. -
Page 42: Printing All Recipes
Manual Programming of Recipes 13.10 Printing All Recipes 1. Press displays first recipe. REC - 01 2. Press recipe. 3. Press again prints all recipes in memory. 13.11 Loading a Recipe REC - 01 1. Repeatedly press until recipe displayed. 2. -
Page 43: Other Functions
Other Functions 14.0 OTHER FUNCTIONS 14.1 Hold Hold mode prevents displayed weight from changing while moving mixer around. 1. Press HOLD 2. Press again, to return indicator to normal. 3. If weight is added while in hold mode press to cancel hold. Note: This feature is disabled on all legal for trade systems. -
Page 44: Options Changed By User
15.0 DIRECT ACCESS NUMBERS (D.A.N.) 15.1 Options Changed by User To display menus 1, 2, 3, 4, 5, 6 and Calibrate: 1. Repeatedly press until MENU is displayed. 2. Press and hold 3. Repeatedly press to select Menus1, 2, 3, 4, 5, 6 or Calibrate. 4. - Page 45 SETTING D.A.N. OPTIONS [displayed] DESCRIPTION [display] BOLD=DEFAULT 1=General Select weigh method. The WEIGH METHOD 1005 2=Fast speed the weight changes as W MTHD shown on the LCD. 3=Slow 1 PRESS ZERO If ON -press and hold Zero 1006 ON/OFF key to Zero/Balance scale. 1 ZERO Indicator turns off after AUTO OFF...
- Page 46 SETTING D.A.N. OPTIONS [displayed] DESCRIPTION [display] BOLD=DEFAULT OPEN, --, +, *,0, 1,2,3, REMOTE SWITCH 4,5,6,7,8,9, A, B, C, Message that is displayed for MESSAGE remote input switch condition. 1402 D, E, F, G, H, I, J, K, L, D.A.N. 1401 set to “switch”. M, N, O, P, Q, R, S, T, U, RI IMSG -V, -W, -X, -Y, -Z...
- Page 47 SETTING D.A.N. OPTIONS [displayed] DESCRIPTION [display] BOLD=DEFAULT DDL ATTACHED Enables connection of a DDL 2004 YES/NO (Data Down-Loader) SCOREBOARD 0,1,2,3,4,5,6,7,8,11,12,15,27,37,38 MODE 2101 Select scoreboard output SCOREM Weight displayed= Then press Allows zero/balance for ZERO OUTPUT 2102 ZERO key and hold for three SCOREM #11 serial gross ZEROUT seconds.
- Page 48 SETTING D.A.N. OPTIONS [displayed] DESCRIPTION [display] BOLD=DEFAULT AUTO PRINT If ON -pressing keys auto- 2303 ON/OFF prints weight values. APRINT AUTO, WTONLY, DOWNLD, DT+TM, ID+TM, IDWTTM, Select alternate & comma BATCH1, PRTAC1, PRTAC2, (CSV) formats. PRINT FORMAT 2304 PRTAC3, PRWTRC, PRTFMT WTRCTM,3200-A, 3200-B, SCLABC,32-TMR, FDINFO,...
- Page 49 SETTING D.A.N. OPTIONS [displayed] DESCRIPTION [display] BOLD=DEFAULT Enter the weight to active WM1 ADJUST 3 quick response weight 3005 4000 Default-10% of scale WMA1-3 capacity WM2 ADJUST 1 30, value must be less than 100 Increase this number to 3006 and more than 2.
- Page 50 SETTING D.A.N. OPTIONS [displayed] [display] BOLD=DEFAULT DESCRIPTION Set time delay before the GROSS SET POINT 4103 +12VDC Alarm Output Can DELAY ( SETDEL Turn On/Off. Set a gross weight in long GROSS SET POINT form that will activate 4104 5000 +12VDC Alarm Output on SETPNT Power cord.
- Page 51 SETTING D.A.N. OPTIONS [displayed] DESCRIPTION [display] BOLD=DEFAULT Sets printer port PRINTER PORT OFF, COM1, COM2, COM3, 5005 COM4 PRPORT SCOREBOARD Sets scoreboard port OFF, COM1, COM2, COM3, PORT 5006 COM4 SCPORT OPSTAT PORT OFF, COM1, COM2, COM3, 5007 Sets op-stat port COM4 OPSTAT Sets DDL port...
- Page 52 SETTING D.A.N. OPTIONS [displayed] DESCRIPTION [display] BOLD=DEFAULT PEN TOLERANCE Enter value to accept pen as completed. 6006 PTOLER BATCH If ON – prevents auto- TOLERANCE OFF, ON advancing if preset exceeds OVERLOCK 6007 tolerance BOVRLK BATCH ADVANCE Select seconds to delay 0, MANUAL DELAY before advancing to next...
- Page 53 D.A.N. OPTIONS [displayed] SETTING DESCRIPTION BOLD=DEFAULT [display] 1-amount/animal, 2- ENTERY METHOD Select batching method. percent/load, D.A.N. 6054 set to 6101 “SCALE”. E MTHD 3-amount/load DISPLAY SCOOP % If ON - displays scoop OFF, ON percentage to load. D.A.N. 6102 6054 set to “SCALE”. SCOOP % INGREDIENT If ON - displays ingredient...
- Page 54 SETTING D.A.N. OPTIONS [displayed] DESCRIPTION [display] BOLD=DEFAULT DOUBLE KEY Ignore extra INGR ADVANCE OFF, ON keys while feeding. 6204 DBLKEY RECIPE REMAIN ACTIVE Allows recipes to be RE- OFF, ON USED for another load. 6205 RE-USE RECIPE ENTRY RECIPE, BATCH# Select recipe start method - METHOD recipe name or batch...
- Page 55 SETTING D.A.N. OPTIONS [displayed] DESCRIPTION [display] BOLD=DEFAULT If ON –Feed-lines sent from RANGE TEST OFF, ON Data-Link are marked "done". 6216 R-TEST Valid when using Data-Link System. AUTO START PENS OFF, ON If ON -Starts Pens List after Recipe is loaded. 6217 AUTPEN FEED ZONE...
- Page 56 SETTING D.A.N. OPTIONS [displayed] DESCRIPTION [display] BOLD=DEFAULT MENU 8.1 – CALIBRATION DEAD WEIGHT CAL Calibration method using 8121 Follow instructions shown on LCD weights WT CAL TEMPERATURE On=Scale adjusts for CALIBRATION temperature changes 8123 OFF/ON T CALB CALIBRATION Calibration method used for MATCH 8124 ENTER KNOWN WEIGHT...
- Page 57 SETTING D.A.N. OPTIONS [displayed] DESCRIPTION [display] BOLD=DEFAULT MISCELLANEOUS UTILITIES KEYTEST 8888 Enables front panel key test Enables clock – press any CLOCK 8997 key to return to weighing mode. D4208-EN TMR4610 Operators Manual...
-
Page 58: Installation
Installation 16.0 INSTALLATION 16.1 Indicator Mounting For most applications, the equipment manufacturer provides the necessary mounting system and hardware, and mounts the Indicator for the End User. Digi-Star provides several mounting options that allow the end user to customize the location and placement of the Indicator. - Page 59 Installation RAM MOUNT PART DESCRIPTION NUMBER KIT-1.5” RAM MOUNT WITH BOLT-ON BASE WITH HARDWARE 404799 KIT-1.5” RAM MOUNT WITH DUAL U-BOLTS (FITS 0.5”-1.5” ROUND) 407544 KIT-1.5” RAM MOUNT WITH TRIPLE SUCTION CUP BASE 407434 SIDE & UNIVERSAL MOUNTS PART DESCRIPTION NUMBER 408880 Mount for Large Indicators with hardware and magnet...
-
Page 60: Cable Connections
Installation 16.2 Cable Connections For accurate and reliable operation care, should be taken when routing and connecting cables to the Digi-Star Indicator. • Cables should be secured and protected from damage and abrasion. Long cables should not “hang” by the cable connector at the Indicator but should be •... - Page 61 Installation Indicator Connection Diagram Pin To 12VDC Power Supply +Terminal Black -Terminal Orange Alarm Out Scale Indicator Blue Remote Input Remote Indicator (Option) Power Supply See Indicator Connection Diagram See Junction Box Connections D4208-EN TMR4610 Operators Manual...
- Page 62 Installation Power Cord Remote Indicator Digital Input/ J-Box Connection Output Connection Connection Connection (Optional) Bottom Panel Cable Connections TMR4610 Operators Manual D4208-EN...
-
Page 63: Connecting Load Cells To Junction Box
Installation 16.3 Connecting Load Cells to Junction Box Connect load cell wires J-Box Illustrated for 4 Load to terminal blocks. See Cells to be installed. wire color chart. Wire Color Key Color Description White Signal + Green Signal - Excitation + Black Excitation - Shield... -
Page 64: Optional Equipment
Optional Equipment 17.0 OPTIONAL EQUIPMENT Features • Wireless remote with full key control of 17.1 Cab Controls (Wireless) indicator on mixer • Mount remote in easy view of loading • Improves loading accuracy Functions • Communicates with multiple mixers Specification •... -
Page 65: Remote Indicators
Optional Equipment 17.4 Remote Indicators RD440 small remote display RD2400V backlit remote display with 1.7” high numbers RD2400V backlit remote display w/transmitter and installed receiver RD2400 backlit remote display with 1” high numbers RD2400 backlit remote display w/transmitter and installed receiver RD4000 remote display 17.5 Rotation Counter Sensor (Kit p/n: 408088) Use with TMR4610 indicator. -
Page 66: Declaration Of Conformity
Declaration of Conformity 18.0 DECLARATION OF CONFORMIT TMR4610 Operators Manual D4208-EN... -
Page 67: Notes
Notes 19.0 NOTES D4208-EN TMR4610 Operators Manual... - Page 68 TMR4610 Operators Manual D4208-EN...
Need help?
Do you have a question about the DIGISTAR TMR4610 and is the answer not in the manual?
Questions and answers