Table of Contents
Advertisement
Quick Links
Outdoor Use Only
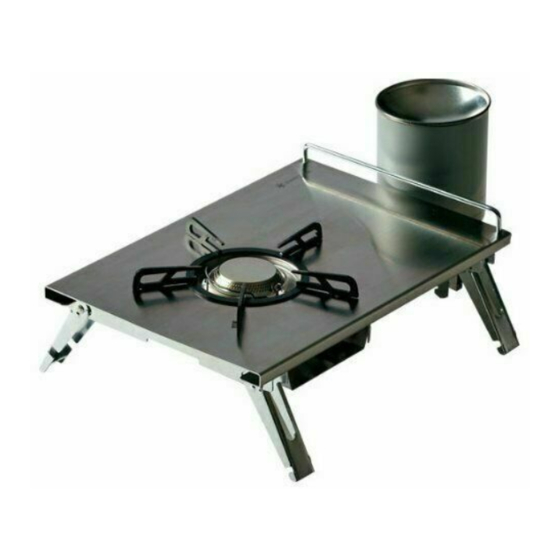
GigaPower Plate Burner LI
- Baja Burner -
Instruction Manual
Thank you very much for purchasing Snow Peak product.
Before Using this product, be sure to read these instructions
carefully and use the product correctly and safely. After
reading these instructions, keep this manual in a safe place
for future reference. Although this product is expected to be
complete and safe, please check all accessory items and
practice assembling and handling it in a safe location prior to
use in the field.
If you find anything in the instruction manual that is difficult to
understand, or if you find a defect in a product, stop use
immediately and please contact to the dealers where you
purchased the product or Snow Peak Customer Service.
Contents Include
Burner
Carrying Case
Instruction Manual
Pot Support
Name of Parts
Top Plate
Burner Head
Generator
Bottom Plate
Auto Igniter
Rotaiting Arm
Fuel Hose
Fuel Canister Joint Parts
Joint Parts Holder
All cumbustion appliancescreated by Snow Peak are required to
pass throughgoing burning tests before shipment. Therefore,
please understand that there may be a slight tarnish on the pot
support and burner head.
Specifications
Product Name
Canister Stove (Detachable Type)
Model
GS-400
Burner / Stainless Steel, Steel, Brass,
Aluminum
Material
Case
/ Nylon
External
L 18.5 W 12.4 H 5.1 in
During Use
Dimensions
Stowed
L 14.2 W 9.8 H 3.9 in
Usable pots
Weight
6.0lbs (2.7 kg)
Diameter
- up to 14cm (9.1 in)
Gas Consumption
9.0oz (254g)/h
(No Dutch Ovens)
Weight
Heat Output
12,000 BTUs
- Up to 5.0 Liter (169 fl oz)
Please use Snow Peak designated
Compatible
fuel canister only.
Fuel Canisters
Country of Origin
MADE IN KOREA
Gas consumption and heat output is measured and calculated
in accordance with In-house testing methods.
Use the Snow Peak gas canisters as shown on the above table.
Set up and Use
When assembling, please choose a flat surface and do not
attach to a dirty or dusty fuel canister.
Assemble the four legs.
Rotate the four legs at both
side of main body with your
hand and wake them up.
Leg Base
Rotate slowly until the leg hits the leg base.
Assemble the flame control
Slide Ring
valve. Rotate the flame
Axis B
control valve and straighten
the axis A and the axis B.
Slide the slide ring
Slide the
backward (in the direction
ring
backwards
of the arrow) to assemble
the flame control valve.
Axis A
Flame
Control
Caution:
At this point you can not assemble flame
control valve unless you assemble the legs.
Rotate the rotaiting arm to set up. Lift the handle and rotate
the rotating arm fixed to the joint stopper to raise it.
Put the stove in horizontal position and press the joint stopper
on the joint holder and slide the fuel canister joint parts in
the direction of arrow to remove it.
Rotating Arm
Joint
Holder
Joint
Stopper
Fuel Canister
Joint Parts
Fuel Canister Mounting
Warning:
Make sure the flame control is
completely closed.
Have the connector of
fuel canister face up and
connect with Fuel Canis-
ter Join Parts.
Caution:
Handle
When mounting fuel canister,
have the fuel canister in an
up-right position.
(Connector face up)
Slowly turn fuel canister in a counter clockwise
motion, making sure that the canister is tight-
ening.
Legs
Warning:
When installing and removing canister, there will be
some gas that escapes. Only install or remove canister
in a well ventilkated area, as there is a chance of fire.
Lighting Stove
Check 2-3 times that the
Flame Control Valve
igniter is surely dischage.
Slowly turn flame control
counter
clockwise
when looking directly at the
control. After ejecting a
small amount of gas, push
the igniter button. After
igniting a few seconds, the
generator warms up and the
flame power stabilizes.
Warning
Caution:
Caution:
After
the
flame
slowly lower the Fuel Canister
Joint Parts.
Align
the
groove
canister Joint Parts with the
groove of the Joint Holder and
push it in the direction of the
arrow. Make sure the Joint
Stopper is securely fixed to the Fuel Canister Joint Parts.
Caution:
Adjusting the flame
When the flame control valve is rotated counter
clockwise (turn left), the flame become larger and when
it is rotated clock wise (turn right), the flame become
smaller. Turn flame control valve slowly.
Extinguishing the flame
Push
down
Stopper and Pull the Fuel
Canister Joint Parts in the
Leg
direction of arrow.
Slowly raise the fuel canister
upright (the Fuel Canister
Joint Parts on top side) and
Revolve the flame control valve slowly
clockwise (turn right) until it stops.
Removing the fuel canister
Slowly rotate the fuel canister
clockwise with the Fuel Canister
Joint Pats facing up and separate
Pull up
the Fuel Canister Joint Parts and
the valve
fuel canister
Warning:
Handle
Stopper
Please use this stove
with only Snow Peak
designated fuel
cancanisters.
Operation
(Left)
Auto
Flame Control
Igniter
Valve
Never deform the generator pipe.
Deformation causes abnormal
combustion.
If the stove does not ignite with auto
igniter after releasing gas for 2
seconds, turn off the stove and wait
until there is no more gas smell. When
it does not ignite easily, we recommend
using a long nozzle lighter.
The igniter reacts differently depending
on altitude and weather and may not
ignite properly. Always carry extra
matches.
stabilizes,
of
Fuel
Fuel Canister
Joint
Joint Parts
Joint
Holder
Stopper
When igniting and extinguishing the stove,
make sure to have fuel canister in an upright
position
the
Joint
Fuel Canister
Joint
Joint
Joint Parts
Holder
Stopper
Always put the cap on the fuel canister
before storing it.
Storing Stove
Store in the reverse order of assembling.
(Rotating Arm →Flame Control Valve→Legs)
Makaking sure not to bend the fuel hose at a sharp
angle, put the stove in carrying case.
Maintenance
Attaching and detaching the Pot Support
Place the protrusion under the Pot Support in the hole
of Top Plate and rotate Pot Support counterclockwise.
Make sure the Pot Support is mounted securely as
shown on figure.
Pot
Support
Protrusion
Top Plate
When dirt or dust adhere, wipe it clean with cloth.
Caution:
At the oart get high temperature, the
coating of Pot Pupport will peel off.
Caution:
Do not pur water on Burner Head.
That may cause rust inside of Burner Head and
may cause abnormal combustion.
Check the fuel canister joint O-ring (interchangeable)
each time before use. If there is any damage or wear,
stop use and contact dealer or Snow Peak Customer
Service.
After washing the Pot Support or when it gets wet,
wipe off the water and dry throughly.
Although this product is made of stainless steel, it may
rust depending on usage conditions.
Trouble Shooting
Sympton
Cause
Improper mounting of
Make sure the fuel
Gas leakage
fuel canister.
canister
correctly.
The fuel canister joint
O-ring is damaged.
Stop using immediately
Gas is leaking from other
than the fuel canister
connection. part.
Clogged burner head.
Clean the burner head to
Stove does
not ignite
remove the clogging.
Replace the fuel canister
Low fuel level in fuel
Low heat output
with a new one.
canister.
Clogged burner head.
Clean the burner head to
Uneven flame
remove the clogging.
Low fuel level in fuel
Clean the burner head to
Flame extinguishes
canister.
remove the clogging.
during operation.
Replace the fuel canister
Clogged burner head.
with a new one.
Turn the flame control valve
Flame does not
Flame controle valve is
clockwise until it stops.
distinguish.
not closed completely.
Red
flame
appears
The red flame around auto
around auto igniter.
igniter is a flame reaction by
material of auto igniter.
Water or food boiled
Clean the burner head to
over is remaining on
Red Flame
remove the clogging.
burner head.
The red flame around pot
Red
flame
appears
support is a flame reaction
around pot support.
by material of pot support.
Auto Igniter does
The wire is disconnected.
Reseat the wire.
not spark
Low fuel level in fuel
Replace the fuel canister
with a new one.
canister.
Clean the burner head to
Auto Igniter sparks
Clogged burner head.
remove the clogging.
but does not ignite
Auto igniter is not in proper
position. ( Proper distance
Adjust the auto igniter
between tip of igniter and
tip.
metal mesh is 3-4 mm )
Discolorations is caused
Discoloration of burner
by combustion and this
head, pot support and
is not a malfunction.
Top Plate.
This is due to the structure
I n t e r m i t t e n t
of product and it is not
combustion noise
malfunction.
When these solution does not work...
Stop using this product immediately and contact the dealer where you
purchased the product or Snow Peak Customer Service.
Please check through the above symptoms and causes, and if
malfunction persist or the cause is not clear, contact the retailer
where you purchased the product or Snow Peak Customer
Servise.
In case the flame does not extinguish, make sure it is in a safe
location and allow it to burn until the gas is used up.
Warranty
Snow Peak guarantees its products against manufac-
turer defects. We have made every effort to ensure our
products are free from any defect or flaws. In the rare
event that you feel this product has a defect or needs
repair, please contact Snow Peak Customer Service or
go to your local Snow Peak dealer where you purchased
this product. Snow Peak will not be able to replace this
product in any damages occurred due to any of the
following:
1. Material quality has changed due to aging of product.
2. Damage by altering or careless handling.
3. Damaged due to improper handling which is prohibited
as shown in instructons.
4. Products failure due to user accidents.
5. Any damage except with product defect due to
manufacturing.
6. Damage by dirt and rust.
7. Damage by dismantling.
8. Deformation and failure of parts damaged by dropping
or other similar incidents.
9. Product failure due to wear and tear by user.
10. Damage caused by improper use with other products.
Solution
is
mounted
Advertisement
Table of Contents

Related Manuals for Snow Peak GS-400


Summary of Contents for Snow Peak GS-400
-
Page 1: Trouble Shooting
In the rare event that you feel this product has a defect or needs Use the Snow Peak gas canisters as shown on the above table. When igniting and extinguishing the stove,... - Page 2 Reason Use for such as heating or drying ■ Reason ■ Snow Peak fuel canister are not made to be avoid danger. clothes may lead to such unexpected accidents as fire, burns, and oxygen deficiency.
Need help?
Do you have a question about the GS-400 and is the answer not in the manual?
Questions and answers