Table of Contents
Advertisement
Advertisement
Table of Contents

Related Manuals for Vinten Osprey Elite Studio 3574-3C

Summary of Contents for Vinten Osprey Elite Studio 3574-3C
- Page 1 Osprey Elite Vinten Camera Control Solutions...
- Page 2 All rights reserved throughout the world. No part of this document may be stored in a retrieval system, transmitted, copied or reproduced in any way including, but not limited to, photocopy, photograph, magnetic or other record without the prior agreement and permission in writing of Vinten Broadcast Limited. Vinten is a registered trademarks of Vinten Broadcast Limited.
-
Page 3: Safety - Read This First
Safety - read this first Warning Symbols in this Operators Guide Where there is a risk of personal injury, injury to others, or damage to the ped- estal or associated equipment, comments appear, highlighted by the word WARNING! and supported by the warning triangle symbol. Warning symbols on the pedestal On encountering the warning triangle and open book symbols it is imperative that you consult this operators guide before using this pedestal or attempting... -
Page 4: Usage
For full details on maintenance and spare parts, please refer to the Osprey Elite Pedestal Main- tenance Manual and Illustrated Parts List - Publication Part No. 3574-9.These are obtainable from Vinten Broadcast Limited or your local Vinten distributor. For information on-line, visit our website www.vinten.com. -
Page 5: Table Of Contents
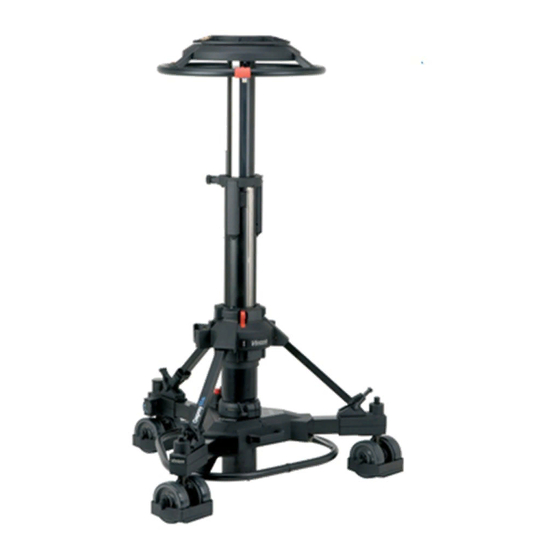
Pressurizing from an external pressure source ....... 12 Pressurizing the pedestal using the Vinten portable pump ..... . 13 Balancing the load . - Page 6 (25) (24) (23) (22) (21) (20) (19) (18) (17) (10) (11) (16) (15) (14) (13) (12) Osprey Elite Pedestal...
- Page 7 Osprey Elite Pedestal Four-bolt mounting plate Pressure gauge Weight tray Steering indicator Moving column Safety catch Trim weight Short strut Skid clamp (10) Foot support and strap (11) Wheel brake foot-button (12) Cable guard (13) Kick bar (14) Outer Tube (15) Crab/steer changeover foot-button (16)
-
Page 8: Introduction
Two versions of the skid are available. The OB skid has 160mm (6.3in.) wheels. The studio skid has 125mm (5in.) wheels with cable guards (12). The Vinten heavy-duty tracking skid, designed for use on 620mm track, may also be used with the Osprey Elite pedestal. -
Page 9: Operation
Operation Assembling the pedestal Turn the skid upside-down, depress the leg locking plungers and swing each folding leg out until the plungers lock the legs in the fully open position (See Changing the skid tracking width). Fit the kick bar (13), which is secured by three sliding catches on the underside of the centre cast- ing. -
Page 10: Fitting The Load
Apply the on-shot clamp (22). Fit the pan and tilt head and tighten the bolts securely using a flat-bladed screwdriver or a spanner of the correct size. A Vinten spanner, Part No. J551-001, is available for this pur- pose. Set the safety catch slide... -
Page 11: Pressurizing The Pedestal
Pressurizing the pedestal The Osprey Elite may be pressurized from an external pressure source or by using the Vinten portable pump (Part No. 3357-3). Trim weights are provided for fine balance. Ascertain the payload to be fitted to the pedestal (payload = pan and tilt head, camera, lens and all ancillary equipment). -
Page 12: Pressurizing From An External Pressure Source
Do not exceed the maximum working pressure, indicated by the leading edge of the red sector on the gauge (2). Disconnect the charging line, but do not refit the Schrader valve cap at this stage. (P.1) (P.5) (P.2) (P.4) (P.3) Vinten Portable Pump... -
Page 13: Pressurizing The Pedestal Using The Vinten Portable Pump
The pedestal is fitted with a pressure relief valve as a safeguard against over-pressurization. Do not attempt to adjust the pressure relief valve. To pressurize the pedestal using the Vinten portable pump, proceed as follows: Set the safety catch slide to ON (I) and fully depress the moving column until the safety catch engages. -
Page 14: Balancing The Load
Balancing the load After pressurization of the pedestal, the pan and tilt head and payload can be accurately balanced, as follows: Push down on the steering ring (23) against residual pressure and release the safety catch (6). Allow the column to extend under hand restraint. Exercise the moving column over its full travel at least twice, then position the column in the mid-height position. -
Page 15: Using The Osprey Elite Pedestal
Using the Osprey Elite pedestal Height adjustment The column has an on-shot stroke of 770 mm (30 in.) and the load can be moved over this dis- tance, in perfect balance, by raising and lowering the steering ring (23). The movement is adjust- able for drag (21) and an on-shot clamp... -
Page 16: Steering Tiller
Steering tiller The steering tiller (Part No. 3329-21) provides an alternative means of steering the skid. It is par- ticularly useful when the skid is fitted with a head-to-skid adapter or fixed column, or when a grip or assistant is required to manoeuvre the pedestal. The tiller is fitted as follows: Unscrew and remove the round cap (17) -
Page 17: Changing The Skid Tracking Width
Changing the skid tracking width The movable skid legs can be set to either of two positions. Position 1 is for normal use and gives maximum stability. Position 2 provides a reduced width for tracking through narrow doorways etc. WARNING! To ensure maximum stability when the skid is set to narrow track, particularly when moving over uneven ground, reduce pedestal height to a minimum To change the tracking width:... -
Page 18: Optional Wheels
Optional wheels A set of 160 mm (6.3 in.) wheels (Part No. 3329-30) is available to convert the skid from studio to OB use. A set of 125 mm (5in.) wheels with cable guards (Part No. 3329-43) is available to convert an OB skid to a studio skid. - Page 19 Apply the on-shot clamp (22). Undo the four mounting bolts and remove the pan and tilt head. To avoid the possibility of dust or abrasive particles collecting on moving components, re- lease the on-shot clamp (22), set the column to minimum height and engage the safety catch (6).
-
Page 20: Servicing
Servicing General The Osprey Elite pedestal is robustly made to high engineering standards and little attention is required to maintain serviceability save regular cleaning. Attention to the following points will en- sure a long and useful service life with minimum need for repair. Cleaning During normal studio use, the only cleaning required should be a regular wipe over with a lint-free cloth. -
Page 21: Skid Clamp Adjustment
Skid clamp adjustment To adjust the skid clamp: The skid clamp is applied or released by turning the handle clockwise or counter-clock- wise. The handle has a pull-off/push-on ratchet adjustment. To take up wear, pull the han- dle away from the spindle, rotate counter-clockwise and release. Repeat the above procedure, as necessary, until the clamp locks when applied but allows free movement when released. -
Page 22: Parts List
Parts list The following lists include main assemblies, user-replaceable spare parts and optional accesso- ries. For further information regarding repair or spare parts, please contact Vinten Broadcast Ltd or your local distributor. For information on-line, visit our website at www.vinten.com. -
Page 23: Technical Data
Technical data STUDIO Payload 75 kg 75 kg (165 lb) (165 lb) Column weight 24.5 kg 24.5 kg (54 lb) (54 lb) Skid weight 21 kg 21 kg (46.2 lb) (46.2 lb) Trim weights 3 kg 3 kg (6.6 lb) (6.6 lb) Total pedestal weight 48.5 kg...
Need help?
Do you have a question about the Osprey Elite Studio 3574-3C and is the answer not in the manual?
Questions and answers