
Summary of Contents for Centurion Code lock YL-99
- Page 1 Programming and Installation Instructions Passed ISO9001-2000 international system ratification...
-
Page 2: Master Code
ACCESS CODE INSTRUCTIONS The YL-99 electronic lock is capable of storing up to 10 access codes; 1 Master code, 1 Passage code and 8 User codes. All codes are allocated a starting number or sequence number. The master code is ‘0’, the passage code is ‘9’ and the user codes are ‘1-8’. -
Page 3: Changing The Master Code
CHANGING THE MASTER CODE USER CODES AND PASSAGE CODES Step 1. The user and passage codes can be any number and combination of ‘0 - 9’ with a maximum of 15 digits. Enter the default master code (‘0123’) or the current master code, and press the ‘#’... -
Page 4: Changing User Codes
SETTING THE USER CODES AND CHANGING USER CODES PASSAGE CODE contd . . . In addition to the master code, each user code has the Repeat these steps until all eight user codes and the ability to change their own code. passage code have been successfully set. -
Page 5: Deleting A User Code
PASSAGE MODE DELETING A USER CODE - ONE DIGIT ACCESS If you want to delete all user codes. Step 1. The YL-99 has the ability to be set to passage mode by Enter the master code and press the ‘#’ key. entering a passage code. -
Page 6: Battery Information
ENCRYPTION USER CODE AUDIT TRAIL This function is an added security feature which is aimed The lock will record the last 50 events. at preventing codes being observed while being Please contact your distributor for more information. entered. Step 1. BATTERY INFORMATION Enter the first digit of the code you want to enter. -
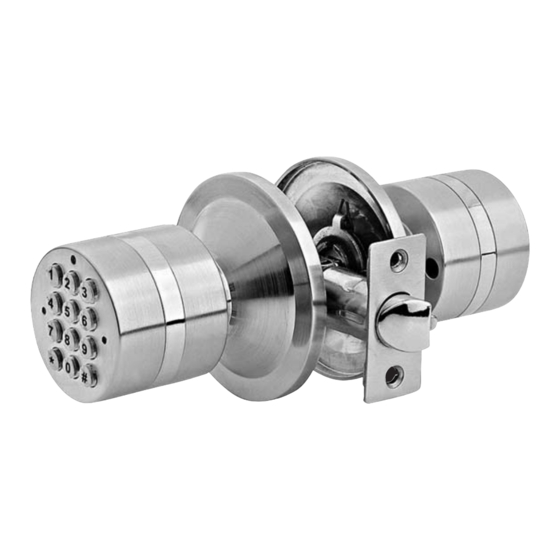
Page 7: Lock Components
LOCK COMPONENTS A : Outside Knob F : Battery Box L : Latch Faceplate B : Outside Rose Plate G : Inside Knob Cover M : LED Indicator C : Latch Assembly H : Cover Plate Screws N : Keypad D : Inside Rose Plate J : Strike Plate P : Emergency Power Jack... -
Page 8: Installation Instructions
INSTALLATION INSTRUCTIONS Step 1. Mark Door Step 3. Install Latch Using template, mark Insert latch into hole and hole on both sides of mark a line around edge of door at required latch plate and remove backset, then mark latch. (Fig. 3a) latch hole on door Chisel approx. - Page 9 Step 4. Install Strike Step 6. Install Inside Knob Feed power cable through Close door and mark horizontal centre of latch on to door hole in knob and guide frame. Mark vertical line where door edge meets frame spindle into handle. (Fig 6a) and measure in half of door thickness to find vertical centre.
- Page 10 Dealer of Centurion Code Lock . It is not transferrable or assignable. Centurion International Wholesalers Pte. Ltd. will not cover the cost of removal or re-installation of the Centurion Code Lock . Centurion International Wholesalers Pte. Ltd. will not cover the cost of transport of the unit to and from your Authorised Code Lock Dealer.
- Page 11 Stick template to door, aligning fold correctly on door edge.
- Page 12 Distributed by: Centurion International Wholesalers Pte. Ltd. 52 Horne Road #02-01 Singapore 209071 info@centurioncodelock.com.au www.centurioncodelock.com.au...
Need help?
Do you have a question about the Code lock YL-99 and is the answer not in the manual?
Questions and answers