Advertisement
Quick Links
g2.0 PEDOMETER
USER GUIDE
/INSTRUCTION MANUAL
4. GETTING STARTED
ACTIVATING YOUR PEDOMETER
1 From the My Home page, in the right hand column, click on the
"Register" button to download the GearSync software and activate
your pedometer.
NOTE: if you have already registered a previous Humana pedometer, click on
the "Manage Pedometer" button and follow the prompts to update the system
with your new pedometer.
2 Follow the steps in the browser window to complete download and
installation.
3 Connect the pedometer by extending the USB connector and inserting
into a USB port on your computer.
4 Select the "Start" button to begin your pedometer activation process.
5 When prompted, select "Finish." You will see a "SUCCESS" notice.
Your pedometer is now activated.
NOTE: To program your pedometer and personalize settings, see instructions
on opposite side.
SYSTEMS REQUIREMENTS:
• Mac, IBM®, or compatible PC
• OS 10.6, OS 10.7, Windows
®
XP, Vista, Windows
®
7
• USB 1.1 or greater and an Internet Connection
• Microsoft® Internet Explorer 7 and above, Safari (or compatible browser)
1. INTRODUCTION
Your Humana g2.0 pedometer is a small but powerful device. It
lets you track your personal fitness goals like never before.
When you connect your pedometer with your account on Humana
fit you can earn steps by simply walking your dog, taking a morn-
ing jog, or wearing your pedometer while working out on the
treadmill at the gym. If you have a Humana Vitality account, you
can turn your steps into Vitality Points.
At every fitness level, your route to lifelong well-being becomes
more fun and more rewarding. Humanafit.com downloads your
steps from the pedometer and displays your daily progress.
Your pedometer and Humana fit are with you every step of the
way!
5. HOW TO WEAR THE PEDOMETER
USING THE PEDOMETER'S BELT CLIP
Insert the pedometer into the belt clip USB
port side first. The display's orientation will
be upside down on your belt; however, it
will be right-side up when turned upward to view.
This pedometer will be most accurate
when you wear it close to your body, on
your waistband or belt. You may choose
to carry it in a tight, secure pocket.
The pedometer is also equipped with a
security leash. To attach the security leash:
1 Thread the end loop through the eyelets on the back of the unit.
2 Pull the lanyard through the loop and pull tight.
3 Place the unit in the belt clip, attach at the waist, and attach the gator
clip to belt or clothing.
1
2
3
2. GETTING STARTED
REGISTERING FOR YOUR FREE HUMANAFIT ACCOUNT
1 To sign up, go to www.humanafit.com and click the Sign Up for
Free link (top right of the browser window).
2 Click on Create a New Account.
3 Enter all the requested information (email, username, pass-
word, etc) and click on Agree to Terms. (Make a note of your
username and password for future logins.)
4 Proceed through all the prompts to continue signup.
NOTE: you may elect to skip several of the "Find Friends" steps.
5 Select Go to My Home to complete the registration.
6 You can now download the GearSync software and activate your
pedometer.
NOTICE: THE g2.0 PEDOMETER WILL NOT RECORD STEPS OR PEDOMETER DATA
UNTIL YOU REGISTER AND ACTIVATE IT. To register and activate, visit
www.humanafit.com. Follow the instructions to set up your free Humana fit
account.
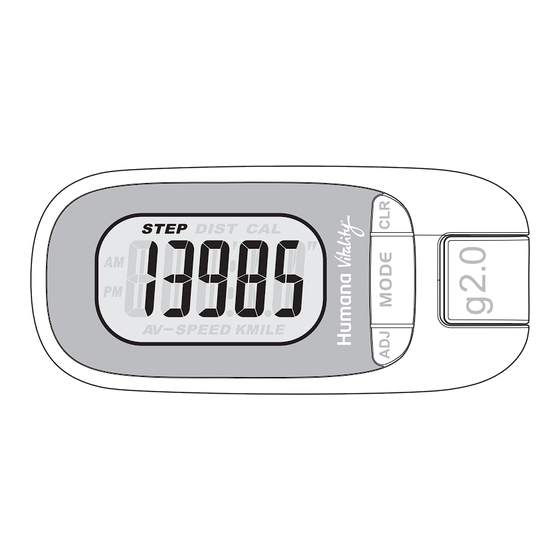
6. KEYS AND THEIR FUNCTIONS
The Humana g2.0 pedometer has 3 keys lo-
cated adjacent to the display: ADJ (Adjust),
MODE and CLR (Clear).
MODE KEY
• Operating Mode: Scrolls through display
modes.
• Programming Mode: Sets information
being adjusted and advances to next set-
ting.
ADJ (ADJUST) KEY
• Operating Mode: press and hold to enter the Programming
Sequence in Time Mode.
• Programming Mode: Adjusts (decreases) information being
adjusted.
CLR (CLEAR) KEY
• Operating Mode: press and hold to clear current pedometer
data.
• Programming Mode: Adjusts (increases) information being
adjusted.
3. GETTING STARTED
REMOVING THE BATTERY INSULATOR TAB
NOTE: In order to power up your pedometer, you must remove
the battery insulator tab inside the battery compartment.
1 Firmly grab the end of the battery insulator tab and pull to
remove it completely from the unit.
2 Remove the static sticker that appears on the pedometer
display.
7. OPERATING THE PEDOMETER
OPERATING THE PEDOMETER
The Humana g2.0 pedometer automatically captures data when
you start moving. There is no Start or Stop button to push.
The g2.0 pedometer has an integrated 10-step delay to ensure
accuracy when you walk. After 10 steps, the unit will begin
counting and retroactively add the 10 steps back into the final
step count.
The pedometer has 5 display
modes: Time of Day, Steps,
Distance, Calories and Average
Speed. Scroll through display
modes by PRESSING the MODE
key.
TO CLEAR ALL CURRENT PEDOMETER DATA:
1 PRESS AND HOLD the CLR key in any pedometer display. Continue
holding as the display reads "CLEAR".
2 When pedometer data reads zeros (O), RELEASE the CLR key. The
unit is now ready for a new workout.
NOTE: Your personal profile settings will be saved.
g2.0 PEDOMETER
Advertisement

Related Manuals for Humana g2.0

Summary of Contents for Humana g2.0
- Page 1 Your Humana g2.0 pedometer is a small but powerful device. It g2.0 PEDOMETER 1 To sign up, go to www.humanafit.com and click the Sign Up for NOTE: In order to power up your pedometer, you must remove lets you track your personal fitness goals like never before.
-
Page 2: Measuring Stride Length
PRESS ADJ or CLR After uploading your steps to the Humana website, you must manually reset the To accept and advance: steps on your pedometer to 0 by pressing & holding the CLR button. The steps dis- PRESS MODE played on your pedometer will not automatically be reset after uploading is complete.
Need help?
Do you have a question about the g2.0 and is the answer not in the manual?
Questions and answers