Table of Contents
Advertisement
Advertisement
Table of Contents

Related Manuals for QOD ELECTRIC GOLF CADDY 2018


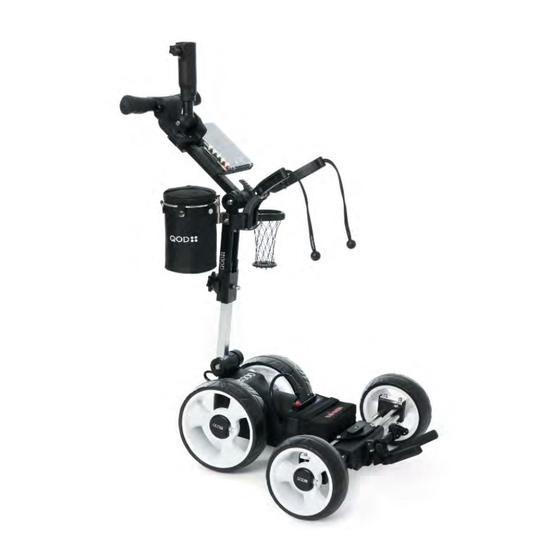
Summary of Contents for QOD ELECTRIC GOLF CADDY 2018
- Page 1 2018 QOD OPERATING MANUAL...
- Page 2 WELCOME TO TEAM QOD. QOD stands for “Quality Of Design.” We pronounce it [Quad], as in four-wheeled, but some prefer to call it “Q” “O” “D” and that’s ok too! Thank you for joining our team. Not long ago we were just like you, golfers who wanted to find a better way to enjoy the walk. Although it will take several rounds to get comfortable operating the QOD, we hope that in time you too will find it helps provide a much more enjoyable way to play the game we all love. Should you ever need any assistance, we will always do our best to give you the service you deserve, as quickly as possible.
- Page 3 BEFORE YOU CONTINUE . . . o Please Note: In order for the terms of the warranty to be valid, the manufacturer requires that you register your caddy and battery on our website within (30) thirty days of receiving your QOD, and by doing so, you acknowledge that you have read and understand the operating manual and the safety precautions contained herein. https://qodgolfusa.com/register o Caddy serial numbers can be found on the front-side of the center spine of the caddy, below the large nut. o Battery serial numbers can be found by unzipping the battery cover and looking to the far right of the back of the battery. You’ll need the last nine digits on the right, underneath the barcode.
-
Page 4: Table Of Contents
Umbrella Holder .......................... 1 1 Storage Pouch .......................... 1 1 BATTERY FITTING ........................12 SECURING GOLF BAG TO CADDY ....................13 ADJUSTING STRAPS OF BAG ......................14 ADJUSTING HEIGHT OF BAG ......................15 OPERATION ..........................16 MANEUVERABILITY ........................18 TRANSPORTING YOUR QOD ......................19 MAINTENANCE ..........................20 ADJUSTING ALIGNMENT ......................21 TROUBLESHOOTING ........................23 No Power or Intermittent Power ...................... 2 3 Sliding Tubes have become Sticky .................... 3 0 Control buttons stop working ...................... 3 1 Diagnosing Squeaking noise from front of cart ................ 3 2 Fixing Squeaky Front Suspension ..................... 3 3... -
Page 5: Mini Miser Lithium Battery & Charger
MINI MISER LITHIUM BATTERY AND CHARGER: BATTERY SPECS: 18aH 14.4 Volts. CHARGER SPECS: 110/240 volts, 50-60 Hz 100VA AC, 16.8 volts, 5 Amps DC SAFETY WARNING: The battery and charger are well designed with proper safety measures in place, as with any lithium-ion battery, please handle with care and use common sense. Do not drop, puncture, or disassemble the battery for any reason. Should the battery be damaged in any way, please do not use and call us immediately for assistance at (800) 774-1088. PLEASE NOTE: Currently these batteries are forbidden on all commercial airlines. -
Page 6: Charging Procedure
Charging Procedure: o You will need to charge your battery prior to first-use. This may take up to 8 hours for the first charge, but the amount of time will decrease on subsequent charges. o Charge the battery in any standard outlet that is not shared with another device. If your socket has an on/off switch, turn it off until you plug the charger into the wall. o Connect the battery to the charger before plugging the charger into the wall. When finished charging, disconnect the charger from the wall before disconnecting the battery from charger. o A red light appears on charger while charging and will blink green upon completion. The battery does not have any lights on it. o Once the charger light is blinking green, you may disconnect and use the battery. If you are not available to disconnect the battery right away, that is completely fine, just disconnect from power supply whenever you are able to. o If you don’t play for a couple of weeks, plug the battery back in before you play, if it is blinking green or solid green, you are good to go, if it is red, let it charge until it blinks green again. IMPORTANT o Never use any charger with this battery other than the Miser supplied to you. o Always recharge after each use until the charger light blinks green. There is no memory in the battery so you will not “waste charges” by keeping it charged. o Always charge and store in a cool, dry place. Do not leave in a hot car or freezing garage, or store on a cold-concrete floor, or room prone to heat and moisture. o If you plan on not using your battery for more than a month, charge your battery for approximately two hours and then disconnect from the wall and store in a cool, dry environment. Set a calendar reminder to charge for about two hours once a month to ensure the longevity of your battery. It does not have to be exactly one month, or exactly two hours, this is just a general guideline. The battery will last longer when stored over long periods of time with approximately 50% of a charge prior to storing. -
Page 7: Caddy Set Up & Folding
CADDY SET-UP AND FOLDING It will take time before these steps become second-nature to you, we recommend following along with the videos at qodgolfusa.com/setup Step 1: Stand next to the folded caddy with the handle bar/control panel facing to your left. On the top of the right side of the caddy, lift up on the small black plastic lever, then lift the hand bar and extend it out to your right until it is pointed in the direction of 2 o’clock. Then close down the same lever, locking it in place. Step 2: On your left, find the other small black plastic lever and lift it upwards to release it. Then lift the handle bar upwards until the spine of the caddy is vertical and pointed at 12 o’clock. Close down the same lever, locking it in place. Step 3: Find the rotating locking knob located in the center of the vertical spine and loosen it by rotating it to the left, extend the spine upwards to its maximum height and then rotate the knob back to the right, which locks it into place. (The height of the spine is not adjustable, it is designed to lock in the same position each time.) - Page 8 Step 4: On the base of the QOD, find the U- shaped piece and lift it and extend it to the right. Then place one hand on the spine of the QOD to your left, and use your right hand to gently lift the front of the QOD off of the ground, and extend the front wheels away from the spine (to your right). Step 5: Find the center of the front section between the two front wheels and place one hand on the plastic piece that holds the center-most screw. Lift the front wheels off the ground, and rotate the plastic piece in between the wheels counter-clockwise to start the extension of the front wheels away from each other. Once started, you can then fully extend the wheels by using one hand on each front wheel and continuing to push away from each other until they lock into place. Step 6: Prior to placing your bag on the caddy, on the front-bottom section of the QOD, you need to separate the upper plastic support bracket (with bungee straps) from the U-shaped bottom bag holder.
-
Page 9: Attaching Accessories
ATTACHING ACCESSORIES All of the accessories on the QOD are designed to remain attached once assembled. The storage pouch can easily slide off to make folding and stowing the QOD easier. Drink Holder: The drink holder is designed to sit on the main spine of the cart, in the small plastic bracket to your left, when you are behind the handle bar. o Phone Holder o If you ordered an umbrella holder, attach that first. Remove the peg from box and slide into the slot on end of the bracket below the right handle. It will be a snug fit! Slide the phone holder onto this peg. If you need a more secure fit, you can add one of the rubber strips provided. Instructions for adjusting the phone holder itself can be found on the box. The outside knob locks the arms in place, while the inside knob adjusts their width. -
Page 10: Scorecard Holder
Scorecard Holder o If you have an umbrella holder attach the scorecard holder like this . . . o You must attach the umbrella holder first Place the scorecard holder on the left side of the QOD just below the umbrella holder. While looking underneath the holder, align the two holes over the two small brass holes on the left side of the QOD handle. o Remove and insert both of the screws taped underneath the holder. o The pencil slot can be gently bent manually to fit the size of your pencil. o If you don’t have an umbrella holder attach the scorecard holder like this . . . o (Optional) Apply double-sided tape underneath the scorecard holder slot. o Place the scorecard holder on the left side of the QOD, just below the bracket below the handle bar. While looking underneath the scorecard holder, align the innermost hole with the brass hole on the bracket. o Remove one of the screws taped underneath the scorecard holder and insert and secure into this hole. You will only use one screw. o The pencil slot can be gently bent manually to fit the size of your pencil. -
Page 11: Umbrella Holder
Umbrella Holder QODGOLFUSA.COM/UMBRELLA o Tools: Phillips Screwdriver, 10mm socket (OR pliers/wrench). Remove screw from top of accessory bracket on handle bar, then remove second screw above it. You no longer need these. Look through the holes to make sure the cable is not blocking the holes. If it is, use a tee to move the cable to one side. Remove the two screws inserted in the umbrella holder bracket. You will use these again in the last step. Lock the umbrella holder in an upright position. While standing behind the caddy, slide the umbrella holder from left to right over the two empty holes. It is a tight fit. Insert stainless screw through the top hole and insert other screw from the bottom. Then tighten both. o Storage Pouch... -
Page 12: Battery Fitting
Battery Fitting Step 1: The battery sits in the center of the caddy, directly on top of the aluminium tubes and plastic extension arm. Step 2: The battery is plugged into the caddy using the cable connected to the caddy. We often refer to this as the “T-Cable.” Step 3: Place the battery in the cradle with the connection port facing the rear of the caddy. Connect the cable to the battery with the + symbol on T-cable facing the direction of the red cap on the battery. NOTE: If you try this the wrong way, the battery will reject the cable, so if it is difficult to connect, twist the cable to attach it using the opposite side of cable. -
Page 13: Securing Golf Bag To Caddy
SECURING GOLF BAG TO THE CADDY o The QOD will work with nearly every type of golf bag available from major manufacturers, however it will perform best with a bag the industry calls a “Lightweight Cart Bag”. o Prior to placing your bag on the caddy, displace the weight of the contents of your bag as evenly as possible on both sides of the bag. This will improve the caddy’s stability and alignment. o Separate the U-shaped lower bag holder from the support bracket just above it (which has the bungee straps extending from it). See Photo #1 Tilt the upper bag holder upwards and extend the arms away from each other. See Photo #2 Photo #1 Photo #2... -
Page 14: Adjusting Straps Of Bag
Place your golf bag in the center of the bag holders with your pockets facing outwards. Make sure the base of your bag is as far back as it can go in the lower bag holder, and lift and extend the bungee straps around the bottom of your bag, securing them by pushing one knob through the loop of the opposite bungee strap. Then grab the bungee cords from your upper bag holder and extend them around the top of your bag. Depending on the style of your bag, you may want to loop the cords through a strap on the bag, and then again you will push one plastic ball of one side of the bungee through the loop of the other bungee strap. ADJUSTING STRAPS OF BAG o The bungee straps on the top bag holder can be adjusted by moving the loop of the strap where it connects to the side of the plastic arm cradle in either direction. To do this, we recommend using a flathead screwdriver or a golf tee to pry the bungee strap off of its retaining peg and push it back onto a different peg. o The bottom bag holder bungee straps can be shortened by making a loop with each cord and then feeding the ball back through that loop before pushing the ball through the loop of the cord on the opposite side. -
Page 15: Adjusting Height Of Bag
If the strap is still too loose for your bag, you can also loop both ends through a strap on your bag, and then loop around the same strap one more time to effectively shorten the bungee straps and increase the tension o If these straps are too short or tight to fit around your bag, we recommend purchasing a small carabiner clip online or from a hardware store. ADJUSTING HEIGHT OF BAG If your bag sits too high or too low, you can make small adjustments that will allow for a minimal change in height. o If your bag sits too high, you can lower the bottom bag support by removing the bolt located underneath the U-shaped lower bag support. o If your bag sits too low, you can replace the rubber sleeves on the U-shape lower bag support with standard bicycle grips with extra thick rubber. The thickness of the rubber will increase the height of where the bag sits. o You can also add a second nut to the bolt located underneath the U-shaped bottom bag support. To do this, remove the bolt, and add a second nut to the bolt-head side of the bolt, then re-insert the bolt through the plastic hole and secure it with the original nut. You can then use the new nut to adjust the height of the bolt to dictate how high or low the bottom bag support is when it hits the front suspension base of the QOD. -
Page 16: Operation
OPERATION Control Panel: The control panel is designed to be easy to understand and simple to use. The only thing you must be aware of is that if you are not using the potentiometer knob, you want to leave that in the “off” position, which is rolled back towards you. If you are using the potentiometer knob, then only use the knob and don’t intermittently use the + or – buttons. Battery Power Lights: o When all three lights are illuminated (Green, Yellow, Red) you have at least 50% power remaining in battery. o When only the Yellow and Red Lights are on, you have between 45% and 10% of your battery life remaining. o When only the red light is illuminated, you have less that 10% of battery life remaining and will soon run out of power. Timed-Advance Function: Press the :10, :20, or :30 button and the caddy will travel a timed distance on its own and stop at the end of the timer. After using this featured a few times you will get an idea of how far the caddy travels with each timed interval. Power On/Off: Press and hold the red power button to turn the caddy on, and to turn it off. Once the caddy is powered on, you may leave it on for your entire round of golf. If you take an extended brake during your round, you can power it down to conserve battery life. - Page 17 Potentiometer Knob: Rolling the knob forwards or backwards will adjust your speed setting. You can use this as an alternative to + or – button. To stop the caddy, roll the knob all the way backwards. *Do not leave knob rotated forward in the ON position while using + or – buttons as that will send mixed signals to the controller. Speed Settings: Use the + or – buttons to adjust your speed between any one of the nine speed settings. *Do not use + or – buttons while potentiometer knob is in ON position. Start and Stop Button: Rest your thumb on the button and press to either start or stop the caddy. If the last speed setting is at 0, the caddy will not start until you hit the + button. This will be the case after using the timed- advance function as the speed always ends up back at 0.
-
Page 18: Maneuverability
MANEUVERABILITY It will take several rounds before you get comfortable operating your QOD on the course in all conditions. We don’t recommend playing in an important golf tournament or match for your first few rounds using the QOD. o To steer your QOD left or right, simply push down on the handle to slightly raise the front wheels off the ground and steer left or right. The narrow rear wheel base allows for easy maneuverability. o When traversing over inclines, declines and side hills, it is important to ALWAYS keep a hand on the QOD. The QOD is powerful enough to climb any hill you put in front of it, however at a certain degree of incline or side slope, gravity will take over and the cart will want to tip back or on its side. o The QOD does not have a braking mechanism other than your hands. Depending on the thickness of grass you are walking on and the severity of the slope, gravity will eventually have more pull down a hill than the gear will provide as resistance. This is one of the trade-offs of having a caddy that always operates in “free-wheel” mode. o The QOD does not have a parking brake so when you park your QOD on a hill, simply turn it across the slope wherever you stop. Because the QOD has four wheels and a soft suspension system in the front wheels, it will settle into the terrain more so than a standard push cart which is designed to have as little friction as possible. o Your QOD is always in “free-wheel” mode without having to change or disengage anything. If you are in the parking lot, tight spots on the course, around the green, or you happen to forget to charge your battery, you will always be able to push or pull your QOD freely forwards or backwards. -
Page 19: Transporting Your Qod
IMPORTANT! o Never catch a ride in a riding cart and pull your QOD alongside of you. Even though QOD operates in freewheel mode, the gear is still engaged with the motor, so moving the wheels faster than intended using the built-in controller will put unnecessary stress on all of the parts. o When dropping down from a higher level of ground onto lower terrain, like coming off of or onto a cart path curb, do not let the caddy land hard on its bottom. Support the caddy with your hands so that the front wheels gently hit the ground first and then with your hands still supporting some of the weight of the caddy in rear, gently let the rear wheels touch down behind the front wheels. TRANSPORTING YOUR QOD o Always be sure to completely fold your QOD, and lock all three levers on the QOD prior to transporting in a moving vehicle. o The wheels do not “lock” and therefore you need to secure the caddy in a position or part of the car where it will not roll. o We highly recommend using a crate or bag like the Clean Trunk Carry Bag accessory we have in order to keep your QOD stationary and protected from scratches and debris. o Never leave your battery in the car, always take it indoors when returning home. Exposing the battery to extreme temperatures can cause damage and will shorten the lifespan. Batteries not properly stored will not be covered under warranty. IMPORTANT o Never leave your battery in a hot or freezing cold car for any time longer than it takes to drive to the course and back. Doing so will significantly reduce the lifespan of the battery and this will not be covered under warranty. o Always take the battery inside and recharge and store in a cool, dry, environment. -
Page 20: Maintenance
MAINTENANCE The more you take care of your QOD, the more it will take care of you. Many of the repair requests we receive for the QOD stem from issues caused during transport, reckless use on the course, and not taking the time to keep the cart clean, lubricated, and tightened. o Take two minutes at the end of every round to wipe down the wheels and body of the QOD with a golf towel or damp cloth. o If dirt, mud, or grass builds up along the ends of the sliding tubes, you can pick away the debris with a golf tee. If necessary, you can wipe the entire tube off with a towel, but remember you are also wiping off the lubricant. Therefore, if you do this, we recommend re-lubricating the tubes with a “synthetic grease” in either a spray or gel form. DO NOT USE WD-40 as it will ultimately make the tubes even more dry. o If you find any of the locking levers or knuckles becoming loose, you can tighten them as necessary. Each lever is spring loaded and has a 13mm bolt, with a 13mm nut on the opposite side, and a 14mm Dome cap nut securing it in place on the outside. o Secure the bolt head in place with one wrench, then loosen the dome cap nut on the opposite side. Then, adjust the nut inside of the dome cap nut to either tighten it or loosen it to your preferred tension level. Then tighten the dome cap nut against the inside nut and you are good to go. o If either the top bag support or lower bag support become loose at any time, you can also easily tighten these by securing the bolt head on one side and tightening the nut on the other. o If you find dirt or debris stuck in between the wheels and the caddy body, you can easily take the wheels off to clean the axle peg and the wheels bearings. Simple compress the metallic pin extending out from the wheel hub caps and pull the wheel off its axle. When finished, simply compress the pin again and push it back onto the axle until you heard the pin click into place onto the axle. o If you find your wheels getting “sticky” or loud over time, you can remove the wheels and add a lubricant like WD-40 to the bearings to make the wheels turn more smoothly and quietly. - Page 21 IMPORTANT! o Never use WD-40 as a lubricant on the tubular axle shafts as this compound will ultimately leave the tubes drier and “stickier” than when they first started. If you want to re-lubricate the sliding tubes, you can clean dry with a rag, and then apply a spray or get “synthetic lubricant.” o Never power-wash your caddy. Spraying the caddy with any kind of water pressure may cause water to enter the main housing of the caddy and short-circuit the electrical components. To clean your QOD, simply wipe down with a wet cloth or golf towel. ADJUSTING THE ALIGNMENT ON YOUR QOD QODGOLFUSA.COM/ALIGNMENT All of the caddies are aligned prior to being shipped, however with the many different styles, sizes, and weights of golf bags on the market, your QOD may require an alignment adjustment to ensure it is tracking straight. Also note, that the slope of the terrain will impact the caddy’s ability to track straight, so naturally when you are on a slope or uneven ground, the caddy will trend in the direction that the ground dictates. The first step in diagnosing your alignment issues is to make sure that you have both sides of your golf bag as equally weighted as possible. Meaning you do not want to keep a couple of water bottles on one side of the bag, and only have a light jacket in the other. Try to disperse the weight of the items in your bag evenly on both sides of your bag. After doing this, check the alignment of your caddy again, if you are still having issues, please continue below.
- Page 22 STEP 1: Gently place the caddy on its back by leaning it back and laying the back of your handle bar on the ground. STEP 2: Loosen the four nuts/bolts on the bottom bracket of the front wheel extension using an adjustable wrench or 10mm socket. Pliers will also work if necessary. STEP 3: Using a Phillips screwdriver, turn tracking screw clockwise to make your caddy steer more to the left. Turn the screw counter-clockwise to make your caddy steer more to the right. STEP 4: After making an adjustment, stand the caddy upright and test your alignment again. If you need to make an additional adjustment please do so. STEP 5: Once you are satisfied with the tracking, lay the caddy back and tighten the four original nuts and bolts. IMPORTANT! Always test your alignment with your bag on the caddy as the weight of the bag will affects its direction. Clean any debris around the tracking screw to ensure that it adjusts smoothly. Tighten the nuts and bolts so they are secure, but do not tighten more than necessary.
-
Page 23: Troubleshooting
TROUBLE-SHOOTING ISSUES WITH YOUR QOD 1. NO POWER OR INTERMITTENT POWER: STEPS TO ISOLATE PROBLEM AREA 1. Check USB Port: If you have lost power completely and are staring at a blank screen, there is a chance you may have a bad or dead battery. To test this, you can check to see if your QOD is getting any power supply up to the handle controls by testing the USB port. o Connect your battery, plug your charging cord into the USB port and check to see if the USB port is providing power to your device. o If your USB port is providing power to your device but your screen is still blank, we can confirm that your battery has power and you can proceed to the steps listed below for checking the electrical connections. o If your battery if fully charged but your QOD has lost power and your USB port is not supplying power to your device, there is chance you may have a bad battery. A loose or poor connection can also cause this scenario, so please proceed to following the steps below. - Page 24 2. Ensure Contact With Battery T Cable Metallic End Points: The two metallic end points on either end of the T Cable are spring loaded. Sometimes the spring on either side can get stuck and cause a poor or lack of connection to the battery. This may cause your screen to occasionally go blank or you may lose power all together. o Compress the end by using your thumb or finger to push inward. It should give some resistance and extend back out when you release pressure. o If your metallic end points are not compressing or releasing as they should, spray the end point with a lubricant like WD-40. Compress the end points in and out a few times to lubricate. o If the end points on your T Cable are spring loaded and performing as they should, move onto Step Three.
- Page 25 3. Secure Battery Terminals: The Battery terminals are located on the top of the battery where you plug in your T Cable to connect the cart to the battery. o The terminal and brass connectors need to be clean and free of debris to ensure a proper connection. o Confirm the terminal is properly secured to the battery. If the terminal is loose, remove the red and black dome caps to expose the Phillips screws which secure the terminal to the battery. Make sure these screws are tight. o If your terminal connection has come loose and you cannot tighten or re-secure it, please contact us.
- Page 26 FOR THE FOLLOWING STEPS, YOU WILL NEED TO REMOVE THE COVER ON THE LOWER SECTION OF THE QOD BY DOING THE FOLLOWING: o Disconnect the T Cable from your battery and remove your battery. o Remove the two rear wheels by compressing the silver clip in the center of the wheel and pulling the wheel off the axle. The rear wheels have one-way bearings and will need to be reattached on the same side as removed. o Locate and remove the two Phillips screws on each side of the motor housing cover. o When the cover is removed, you will expose the Motor/Gear Unit and the Controller. • The battery cable goes through the motor cover and connects to the controller. • The controller is the silver rectangular box located at the back end of the motor housing.
- Page 27 4. Check Battery T Cable to Controller Connection: Inside the motor housing you will find where the battery cable connects to the controller cable. Follow the cable from the battery end to the inside of the caddy cover. First check to make sure the plastic red and black connections are “clicked” into place and secure. Then remove the electrical tape connecting the cable to the Controller cable and make sure this connection point is also secure. o If connection has come loose, reconnect securely. Reconnect the battery and test the controls to see if the QOD is functioning properly. Always be sure to rewrap the connection in electrical tape when finished. o If this connection was loose and securing it has solved your intermittent or lack of power issue, reattach the motor housing cover and you are good to go!
- Page 28 5. Controller to Stem Cable Connection Inside the motor housing you will find the connection between the Controller and the Stem Cable. From the controller, the stem cable is wrapped in a protective spiral wrap and then goes up the spine of the QOD to the handle. o Find the clip style connection between the controller and stem cable. The connection should be wrapped in electrical tape. o Remove the electrical tape to expose the connection and make sure it is clean and secure. If loose, re-connect securely. Plug the battery back in and test the controls to see if working properly. o After confirming a secure connection, always re wrap the connection with electrical tape to ensure a secure connection and keep moisture out. o If this connection was loose and securing it has solved your intermittent or lack of power issue, re-attach the motor housing cover and you are good to go!
- Page 29 6. Controller to Motor: Inside the motor housing you will find the connection between the controller and motor. This is also a clip style connection. o If loose, re-connect securely. Reconnect the battery and test the controls to see if the QOD is functioning properly. o If this connection was loose and securing it has solved your intermittent or lack of power issue, re-attach the motor housing cover and you are good to go! o When reconnecting, you can add electrical tape to ensure a secure connection. o If all of your connections are secure and you still do not have power, please contact us to further diagnose your issue.
-
Page 30: Sliding Tubes Have Become Sticky
2. SLIDING TUBES HAVE BECOME “STICKY” AND DIFFICULT TO CLOSE AND EXTEND: Over time these sliding tubes may become dry and require you re- lubricate. o Use a “synthetic grease” in either a spray or gel form to re-lubricate. o Do not use WD-40! WD-40 will cause the tubes to become more dry and sticky and harder to extend. o Any synthetic grease will work, we recommend using SuperLube, which can be found on amazon. o With the tubes extended, use a cloth or rag to clean the aluminum extension tubes. o Spray or smear the tubes with synthetic grease and spread evenly o Extend and retract the sliding tubes to re-lubricate the seals which the tubes slide in and out of. -
Page 31: Control Buttons Stop Working
3. CONTROL BUTTONS STOP WORKING (BUT SCREEN IS LIGHTING UP): The screen on your control panel is called the fascia. Underneath the fascia is the main Circuit (IC) Board. When you press the buttons on your fascia, you are making a connection with the IC Board and sending a command to the controller. Overtime these buttons may require you to press extra hard to make a connection or may start working intermittently. The connection between these buttons can become dry, but with a bit of WD-40 or similar lubrication, they will be back to working as expected. o Using a small razor blade or similar tool, slide it underneath the bottom right corner of the fascia and pry away from handle to expose the buttons underneath. o Using WD-40 or a similar lubricant (the narrow straw that usually comes with these lubricants makes this much easier), place a small drop on the Pause/Play button or the (+) and (-) buttons as needed. This will re lubricate the connection between the fascia and IC Board. o After placing a drop of lubricant on the desired button, let the fascia board fall back into place and gently apply pressure to the corner to re-adhere the fascia. o Plug your battery in and test the functionality of the buttons. o If you have completed this step and feel the adhesive is no longer adhering the fascia to the T handle, we can always send you a replacement fascia board which will have 3M peel and stick adhesive... -
Page 32: Diagnosing Squeaking Noise From Front Of Cart
4. DIAGNOSING SQUEAKING NOISE FROM FRONT OF CART: If you are hearing a squeaking noise coming from the front of your cart it could be one or both of the following: A Squeaky Front Suspension or a Squeaky Front Wheel Clip. • Check Front Suspension: Remove the front wheel by compressing the silver clip on the outside of the wheel and pulling the wheel off the axle. Look inside the suspension block to find the two suspension springs. Compress the suspension springs by pulling upward on the axle where the front wheel attaches. Test for this noise on both the front right and left side of your QOD. If you hear the same squeaking noise you hear on the course, follow the instructions below for Squeaky Front Suspension to eliminate. Check front Wheel Clip: Lift the front wheels off the ground and use your hand to • freely spin the wheel. Listen for the squeaking noise you hear on the course. If you have ruled out the squeaky front suspension above, this squeaky wheel clip may only happen when you have the bag on your QOD. Try to find a quiet and flat area to strap your bag on the QOD to test and listen for the squeaking noise. If you hear the same squeaking noise you hear on the course, follow the instructions below for Squeaky Front Wheel Clip to eliminate. -
Page 33: Fixing Squeaky Front Suspension
5. FIXING A SQUEAKY FRONT SUSPENSION: o To eliminate this noise, slightly bend the metal plate away from the suspension block to create space between the spring and plate. Using a flat head screw driver, from the inside of the plate bend the metal outward. You only need to slightly bend the metal outwards, as bending too much may cause it to rub on the wheel. o You can always bend slightly and compress the suspension to test if the noise has been eliminated. Once you no longer hear the springs rubbing on the metal, re attach the front wheels. -
Page 34: Fixing Squeaky Front Wheel Clip
6. FIXING A SQUEAKY FRONT WHEEL CLIP o Remove the front wheel by compressing the silver clip on the outside of the wheel and pulling the wheel off the axle. o Remove the hub cap by placing your finger in-between the metal clip and under the black plastic. Pull upward and the hub cap will pop off. o To remove the silver clip, set the wheel down flat with the outside of the wheel facing upwards. Compress the silver clip as you did to remove the wheel and you will see the bottom of the clip exposed. Slide a flathead screwdriver under one side of the clip and push outward. This will extend the clip and allow for you to lift it over the black center wheel hub to remove. - Page 35 o Once the clip is removed, use a plier and squeeze the inward bend on each side of the clip to slightly flatten the clip. This will reduce the friction between the clip and the wheel axle and eliminate the noise. You don’t want to over bend, as it may cause the clip to become too loose and no longer secure the wheel.
-
Page 36: Adjusting Tension In Locking Levers
o To reattach the clip, slide one side over the center black hub. Using the flat head screwdriver or you finger, push the clip back over the center hub, opposite of how you removed it. o Reattach the front wheel. Spin the wheel to test if the noise has been eliminated. Repeat this process and adjust the bend in the clip slightly further if needed. o Once the noise is eliminated, re-attach the black hub cap by aligning the two clips and pushing it into place. 7. ADJUSTING TENSION IN LOCKING LEVERS: If you find any of the locking levers or knuckles becoming loose, you can tighten them as necessary. o The top and bottom folding levers are spring loaded with a 13mm bolt, a 13mm nut on the opposite side, and a 14mm Dome cap nut securing it in place on the outside. o The Spine Extension Knuckle is spring loaded with a 14mm bolt, a 13mm nut on the opposite side and a 14mm Dome cap nut securing it in place on the outside. o To adjust, secure the bolt head in place with one wrench, then loosen the dome cap nut on the opposite side with a second wrench. o While still holding the bolt head in place, adjust the nut inside of the dome cap nut to either tighten it or loosen it to your preferred tension level. o Tighten the dome cap nut against the inside nut and you are good to go. -
Page 37: Rear Wheels Have Wobble When Rotating
8. REAR WHEELS HAVE A WOBBLE WHEN ROTATING: If you notice one or both of your rear wheels wobble when rotating, know that it will not cause any harm to your QOD, but it is a simple fix. o Remove the rear wheels by compressing the silver clip in the middle of the wheel and pulling the wheel off the axle. The rear wheels have one-way bearings and will need to be reattached on the same side as removed. o On the inside of each wheel you will find the wheel bearing. There are two silver Philips screws that attach the wheel bearing to the wheel. If you tighten these two screws, it will eliminate the wobbly wheel. o Reattach the wheels to the same side as removed and confirm the wobble has been eliminated. -
Page 38: Caddy Specifications
CADDY SPECIFICATIONS: Drive Type: Power Polymer Gear, Steel Worm Train/Transmission Drive, with 25:1 Gear Ratio Rate Weight Net Weight Caddy: Approx. 11.9 kg (26.2 lbs) Speed Approximately 7.2 km (4.5 mi) Distance/Range 20 km (12.43 mi) / 18-36 Holes Maximum Load 25 kg (55.12 lbs) Climbing Ability 20 degrees USB Power Output +5v Construction Aluminium, Stainless Steel, Zinc-Plated Steel and Nylon 66 Dimensions Folded: 45(L) x 37.5(W) x 33.5(H) cm 17.71(L) x 14.76(W) x 13.189(H) in Full(cm) 65(L) x 63(W) x Adjustable to 95(H) Full (in) 25.5(L) x 24.8(W) x 37.4(H) in... - Page 39 Warning QOD Golf International Limited, Eagle Compac EU SARL and Oceania Lifestyle Distribution (and its associated companies) strictly enforce protection of their products, and legal enforcement will be made upon infringement on their protected areas mandatorily. The products have received design, copyright and patent protection internationally, including the following countries: European Countries, USA, Canada, China, Australia and Australasia. As of the high-product exposure, this is an acknowledgement that the product purchased will be safe and free from any infringement type on all QOD Golf International products. QOD Golf International product designs are exclusive property of their respective authors, and must not be reproduced or used without their express consent, and any partial or total reproduction of the content is strictly prohibited. Copyright Protection – QOD Golf International, Eagle Compac SARL and Oceania Lifestyle Distribution (and its associated companies) individually or collectively are the exclusive owner of all right, title and interest, including all intellectual property rights. Design Protection – The holder of a registered design right has the exclusive right to authorize or prohibit others from using the design in any way, notably by producing, importing, selling or using products based on the design. Patent Protection – Covers the ornamental design for an object having practical utility. An object with a design that is substantially similar to the design claimed in a design patent cannot be made, used, copied or imported. The copy does not have to be exact for the patent to be infringed. It only needs to be substantially similar. By breaching any of the copyright, patent and design protection, QOD Golf International will withhold the rights to enforce legal action at that time.
Need help?
Do you have a question about the ELECTRIC GOLF CADDY 2018 and is the answer not in the manual?
Questions and answers
My QOD cart almost 10 years old was working perfectly till last week. On Thursday the cart will not move with golf bag mounted on it. When I press ahead button I can hear the motor running but the driven wheel does not run. If I lift the driven wheel of the ground it starts rotating. It is as if motor is slipping under load. In fact, even without bag the cart is moving intermittently and very slowly when the driven wheel touches the ground. I have charged the battery fully. Control panel button are operating normally. Request diagnosis and steps to rectify the defect.
Possible causes for a QOD Electric Golf Caddy 2018 motor running but the driven wheel not moving under load include:
1. Misalignment due to uneven weight distribution in the golf bag.
- Solution: Balance the weight on both sides of the bag to ensure even distribution.
2. Terrain slope affecting movement.
- Solution: Expect the caddy to track in the direction of the slope; this is normal behavior.
3. The caddy is in “free-wheel” mode.
- Solution: The QOD is always in free-wheel mode, so pushing or pulling is possible even if the motor is not driving the wheels. Verify if the caddy is intended to be motor-driven at that time.
4. Mechanical or internal issue (e.g., gear or motor coupling problem).
- Solution: Not directly addressed in the context. Requires inspection or service.
If alignment and load balance are correct and the issue persists, a technical inspection may be needed.
This answer is automatically generated